

Senior Devops Engineer
Neetesh specializes in designing, automating, and managing scalable DevOps pipelines across cloud-native infrastructures.

In today’s cloud-native world, unpredictable workloads are the norm, not the exception. When running Kubernetes clusters on Amazon EKS, one common challenge that teams face is ensuring that mission-critical applications can scale immediately.
Since we are using Spot Instances for the workload, there may be situations where a node is unavailable at the time of pod deployment. In such cases, the pod will remain in an unscheduled state until a new node is provisioned.
Once the new node is available, the pod will then be scheduled and deployed. Please note that this provisioning process may take some time, depending on the availability of Spot Instances.
Your Amazon EKS cluster might scale beautifully during normal load, but when a new deployment hits, perhaps due to a new product development, your high-priority workloads can end up stuck waiting for new nodes to become available.
So what happens when your high-priority pods can’t find available compute? They sit unscheduled, waiting for nodes to spin up — and this delay can translate directly into downtime, poor user experience, or SLA penalties.
Let’s break this down as a practical Problem → Root Cause → Solution, so you can walk away with an approach you can deploy today.
By default, Cluster Autoscaler works reactively: it adds nodes only when unschedulable pods are detected. But spinning up new EC2 instances takes time.
The problem isn’t that Kubernetes or Amazon EKS are flawed — it’s just how the autoscaling mechanism works. Here’s what happens under the hood:
Together, this creates a gap where your high-priority services are left waiting — exactly when you can’t afford it.
The answer is to turn reactive scaling into proactive scaling. This is done by combining:
This approach is called Over-Provisioning. It works like this: you deploy low-priority pods that occupy spare capacity on your nodes. When critical workloads arrive, Kubernetes evicts the placeholders immediately to make room. Meanwhile, Cluster Autoscaler detects that the freed capacity is gone and spins up new nodes to replenish the buffer.
Result? Your high-priority workloads start instantly — no waiting, no lag.
Here’s how you can put this into action on Amazon EKS:
1. Create or Use an Amazon EKS Cluster
If you don’t have an Amazon EKS cluster yet, create one with a managed node group. A typical setup might be:
Instance Type: t3.medium
Minimum Size: 2
Maximum Size: 10
Desired Size: 2
Pick appropriate add-ons for networking and autoscaling.
2. Configure IAM OIDC Provider
Enable OIDC to allow Kubernetes workloads to assume IAM roles securely:
eksctl utils associate-iam-oidc-provider \
--region us-east-1 \
--cluster <Cluster-Name> \
--approve
3. Create an IAM Role for Cluster Autoscaler
Create a new IAM role:
4. Install Cluster Autoscaler
Add the official Helm chart and deploy:
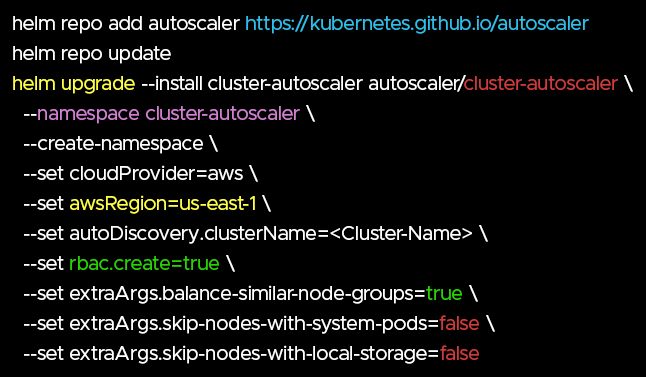
Confirm the cluster-autoscaler pod is running.
5. Define Priority Classes and Workloads
Create three YAML files:
6. Apply them:
kubectl apply -f priority-classes.yaml
kubectl apply -f low-load-pods.yaml
Simulate a Spike and Watch Autoscaling in Action
Apply the high-priority workload:
kubectl apply -f force-high-priority.yaml
The high-priority pods will evict the low-priority placeholders immediately, freeing up resources. Cluster Autoscaler notices the change and provisions new nodes, so the placeholders can be rescheduled and the buffer stays ready for the next spike.
Like every powerful tool, Over-Provisioning has some caveats:
Helpful References
Amazon EKS Best Practices: Cluster Autoscaler
Kubernetes Node Autoscaling
Over-Provisioning is a practical, proven pattern for teams that care about high availability. It helps bridge the gap between your cluster’s current capacity and sudden surges in demand, ensuring your mission-critical workloads run without delay.
If you rely on Amazon EKS for production, adding this pattern to your toolkit is a smart move — delivering a smoother user experience when it matters most.
Running Amazon EKS at scale? Want hands-on support for your Amazon EKS deployments? Let our experts handle the complexity - explore our Kubernetes management services.
Related Resources:
How a Major Amazon EKS Upgrade Solved a Customer's Production Nightmares
How we helped a Production-Scale Team reduce EKS Costs & boost Efficiency

99% of companies saved up to 15% monthly with this plan & achieved peak performance.

Speak with our advisors to learn how you can take control of your Cloud Cost


