5
5In Modern Container-Based Application Deployments or Microservices Environments, Scalability is one of the most important aspects to be considered. Therefore Auto Scaling has become a crucial component in all kinds of application deployment whether it is monolithic or microservice. Since Microservice is based on a decoupling design, therefore, it is easier to implement auto-scaling on it.
As we are seeing that K8s has become a leader for container orchestration, therefore we need to think about how we can scale applications deployed on K8s on demand and scale down when not in use. However, almost every cloud provider comes with a respective Cluster Autoscaler, which in addition to container autoscaling makes a powerful duo to scale any applications with minimal cloud cost.
Cluster Autoscaler
It is a capability provided by different cloud providers to scale in-scale out compute resources (instances,VM) on demand based on application workload. In general, scaling works two ways:
- CA looks for pods that can’t be scheduled on nodes due to insufficient resources, then it automatically increases the number of computenodes. In case there are no pods running on compute nodes then it will scale in that node automatically.
- In the K8s cluster Horizontal Pod Autoscaler (HPA) uses the Metrics Server to monitor and check for resource demand. In case of application resource requirement, HPA will scale out pods horizontally by increasing PODS count and scale in as per lower resources requirement.
What is KEDA?
KEDA is a Kubernetes-based Event Driven Autoscaler. It is a single-purpose and lightweight component that can be added to any Kubernetes cluster. It works along with Horizontal Pod Autoscaler and can extend functionality without duplication. It can monitor and scrape event sources or triggers such as Kafka, RabbitMQ, or any other cloud triggers and store those metrics from these sources into the K8s HPA.
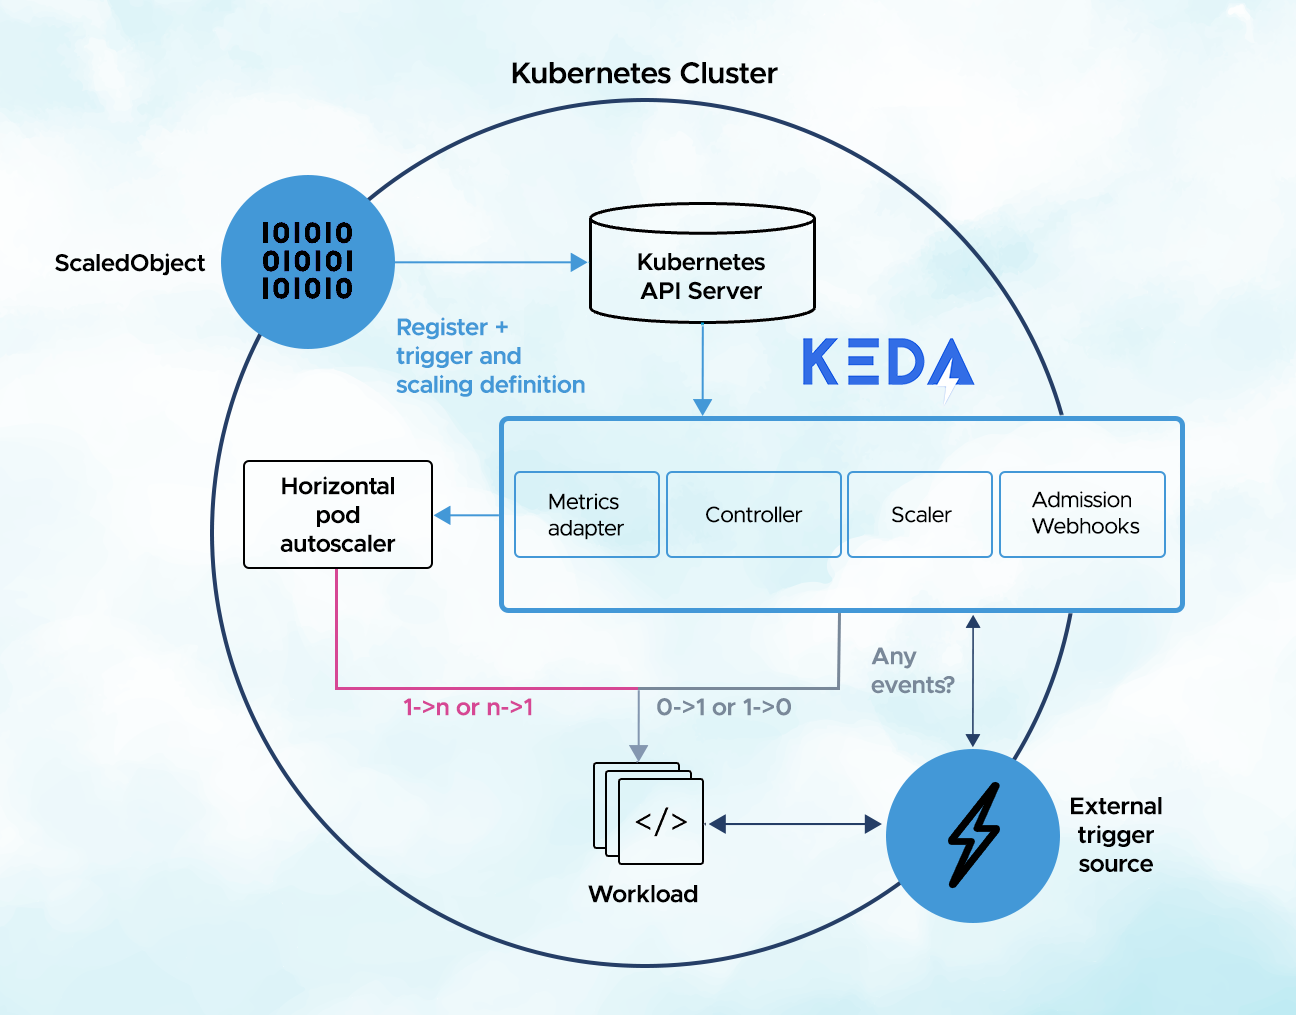
How KEDA works?
In K8s KEDA implement three roles as below:
- Agent — This act runs a container named keda-operator whose main aim is to detect whether the deployment is active or passive
- Metrics — This runs as a keda-operator-metrics-api server container whose primary aim is to expose external event sources data to K8s HPA for operating scaling and serve metrics.
- Admission Webhooks — This is K8s CRD(Custom Resource Definition) whose primary role is to validate the resource changes in order to prevent misconfiguration. It also enforces best practices by using an admission controller. As an instance, it prevents multiple ScaledObjects to target the same scale target.
ScaledObject
ScaledObject is a K8s CRD (Custom Resource Definition) whose main goal is to define how KEDA should scale an application and what triggers to use.
In this article, we will be going to see how we can implement KEDA to autoscale RabbitMQ Producers & Consumers Pods in the Kubernetes cluster, based on the queue count events.
Prerequisites
Kubernetes cluster: We will need a running Kubernetes cluster. In case Kubernetes Cluster is not available then we can follow the instructions to Set Up a Kubernetes Cluster.
Docker Hub Account: An account at Docker Hub for storing Docker images that we will create during this tutorial. Refer to the Docker Hub page for details about creating a new account.
kubectl: Refer to Install and Set Up kubectl page for details about installing kubectl.
Helm: Here we will use Helm (Helm installation guide) to deploy KEDA.
Installation of KEDA
There are several ways to install KEDA in a K8s Cluster. Here we will be using Helm to install it.

Note: KEDA creates multiple deployments which is highly configurable through changes in values in a .yaml file.
Deploying RabbitMQ Application
RabbitMQ Application Deployment includes below steps:
1. Deploy RabbitMQ Cluster K8s Operator

For more, you can refer here
2. Deploy RabbitMQ Server Cluster
This deployment will create K8s CRD as RabbitMQCluster Server with replicas
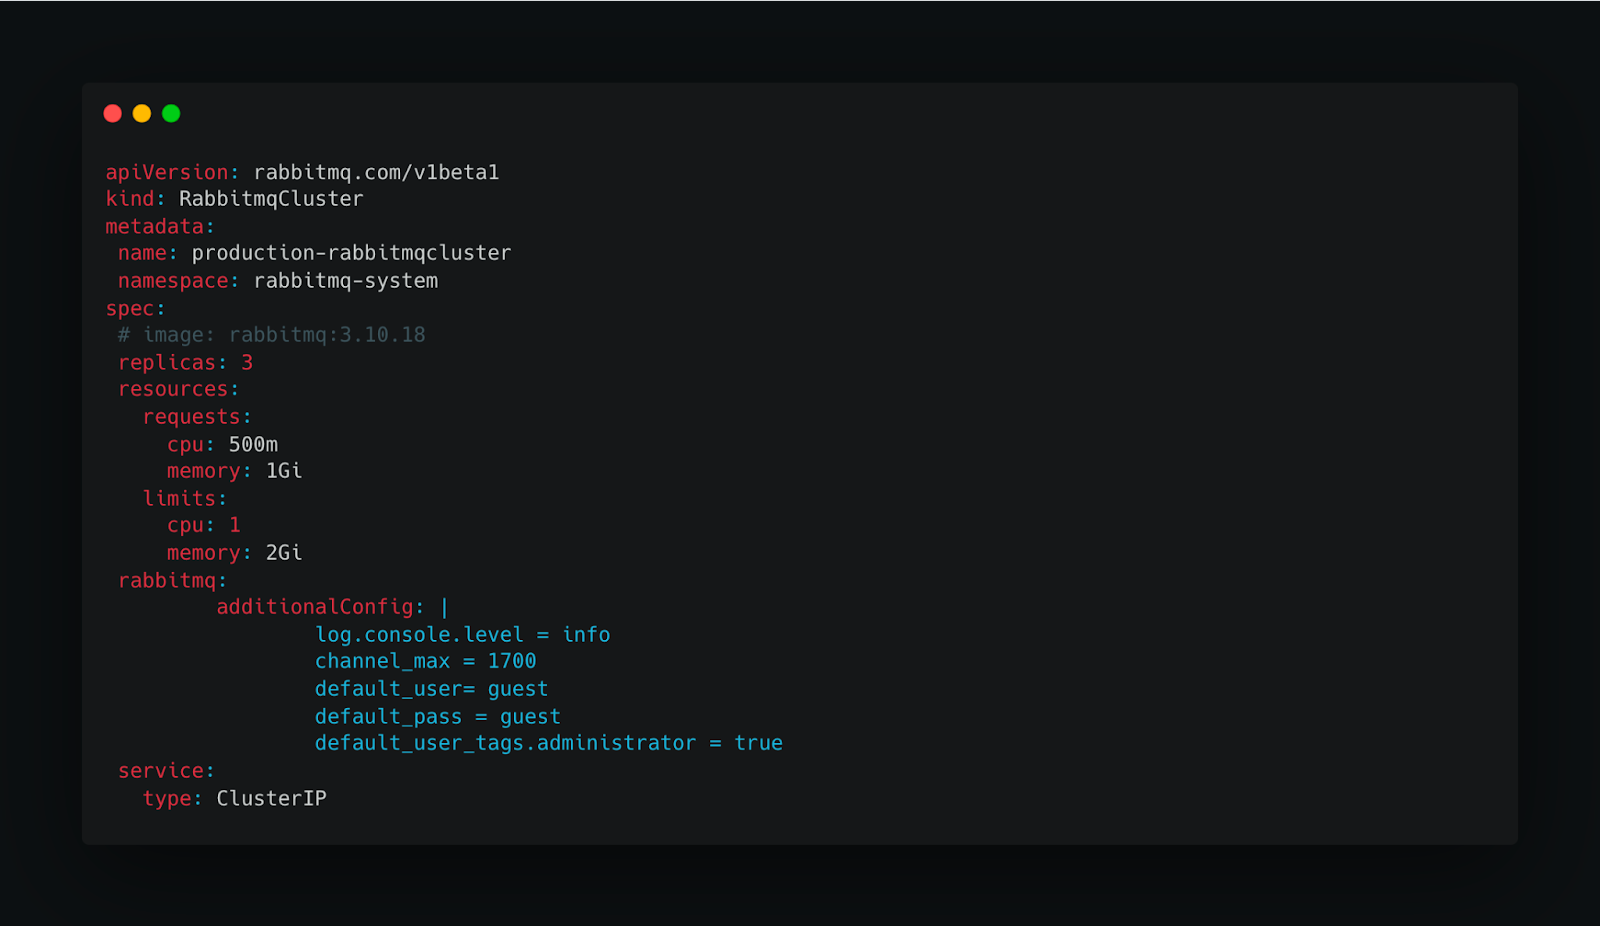
For more, you can refer here
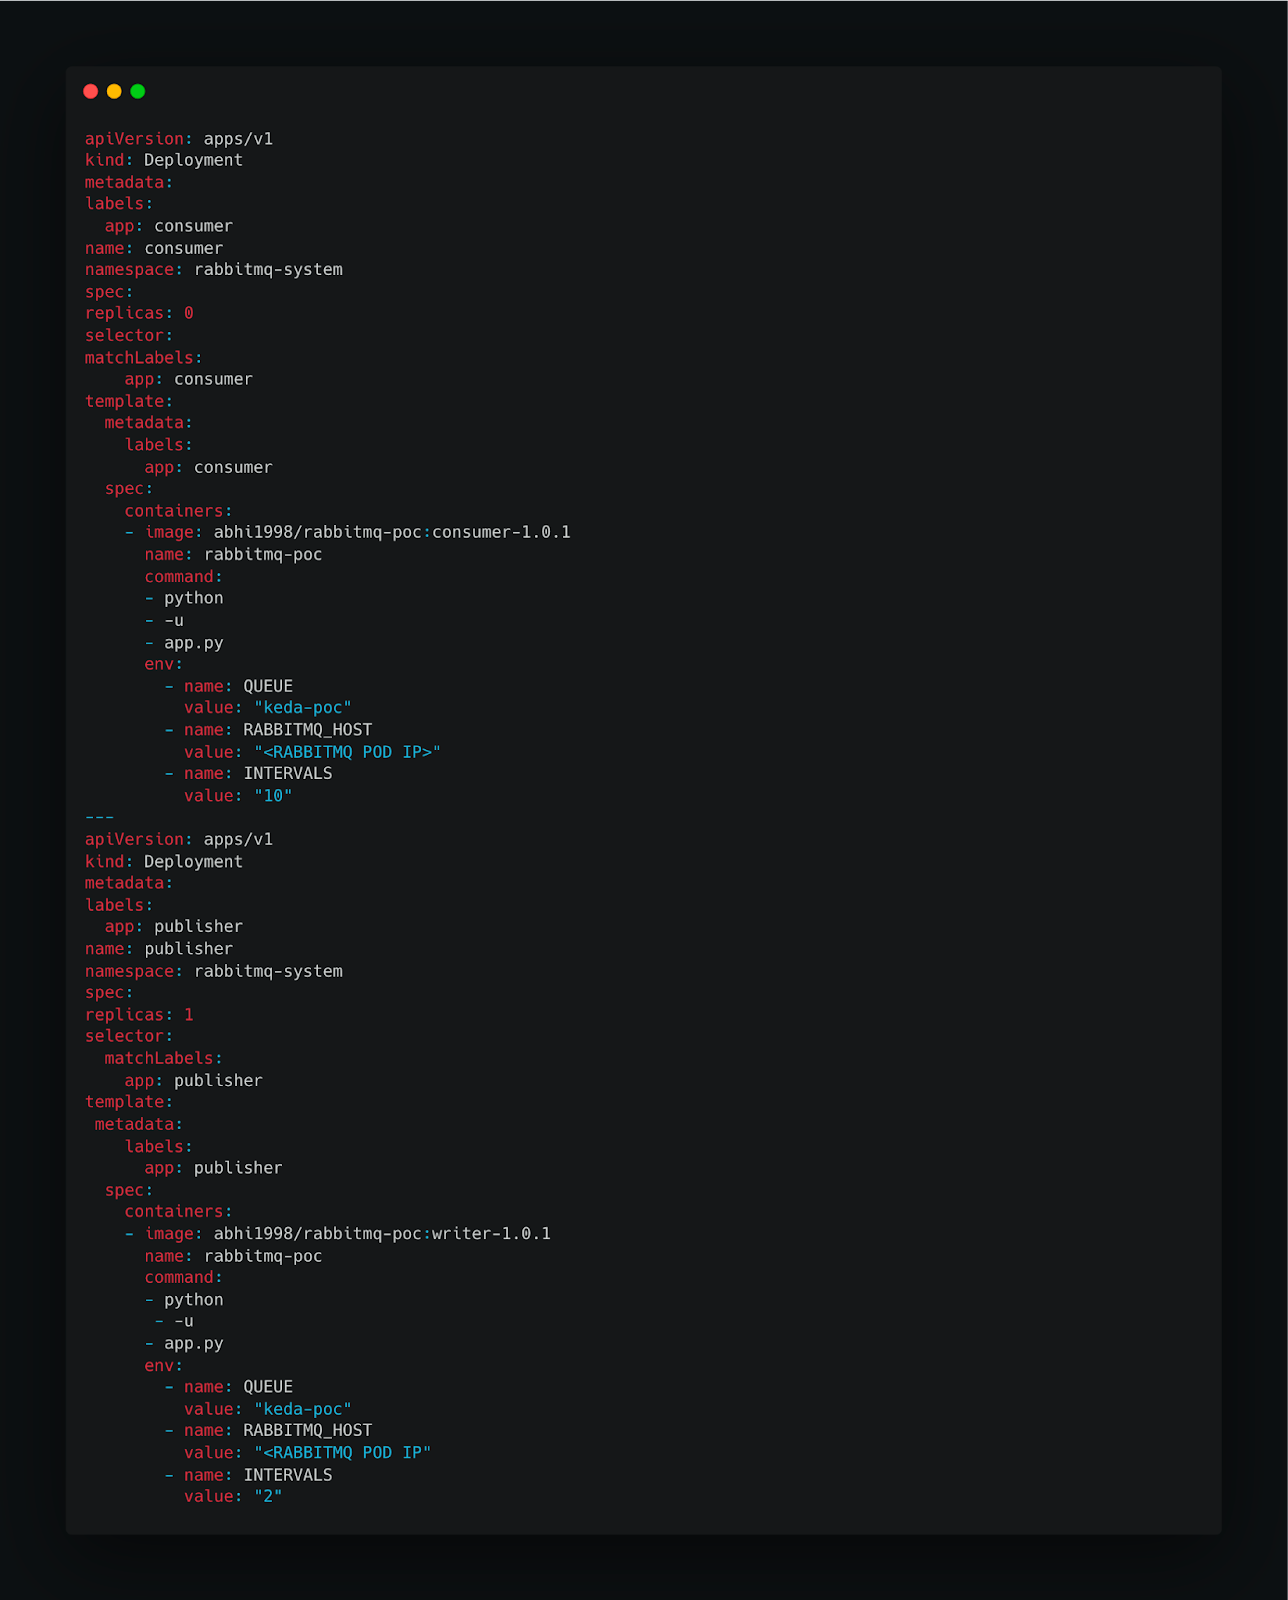
3. Deploy RabbitMQ Consumer and Producer
Deploying KEDA Event Scaler
This event scaler is RabbitMQ based which consists of few K8s KEDA objects and scaling will be done on the basis of queue count i.e. if the publisher is not publishing a message then KEDA scaled object will not scale up consumer pods. Hence Autoscaling will be done based on the event trigger.
1. Encrypt RabbitMQ Connection String

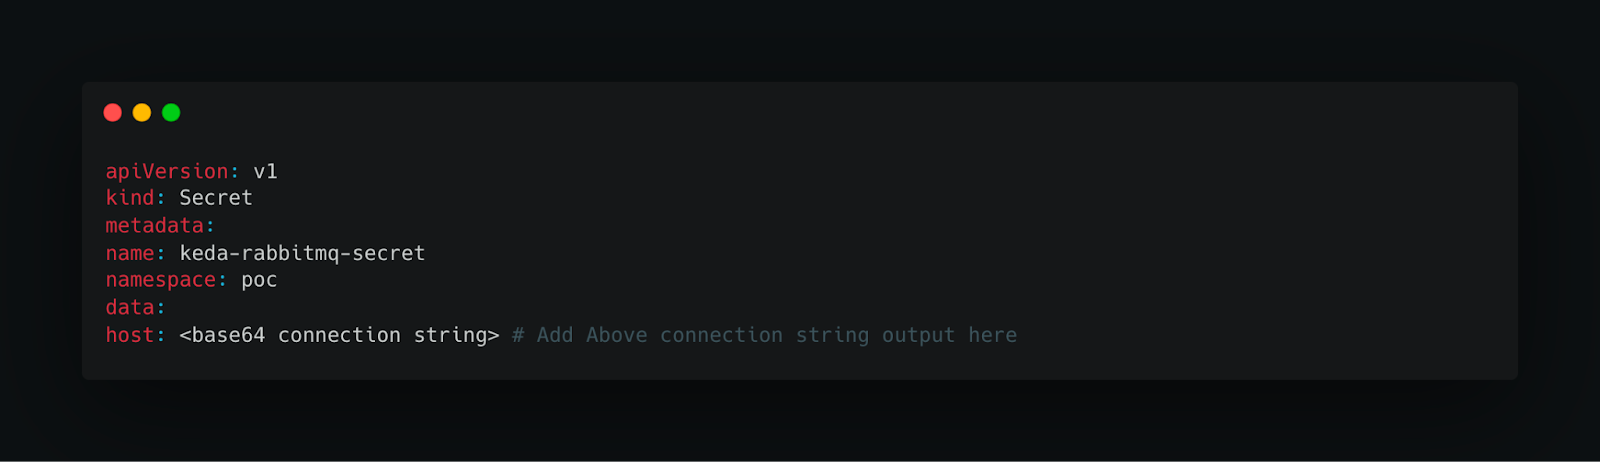
2. Create a Secret for the Connection String
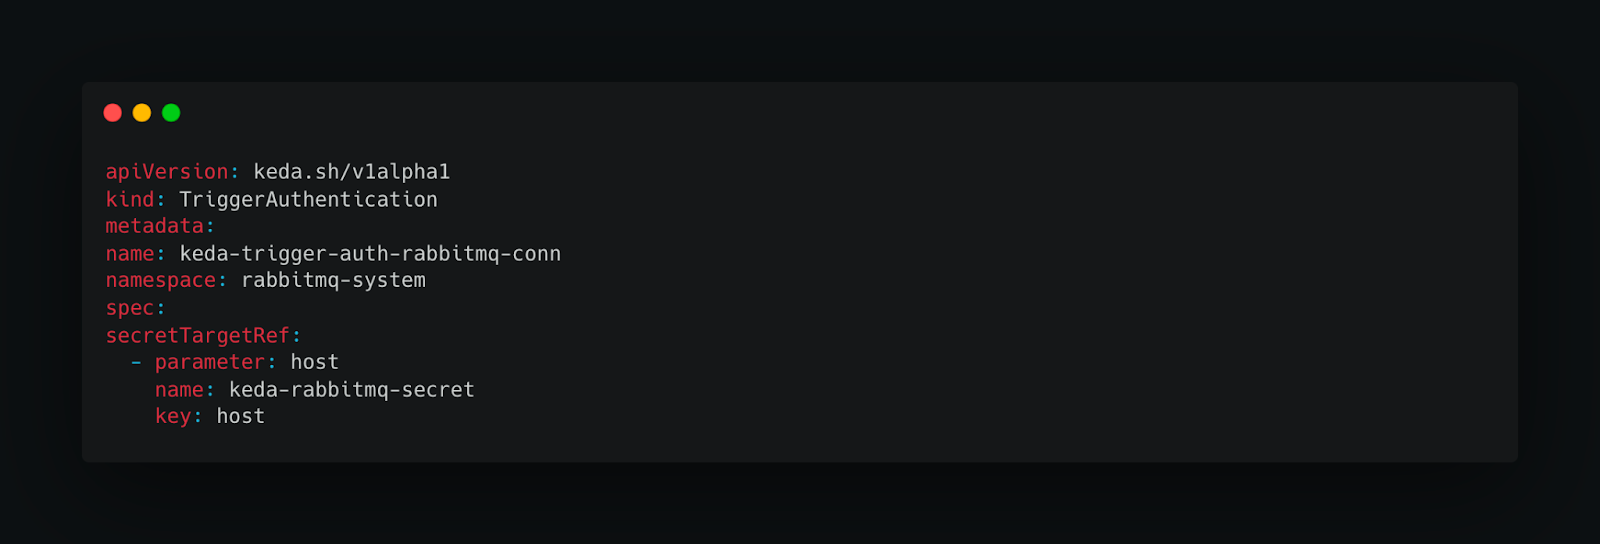
3. Create Trigger Authentication
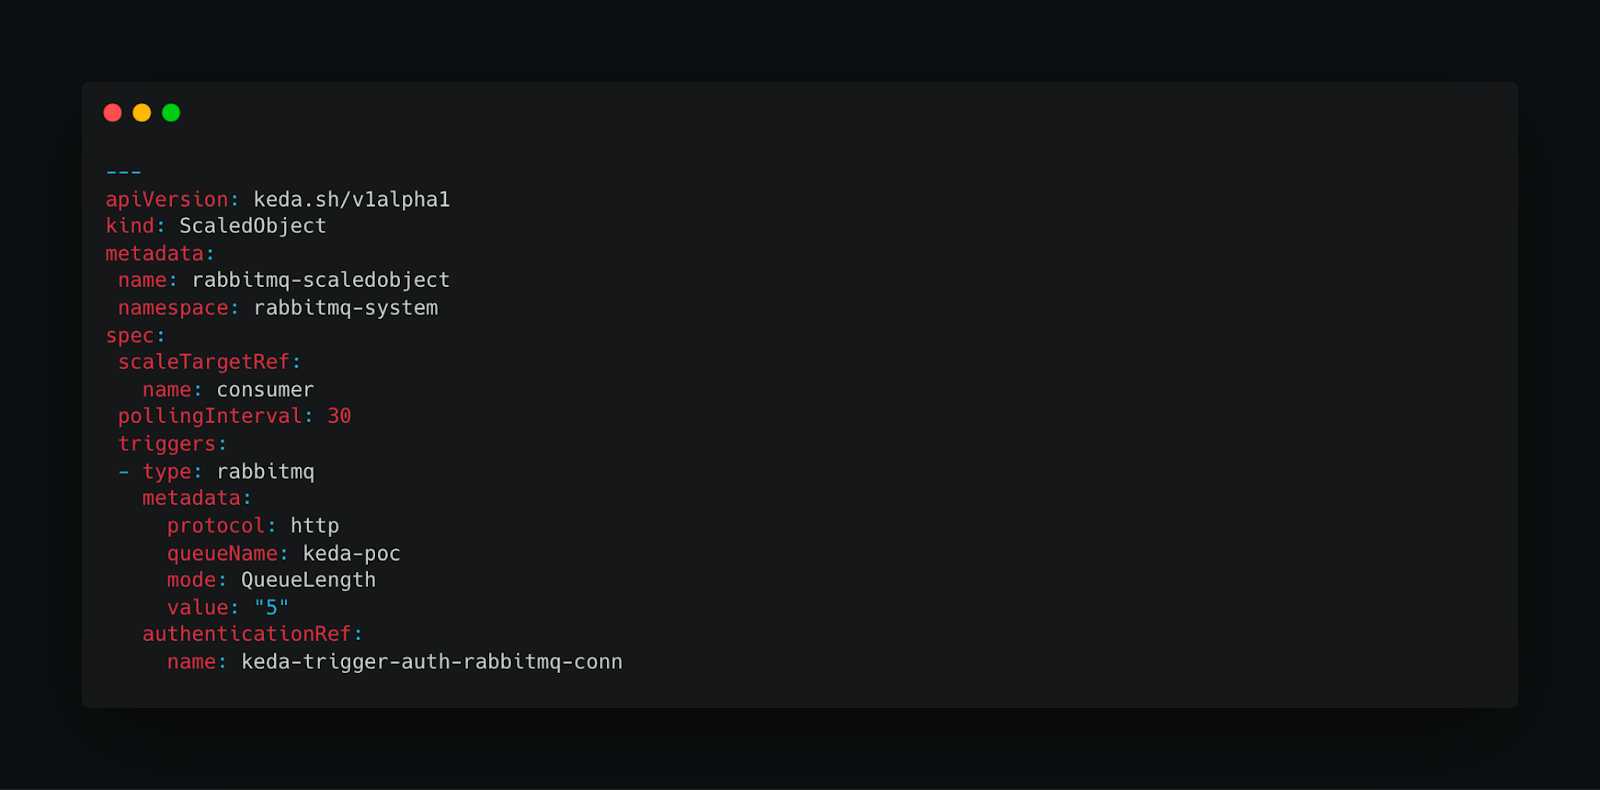
4. Deploy KEDA Scaled Object for Scaling
Testing Auto-Scaling with Event Scaler
In order to test scaling with Event Scaler, We have updated the replica count of publisher deployment to “0” i.e. publisher will not produce or publish any messages in the queue, therefore, queue count will become zero, Hence KEDA Scaled Object will start scaling down the consumer pods.

KEDA is a powerful tool that can help you to optimize your cloud costs and improve the performance of your Kubernetes workloads.
Here are some of the benefits of using KEDA:
Cost savings: KEDA can help you to save money by automatically scaling your workloads up and down based on demand. This can help you to avoid overprovisioning resources, which can lead to wasted resources and unnecessary costs.
Performance improvement: KEDA can help you to improve the performance of your Kubernetes workloads by ensuring that they have the right amount of resources available. This can help to reduce latency and improve throughput.
Scalability: KEDA can help you to scale your Kubernetes workloads up and down to meet demand. This can help you to ensure that your applications are always available and that they are able to handle peak traffic loads.
Would you like to know more about the best practices that can streamline your Kubernetes workloads and cloud architecture as a whole? Talk to our experts today!