

DevOps Engineer
6
6
Managing network traffic in microservices is complex. Developers must configure communication, set up retries, handle timeouts, and enforce security policies—adding significant operational overhead. In Kubernetes, this complexity increases with additional requirements like service authorization and traffic splitting.
So, how can we simplify this? A service mesh is a dedicated infrastructure layer that manages service-to-service communication, ensuring secure, observable, and reliable networking for microservices. By providing east-west load balancing, traffic routing, and security policies, service meshes like Istio streamline network management. Additionally, Istio integrates natively with monitoring tools like Prometheus and Grafana, giving deep insights into network traffic.
In this blog, we will explore how Istio on Amazon EKS can enhance observability, traffic management, and security in Kubernetes environments.
A service mesh is also known as a Programmable Network, since you can offload all your network configurations from the application code, like setting up retries, timeout handling, and establishing trust to the service mesh, and focus on the business logic.
A service mesh works as a dedicated infrastructure layer sitting somewhat between the application Layer and the network Layer.
The main benefit of using a service mesh is that an upgrade in the network configuration across the application would not require rebuilding each microservice and redeploying it; everything can be handled by upgrading the service mesh configuration.
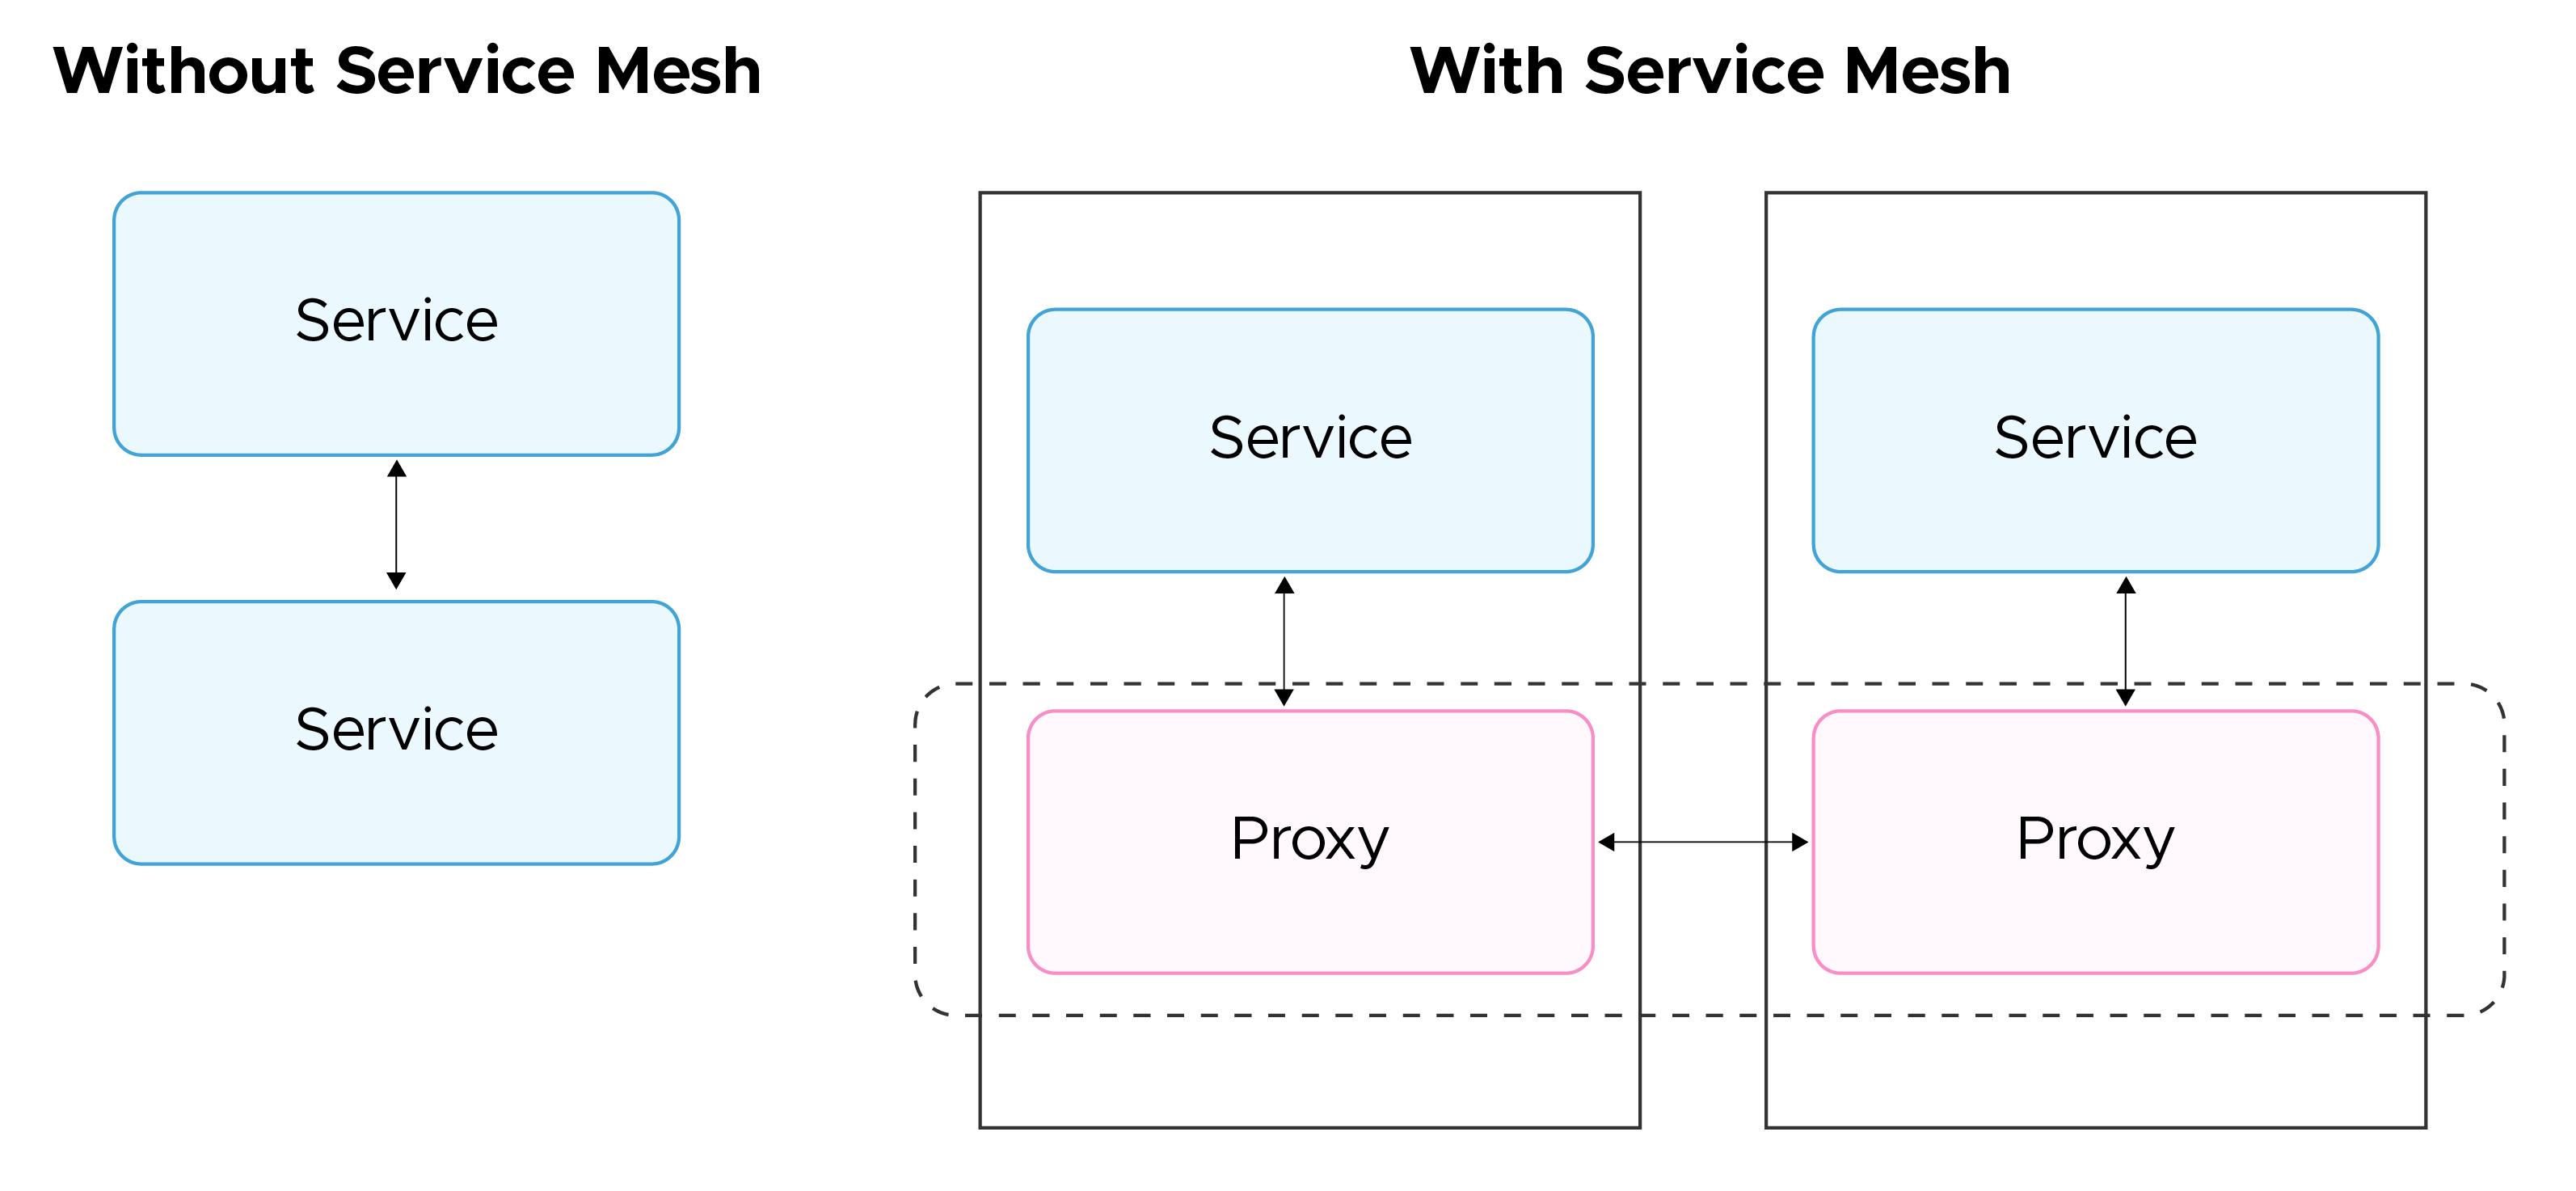
A service mesh operates by deploying distributed proxies alongside each instance of an application or service. These proxies handle all incoming and outgoing traffic, removing the need for the application to manage traffic directly. This approach centralizes traffic control within the mesh, providing greater visibility and fine-grained control over network flows.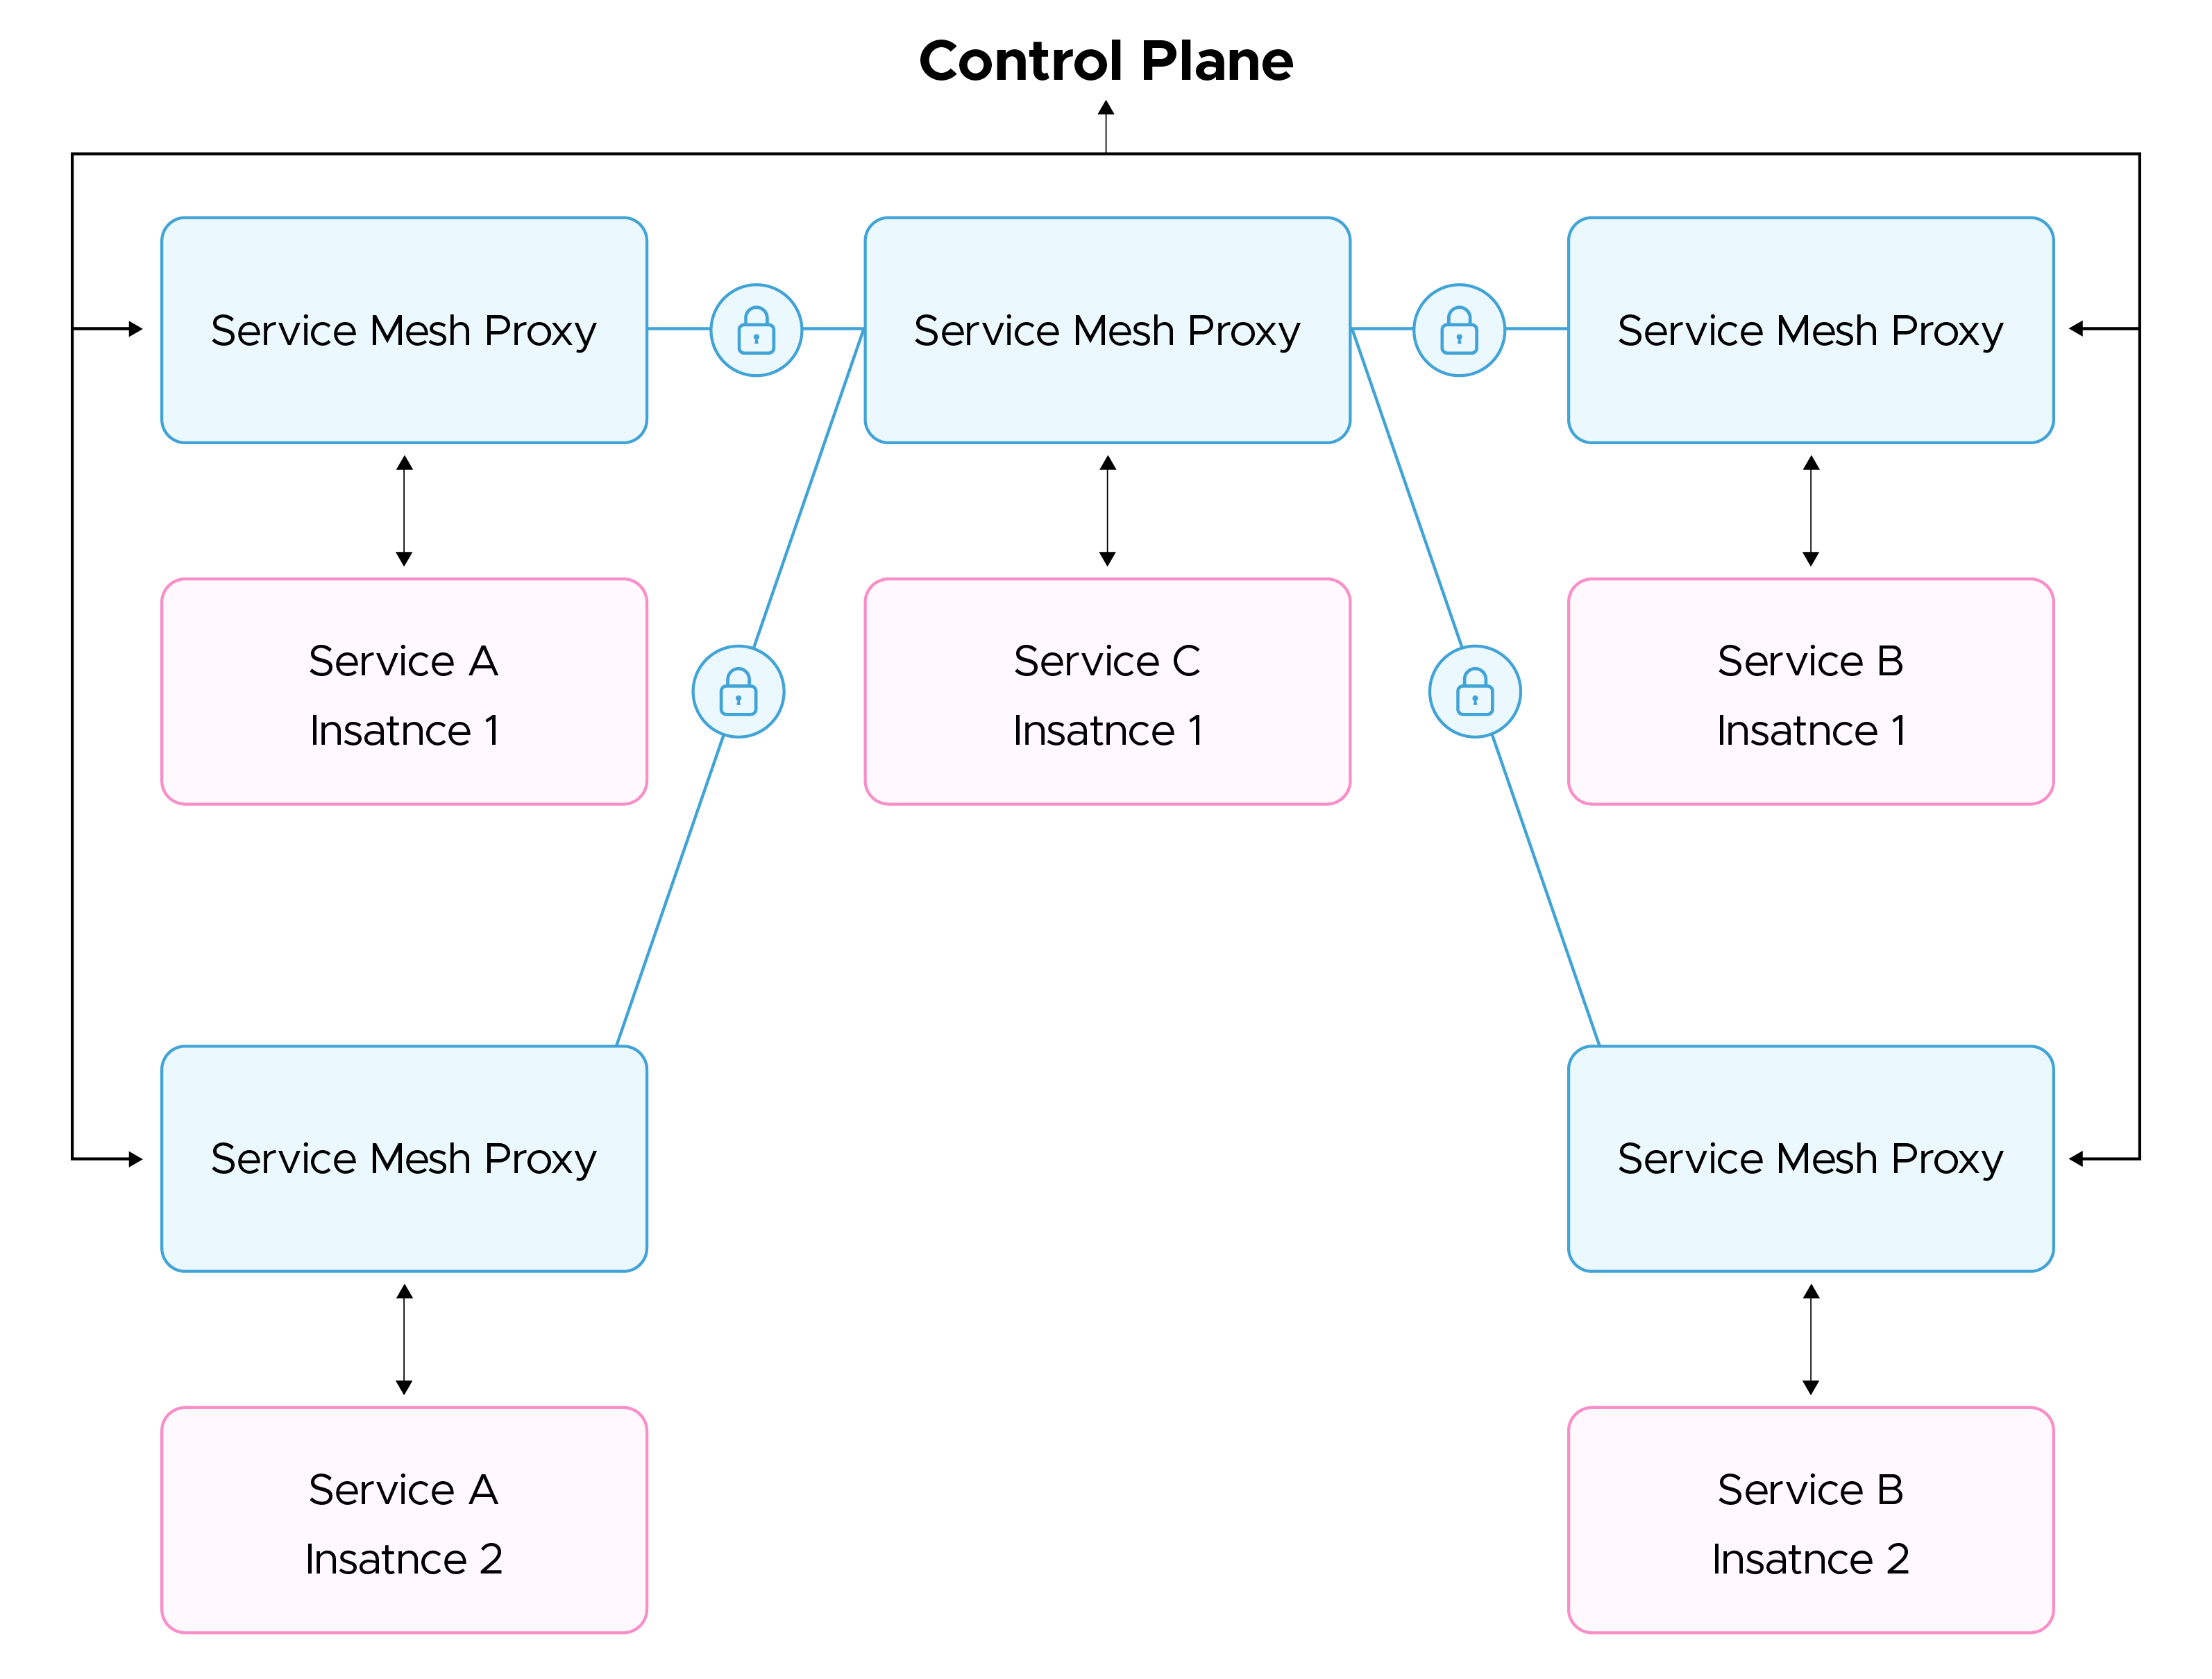
In Kubernetes, where each instance of an application/service is itself running in a container inside a pod, these proxies are implemented as another container running inside the pod as a sidecarside car container. This, this is known as a proxy container, and the whole process is called meshing a pod. This sidecar proxy is co-located and has the same lifecycle as the application instance running in the pod.
Let’s take a closer look at why we should use a Service Mesh to control inter-service communications in our Kubernetes cluster:
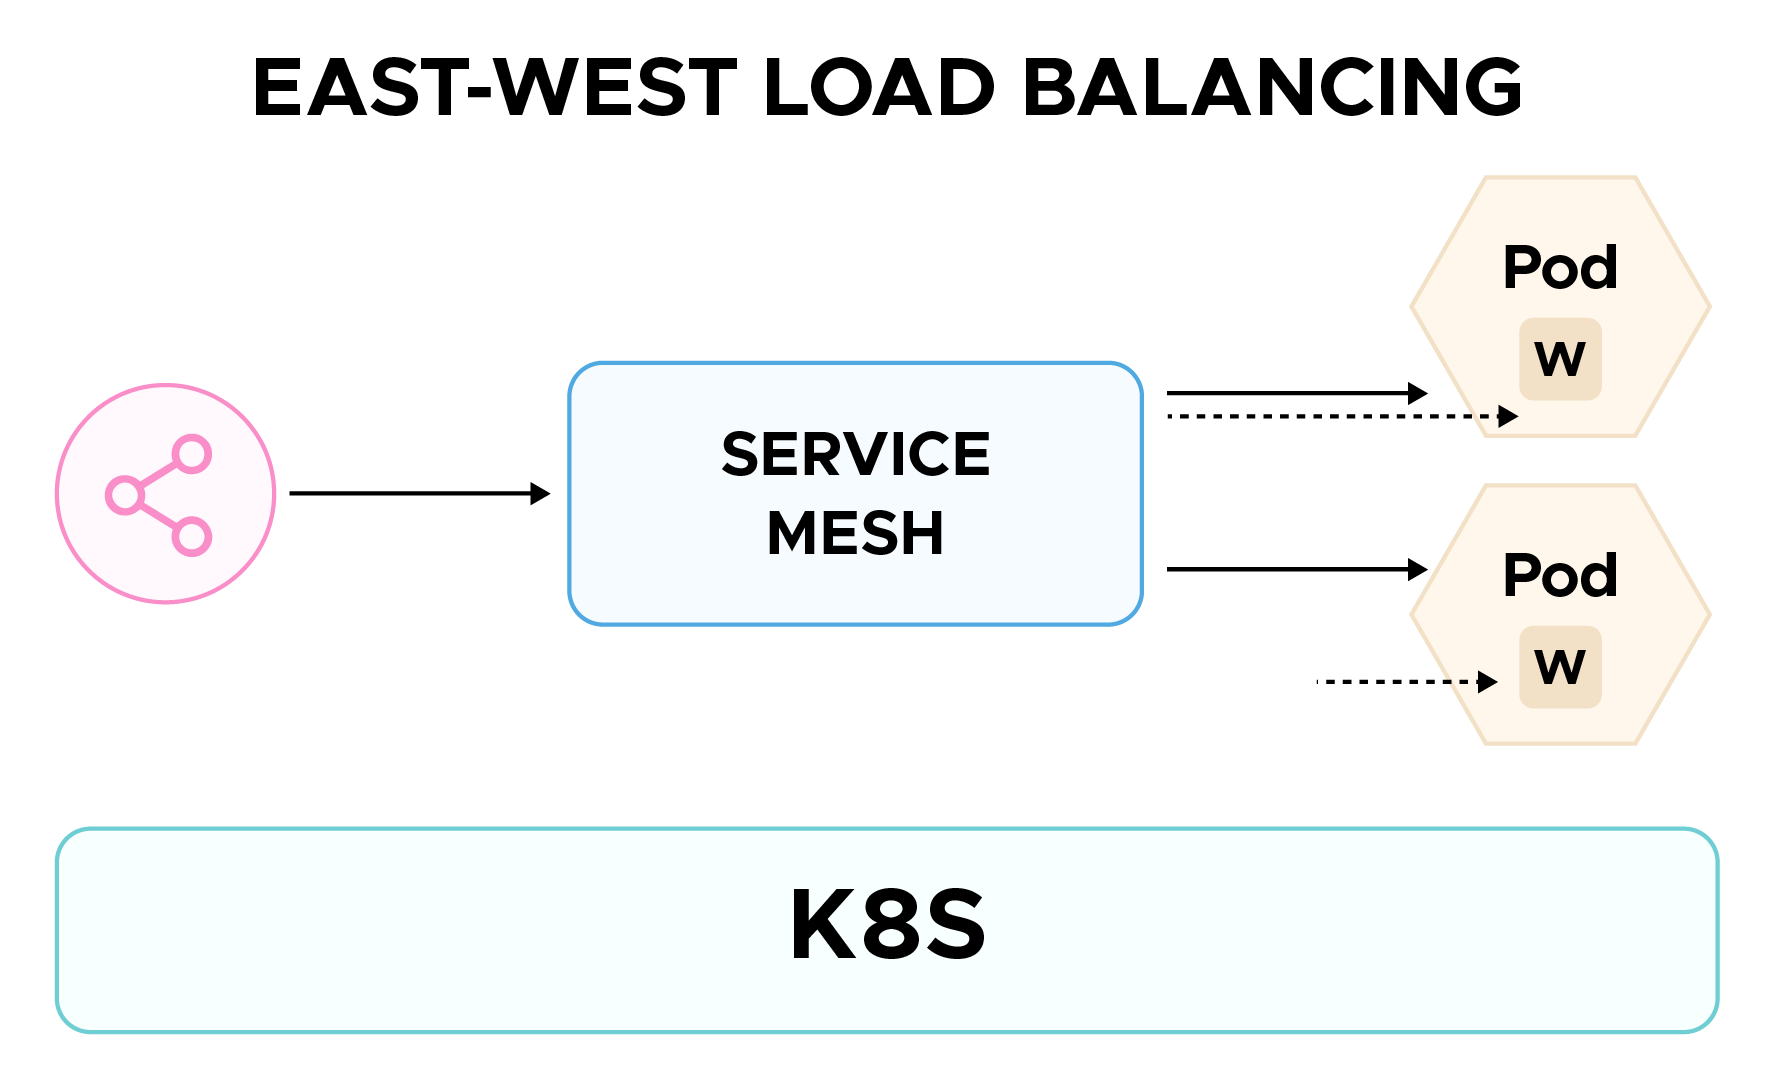
East-West Load Balancing: In a Kubernetes environment, east-west load balancing is simply managing the traffic between various Kubernetes services in a Kubernetes cluster, as opposed to traditional north-south load balancing, which corresponds to managing traffic between external clients and internal services. A service mesh can help us to do that effectively and efficiently while keeping the management overhead to a minimum.
We'll implement Istio, an open source service mesh developed by Google in partnership with IBM and Lyft.
Istio supports two data plane modes:
This blog focuses on the sidecar mode, using Istio's BookInfo sample application as an example.
Prerequisites:
Now, let's set up Istio and deploy the BookInfo application.
Installing Istio:
Go to the Istio release page to download the installation file for your OS, or download and extract the latest release automatically (Linux or macOS):
curl -L https://istio.io/downloadIstio | sh -
Let’s add Istio to path:
export PATH=$PWD/bin:$PATH
Install Istio using Istioctl:
We will be using the default configuration profile (configuration profiles provide the level of customization you can add to the istio control plane based on deployment strategies and platforms).
istioctl install --set profile=default -y
Add a namespace label to instruct Istio to automatically inject Envoy sidecar proxies when you deploy your application later:
kubectl label namespace default istio-injection=enabled
By doing this, we have configured Istio to ingest sidecar containers to applications deployed to the default namespace. In case you want to create a designated namespace for your application, run the above command by replacing default with your namespace.
Let’s deploy the application:
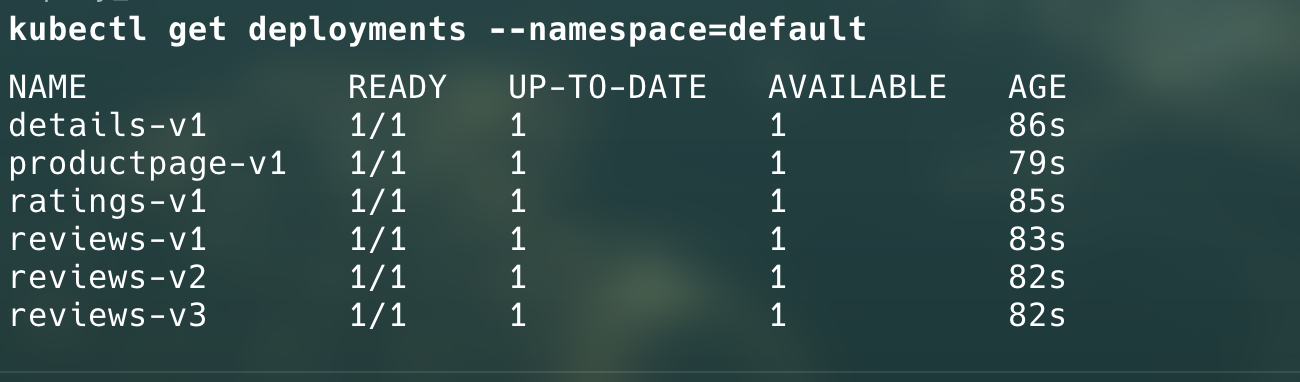
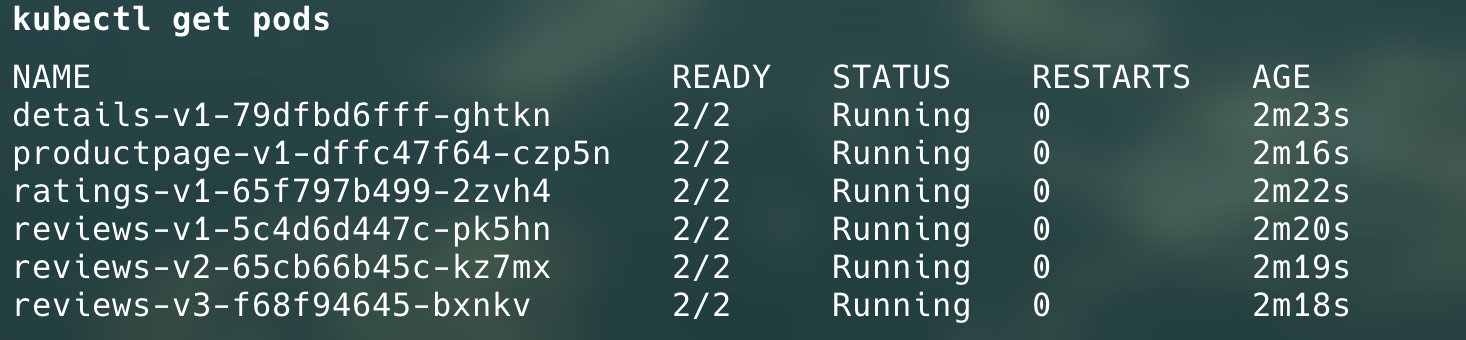
kubectl apply -f samples/bookinfo/platform/kube/bookinfo.yaml
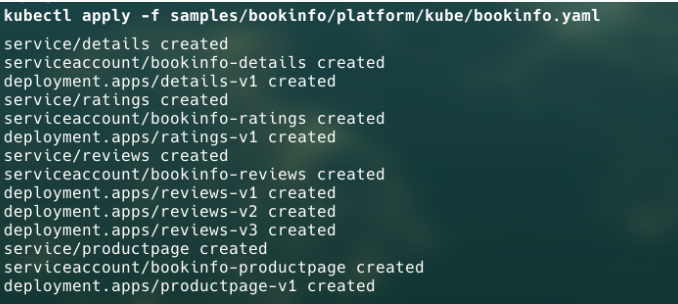
Istio sidecar will be deployed with every application:
Now, we have the application deployed and ready. We need to make it accessible over the internet.For this, we will be using Istio Gateway and AWS Load Balancer Controller.
Gateways in Istio are used to configure ingress and egress access to your application;, they are also deployed as Envoy proxies that run at the edge of the mesh, rather than as a sidecar container with your application.
To deploy the Gateway, run the following command:
kubectl apply -f samples/bookinfo/networking/bookinfo-gateway.yaml

Now, we have deployed the gateway, let’s deploy an Application Load Balancer to grant external access to our application.
I have already installed the AWS Load Balancer Controller. You can use this document as a guide if you have not already installed it.
You can use the following yaml to deploy the load balancer:
apiVersion: networking.k8s.io/v1
kind: Ingress
metadata:
 name: bookinfo-ingress
 namespace: istio-system
 annotations:
   kubernetes.io/ingress.class: alb
   alb.ingress.kubernetes.io/scheme: internet-facing
   alb.ingress.kubernetes.io/target-type: ip
   alb.ingress.kubernetes.io/listen-ports: '[{"HTTP": 80}]'
   alb.ingress.kubernetes.io/healthcheck-path: /productpage
spec:
 rules:
 - http:
     paths:
     - path: /productpage
       pathType: Exact
       backend:
         service:
           name: istio-ingressgateway
           port:
             number: 80
     - path: /static
       pathType: Prefix
       backend:
         service:
           name: istio-ingressgateway
           port:
             number: 80
     - path: /login
       pathType: Exact
       backend:
         service:
           name: istio-ingressgateway
           port:
             number: 80
     - path: /logout
       pathType: Exact
       backend:
         service:
           name: istio-ingressgateway
           port:
             number: 80
     - path: /api/v1/products
       pathType: Prefix
       backend:
         service:
           name: istio-ingressgateway
           port:
             number: 80
After applying the following yaml spec, you can get the load balancer DNS using:

Notice, we have installed the ingress in istio-system namespace.
Navigate to http://<DNS>/productPage and you should see the following page:

Istio provides a Kiali dashboard to provide insights about your service mesh, network topology, and various observability metrics. Let’s install it and access it using the commands below:
kubectl apply -f samples/addons
istioctl dashboard kiali
This will open the Kiali dashboard, which will look like this:

Let’s take a look at the traffic graph for BookInfo application in default namespace:
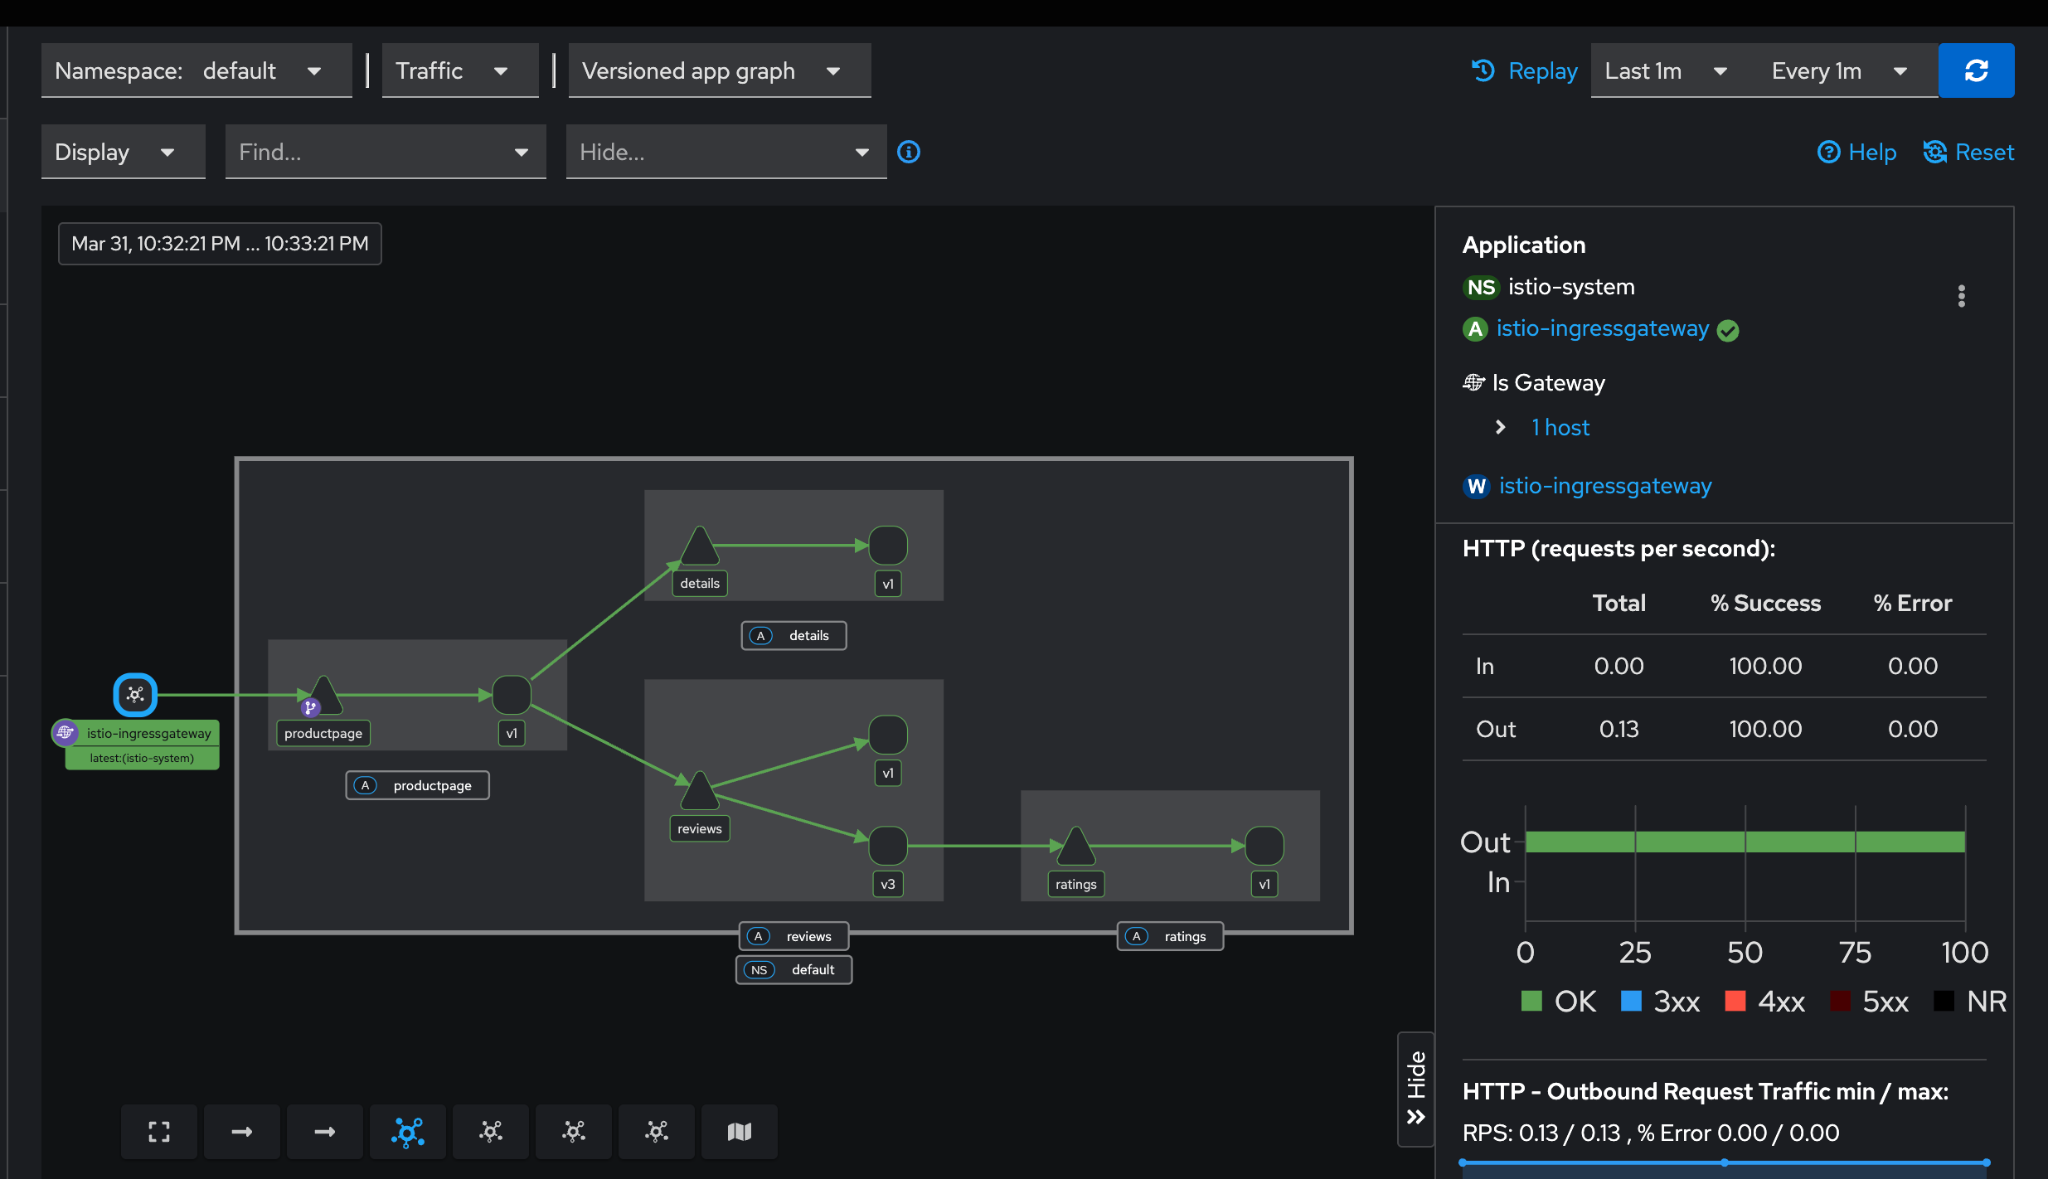
We can filter it out on the basis of deployments and analyse our network performance and inter-service communication.
In this blog, we've explored the fundamentals of service meshes, specifically how Istio can be implemented on Amazon EKS to enhance the observability, security, and management of service-to-service communication within a Kubernetes environment. By using Istio, you can offload complex networking tasks like traffic routing, retries, timeouts, and mTLS from your application code, simplifying your microservices architecture. Through the setup of Istio in sidecar mode on Amazon EKS, we've demonstrated how to deploy and expose a microservices application while ensuring high availability, security, and real-time visibility into your network traffic.
With Istio, the management of Kubernetes services becomes more efficient, allowing developers and operators to focus on delivering business value rather than handling intricate networking challenges. The added observability and robust security features make Istio a powerful tool for any cloud-native application, especially in hybrid or multi-cloud environments.
99% of companies saved up to 15% monthly with this plan & achieved peak performance.

Speak with our advisors to learn how you can take control of your Cloud Cost


