DevOps Engineer
Jatin is a DevOps Engineer with expertise and multiple certifications in Azure and AWS.
16 Sep, 2025 | 11 Min read

Kafka and ZooKeeper form a powerful team. Think of them as a company's executive and operations departments. ZooKeeper is the executive team, making all the high-level decisions and ensuring the company is stable, while Kafka is the operations team, handling the day-to-day work and interacting directly with clients.
Apache Kafka and Apache Zookeeper have traditionally worked together to manage and coordinate distributed Kafka clusters. While Kafka handles message storage and streaming, Zookeeper acts as the coordination layer that helps brokers stay synchronized and aware of cluster-wide changes.
In a Kafka cluster, Zookeeper performs three primary functions:
When a Kafka broker starts, it registers itself with Zookeeper. This allows other brokers and cluster components to discover available nodes and maintain an up-to-date view of the cluster.
Kafka partitions rely on leader brokers to process read and write requests. If a leader broker fails, Zookeeper coordinates the election of a new leader to ensure high availability and minimize service disruption.
Zookeeper stores important metadata related to topics, partitions, broker status, and cluster configuration. Kafka brokers use this information to maintain consistency across the distributed environment.
The role of Zookeeper in Kafka is changing. Beginning with newer Kafka releases, Apache Kafka introduced KRaft (Kafka Raft Metadata Mode), which removes the dependency on Zookeeper and enables Kafka to manage metadata internally.
KRaft simplifies cluster architecture by:
As of 2026, KRaft is the recommended architecture for new Kafka deployments, while many existing environments still use Zookeeper-based clusters. Organizations running older Kafka versions often continue to use Zookeeper until they complete their migration to KRaft.
If you are deploying a new Kafka cluster, consider evaluating KRaft mode before choosing a Zookeeper-based setup. For existing deployments, understanding how Kafka and Zookeeper work together remains essential for cluster administration and troubleshooting.
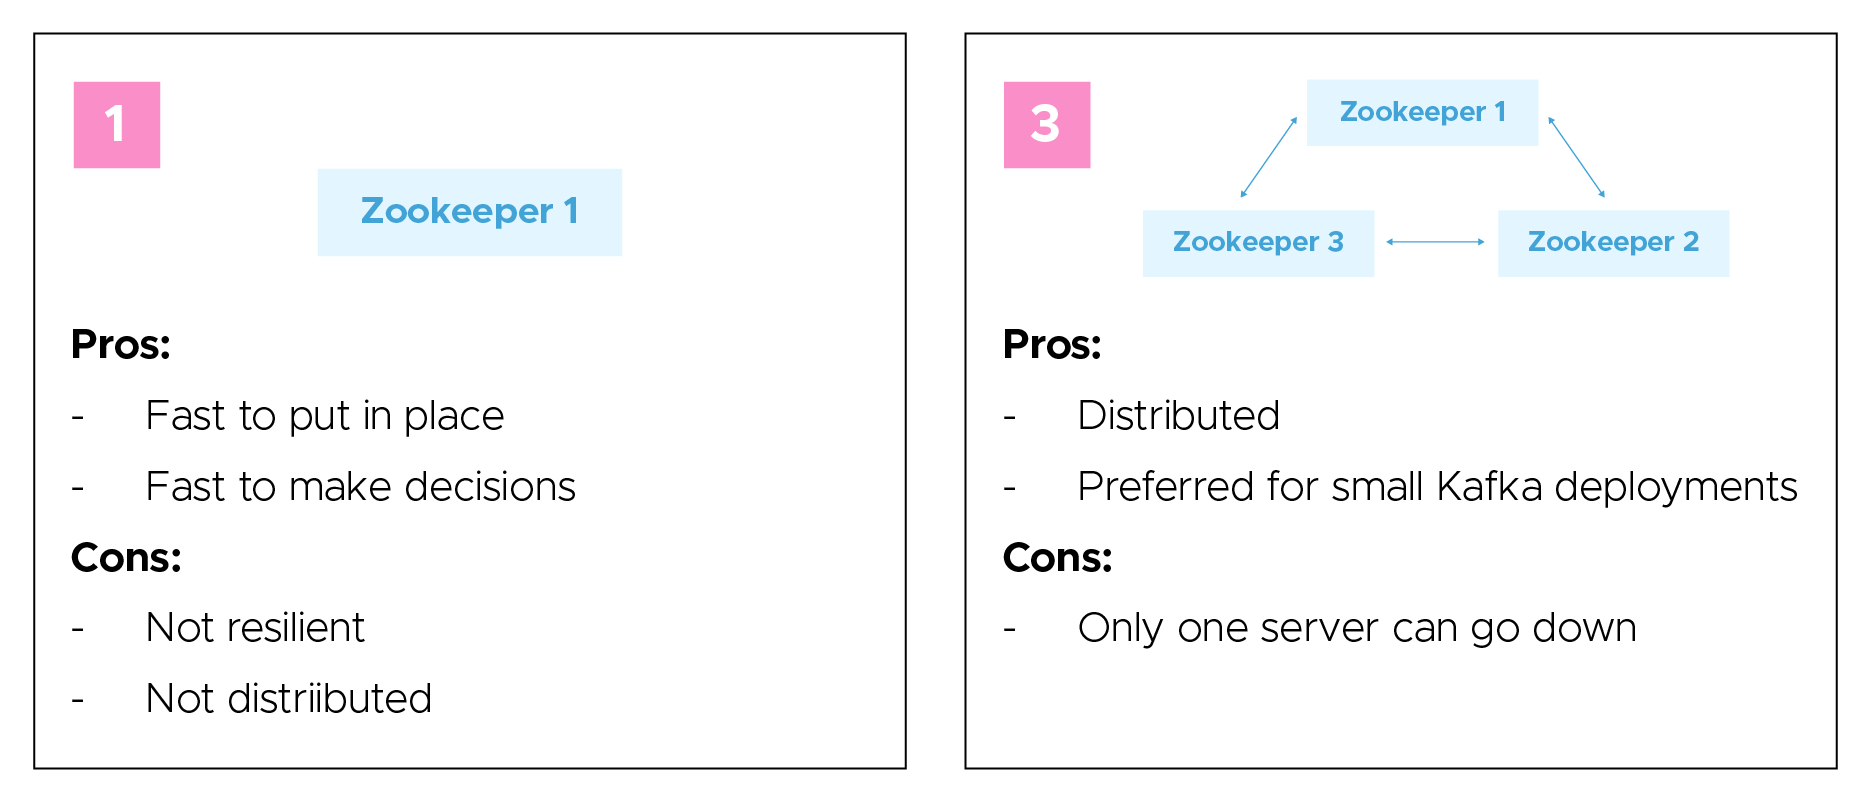
ZooKeeper is the central nervous system of the Kafka cluster. Its main job is to maintain a synchronized, up-to-date view of the entire cluster's state. It manages all the behind-the-scenes coordination that makes the system resilient and reliable.
Here’s what ZooKeeper does:
In short, ZooKeeper handles all the metadata and coordination, providing the stable foundation that Kafka needs to operate.
Kafka is the workhorse that handles all the data and direct client interactions. Once ZooKeeper has set up the cluster and decided on the leadership and topology, Kafka gets to work.
Kafka is responsible for:
Together, ZooKeeper and Kafka create a robust, fault-tolerant messaging system. ZooKeeper provides the brain and stability, while Kafka provides the brawn and direct client interaction.
Besides myid, the rest of the files should remain untouched. They are managed by ZooKeeper.
Enter the following command.
./gradlew jar -PscalaVersion=2.13.10
This command uses the Gradle build tool (specified by "./gradlew") to build the Kafka JAR files, and it sets the Scala version to 2.13.10 during the build process. Building the JAR files is necessary before running Kafka.
Change the ownership of the data/ directory and its contents to the user ‘azureuser’. This is important because ZooKeeper will write data to this directory, and the user running ZooKeeper (typically azureuser) needs to have the necessary permissions.
sudo chown -R azureuser:azureuser data/
Create a file named myid inside the ~/data/zookeeper/ directory and set its content to "3". The myid file is used to identify the ZooKeeper server's unique ID in a multi-server ensemble. In this case, you are setting the ID of this ZooKeeper server to 3.
echo "3" > ~/data/zookeeper/myid
Note: Set a different number in myid for each member of the zookeeper cluster.
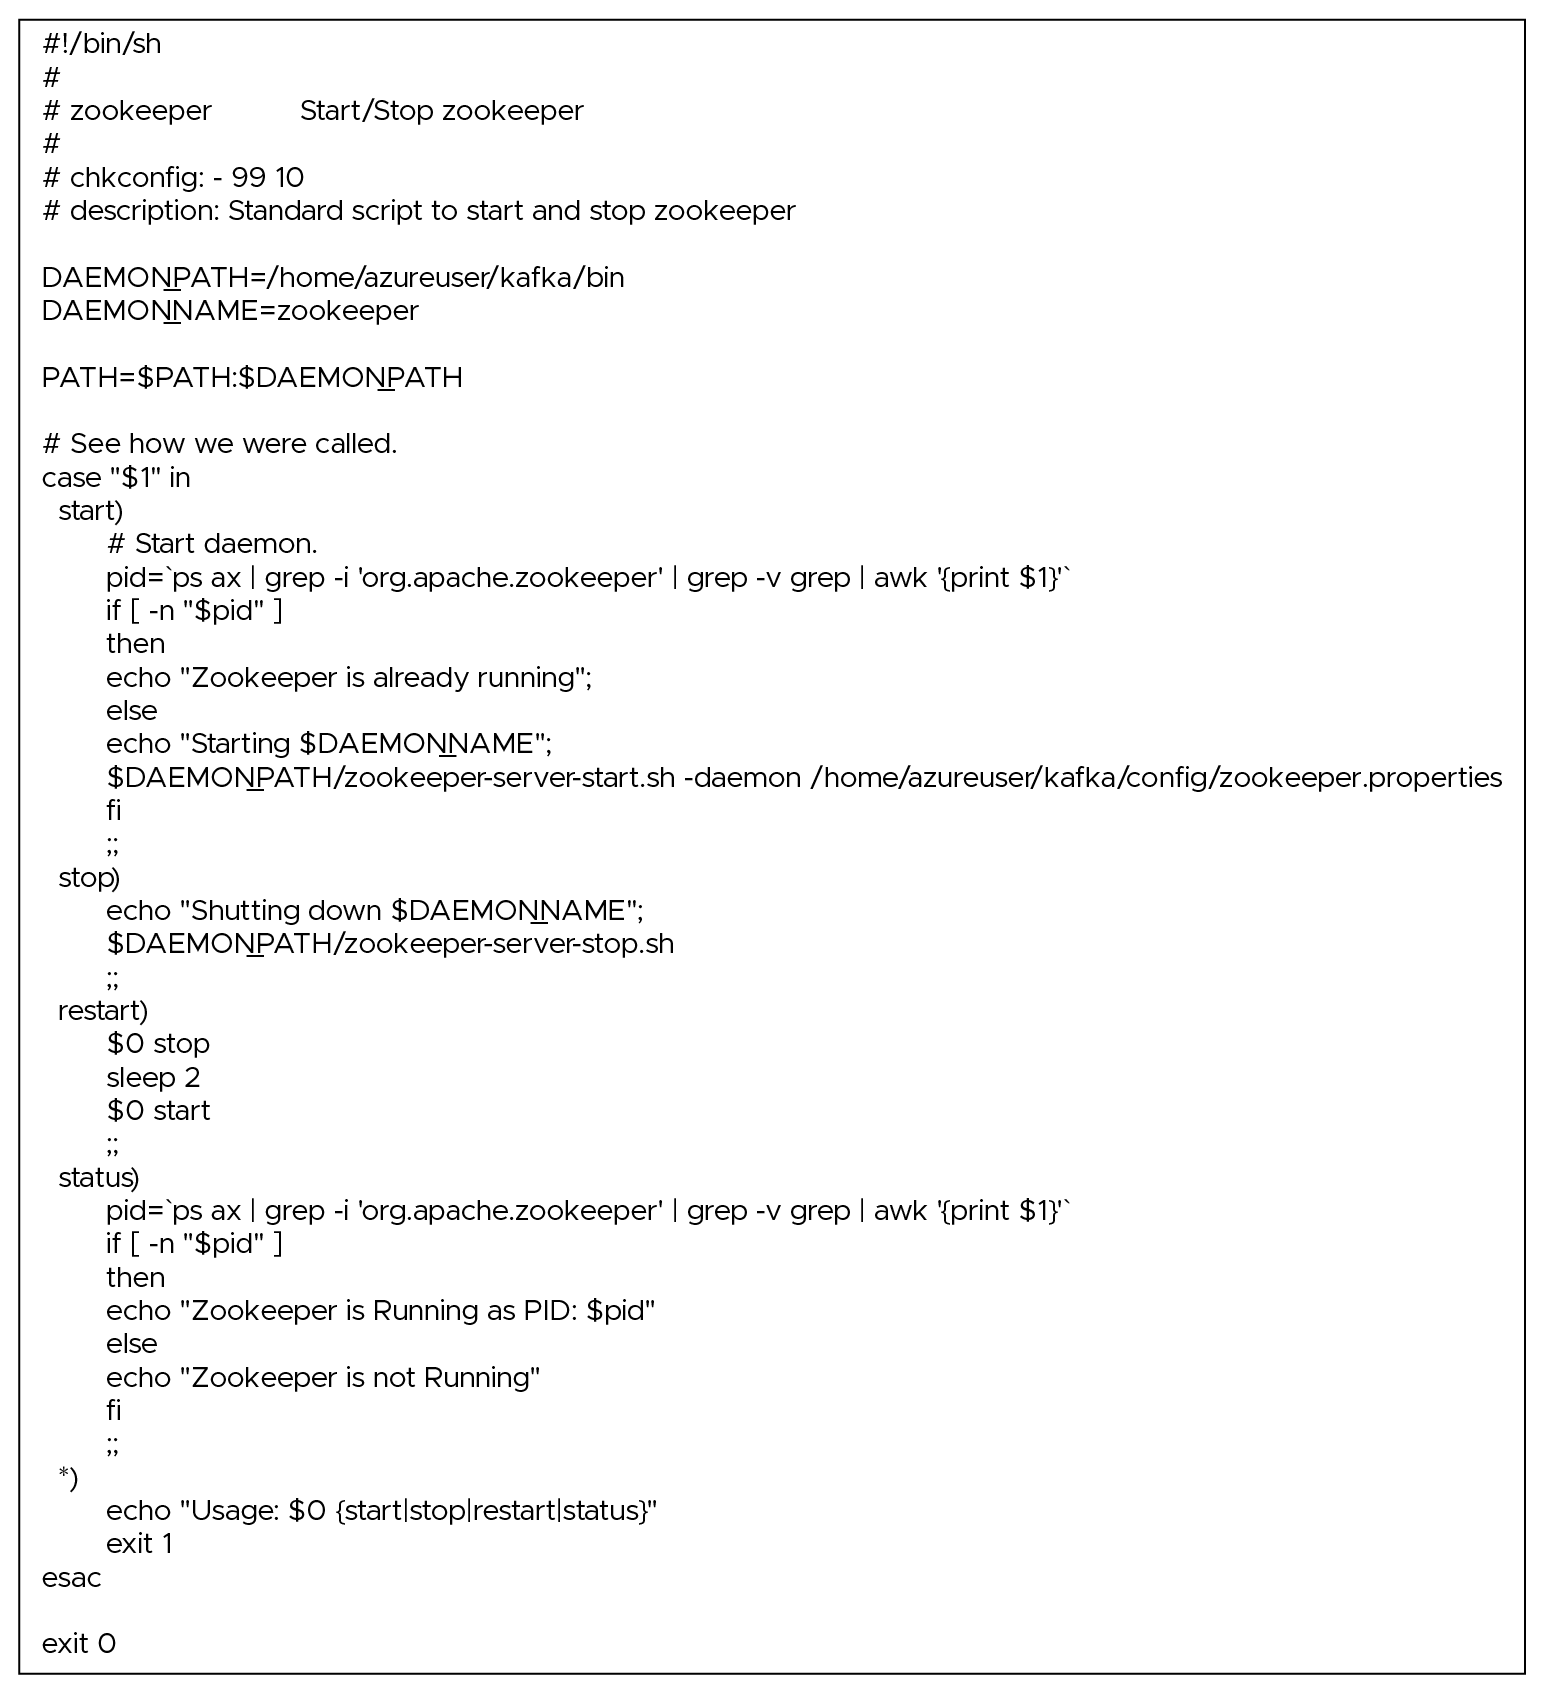
Create the /etc/init.d/zookeeper file using the vim text editor. In this file, we’ll define how the ZooKeeper service should start, stop, and restart. You'll specify the actions to be taken when the service is managed by the system's init process.
sudo vim /etc/init.d/zookeeper
Copy and paste the following script into the /etc/init.d/zookeeper file
Make the /etc/init.d/zookeeper script executable. The system must run it as a service.
sudo chmod +x /etc/init.d/zookeeper
Change the ownership of the /etc/init.d/zookeeper script to the root user and root group.
sudo chown root:root /etc/init.d/zookeeper
Add the ZooKeeper script to the default runlevels, which means that ZooKeeper will start automatically when your system boots. The update-rc.d tool manages the symlinks in the /etc/rc*.d/ directories to control service execution during system startup and shutdown.
sudo update-rc.d zookeeper defaults
Start the ZooKeeper service using the system's service management utility. Once configured and added to the default runlevels, you can start the service this way.
sudo service zookeeper start
Check the status of the ZooKeeper service, indicating whether it's running, stopped, or encountering any issues.
sudo service zookeeper status

Run the following command, which will send the "stat" command to the ZooKeeper server running on localhost and display the server's status information as a response.
echo "stat" | nc localhost 2181 ; echo

You can also run `echo "stat" | nc <other_host’s_name/IP> 2181 ; echo` to check other stats of other zookeeper servers in the cluster.
Run the following command to display the contents of the zookeeper.out log file from the specified location. It contains the output generated by the ZooKeeper server, which can help diagnose issues or monitor ZooKeeper's behavior.
cat kafka/logs/zookeeper.out
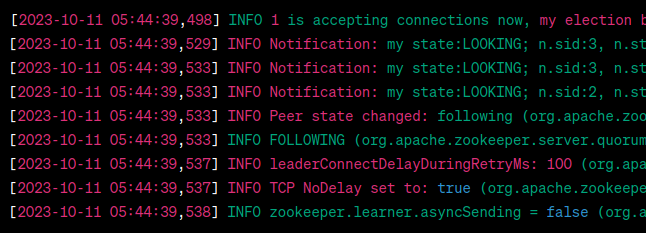
These logs indicate that the ZooKeeper servers have successfully elected a leader, and they are in a functioning ensemble. So, yes, your ZooKeeper servers appear to be connected and are functioning as expected.
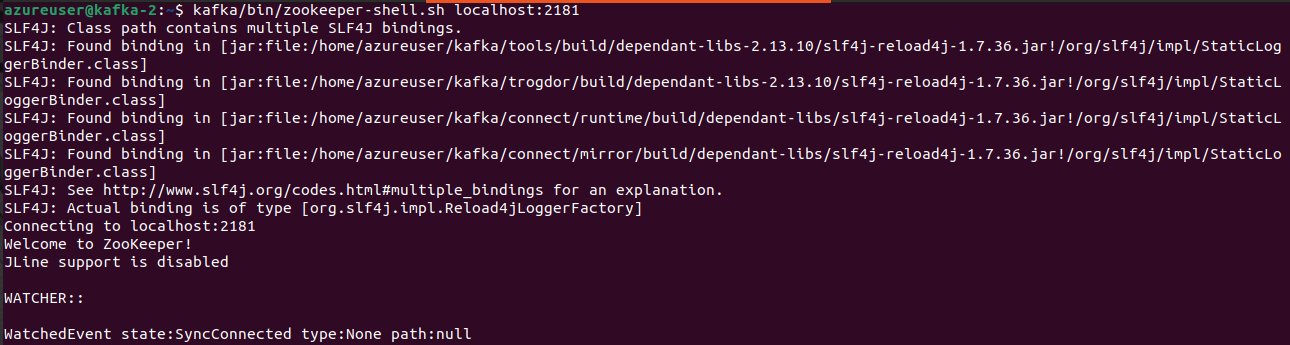
Start a ZooKeeper shell and connect to a ZooKeeper server running on localhost at port 2181. The ZooKeeper shell allows you to interact with the ZooKeeper server to perform various operations, such as creating, deleting, and reading ZooKeeper znodes, which are like nodes or paths in a hierarchical data structure.
kafka/bin/zookeeper-shell.sh localhost:2181
Use the following command inside the Zookeeper shell to list or create a znode (node)
ls /
![]()
create /my-node "some data"
![]()
ls /
![]()
quit
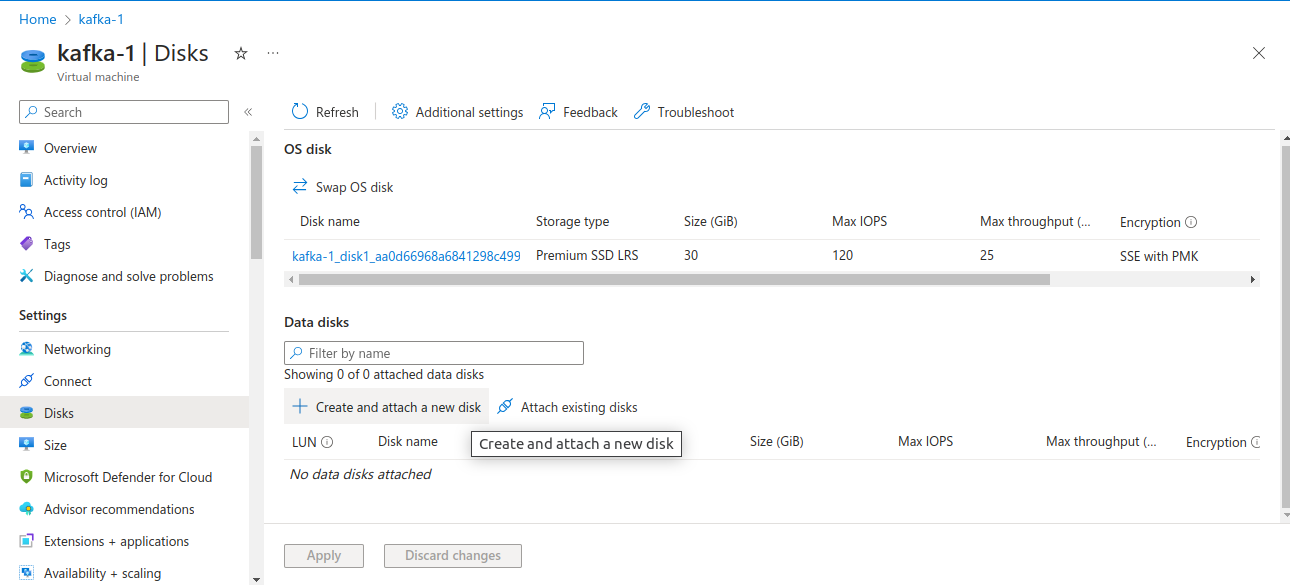
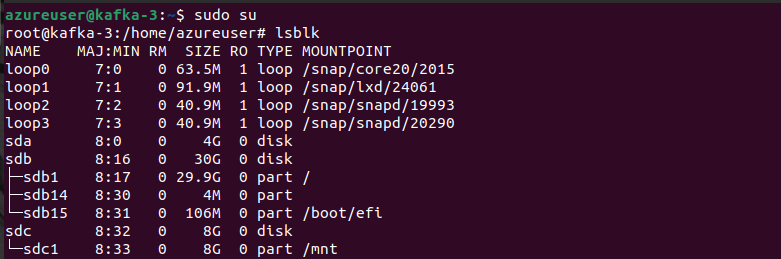
Attach a new disk to your Kafka brokers for storing Kafka’s data.
The steps may vary depending on the cloud platform.
sudo su
lsblk
apt-get install -y xfsprogs

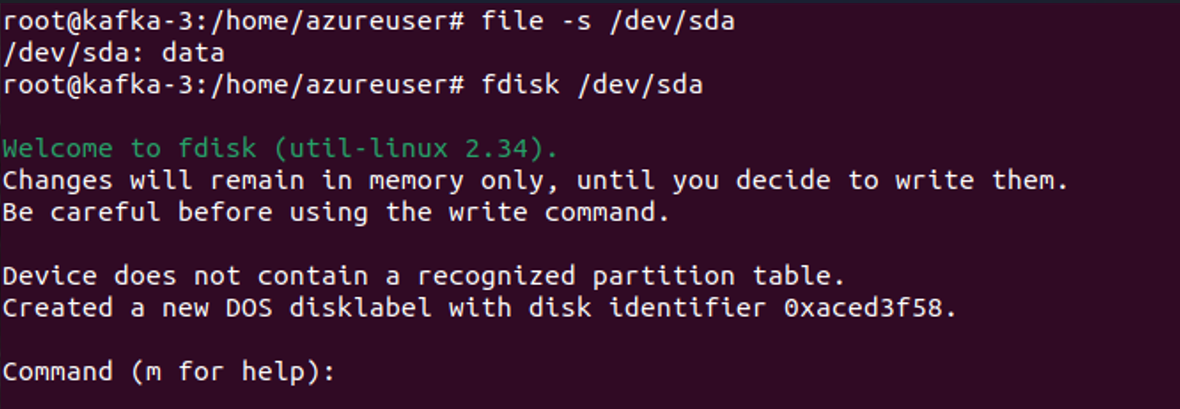
file -s /dev/sda
fdisk /dev/sda
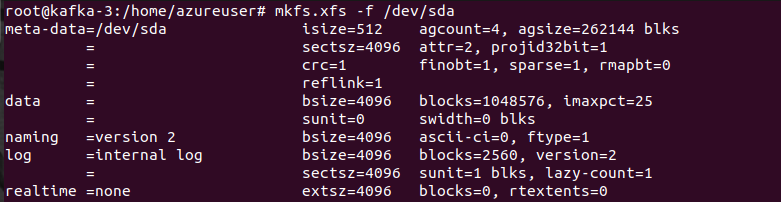
mkfs.xfs -f /dev/sda
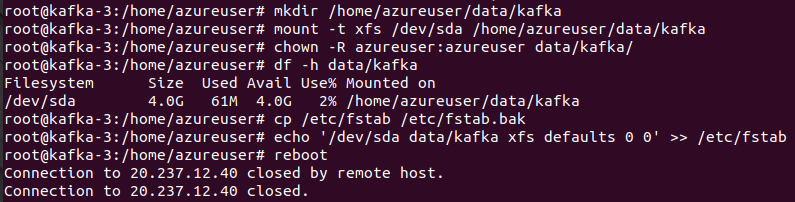
mkdir /home/azureuser/data/kafka
mount -t xfs /dev/sda /home/azureuser/data/kafka
chown -R azureuser:azureuser data/kafka/
df -h data/kafka
To ensure that the user azureuser has the necessary permissions to work with the Kafka data and configuration files, change the ownership of the ~/data/kafka directory.
sudo chown -R azureuser:azureuser ~/data/kafka
Allow all users to have a higher limit for open files (file descriptors). This can be useful for applications like Kafka, which might require a large number of open file descriptors.
echo "* hard nofile 100000
* soft nofile 100000" | sudo tee --append /etc/security/limits.conf

Reboot your system to allow your configurations to take place.
sudo reboot
Start the zookeeper service.
sudo service zookeeper start
Remove the default configuration file of Kafka.
rm config/server.properties
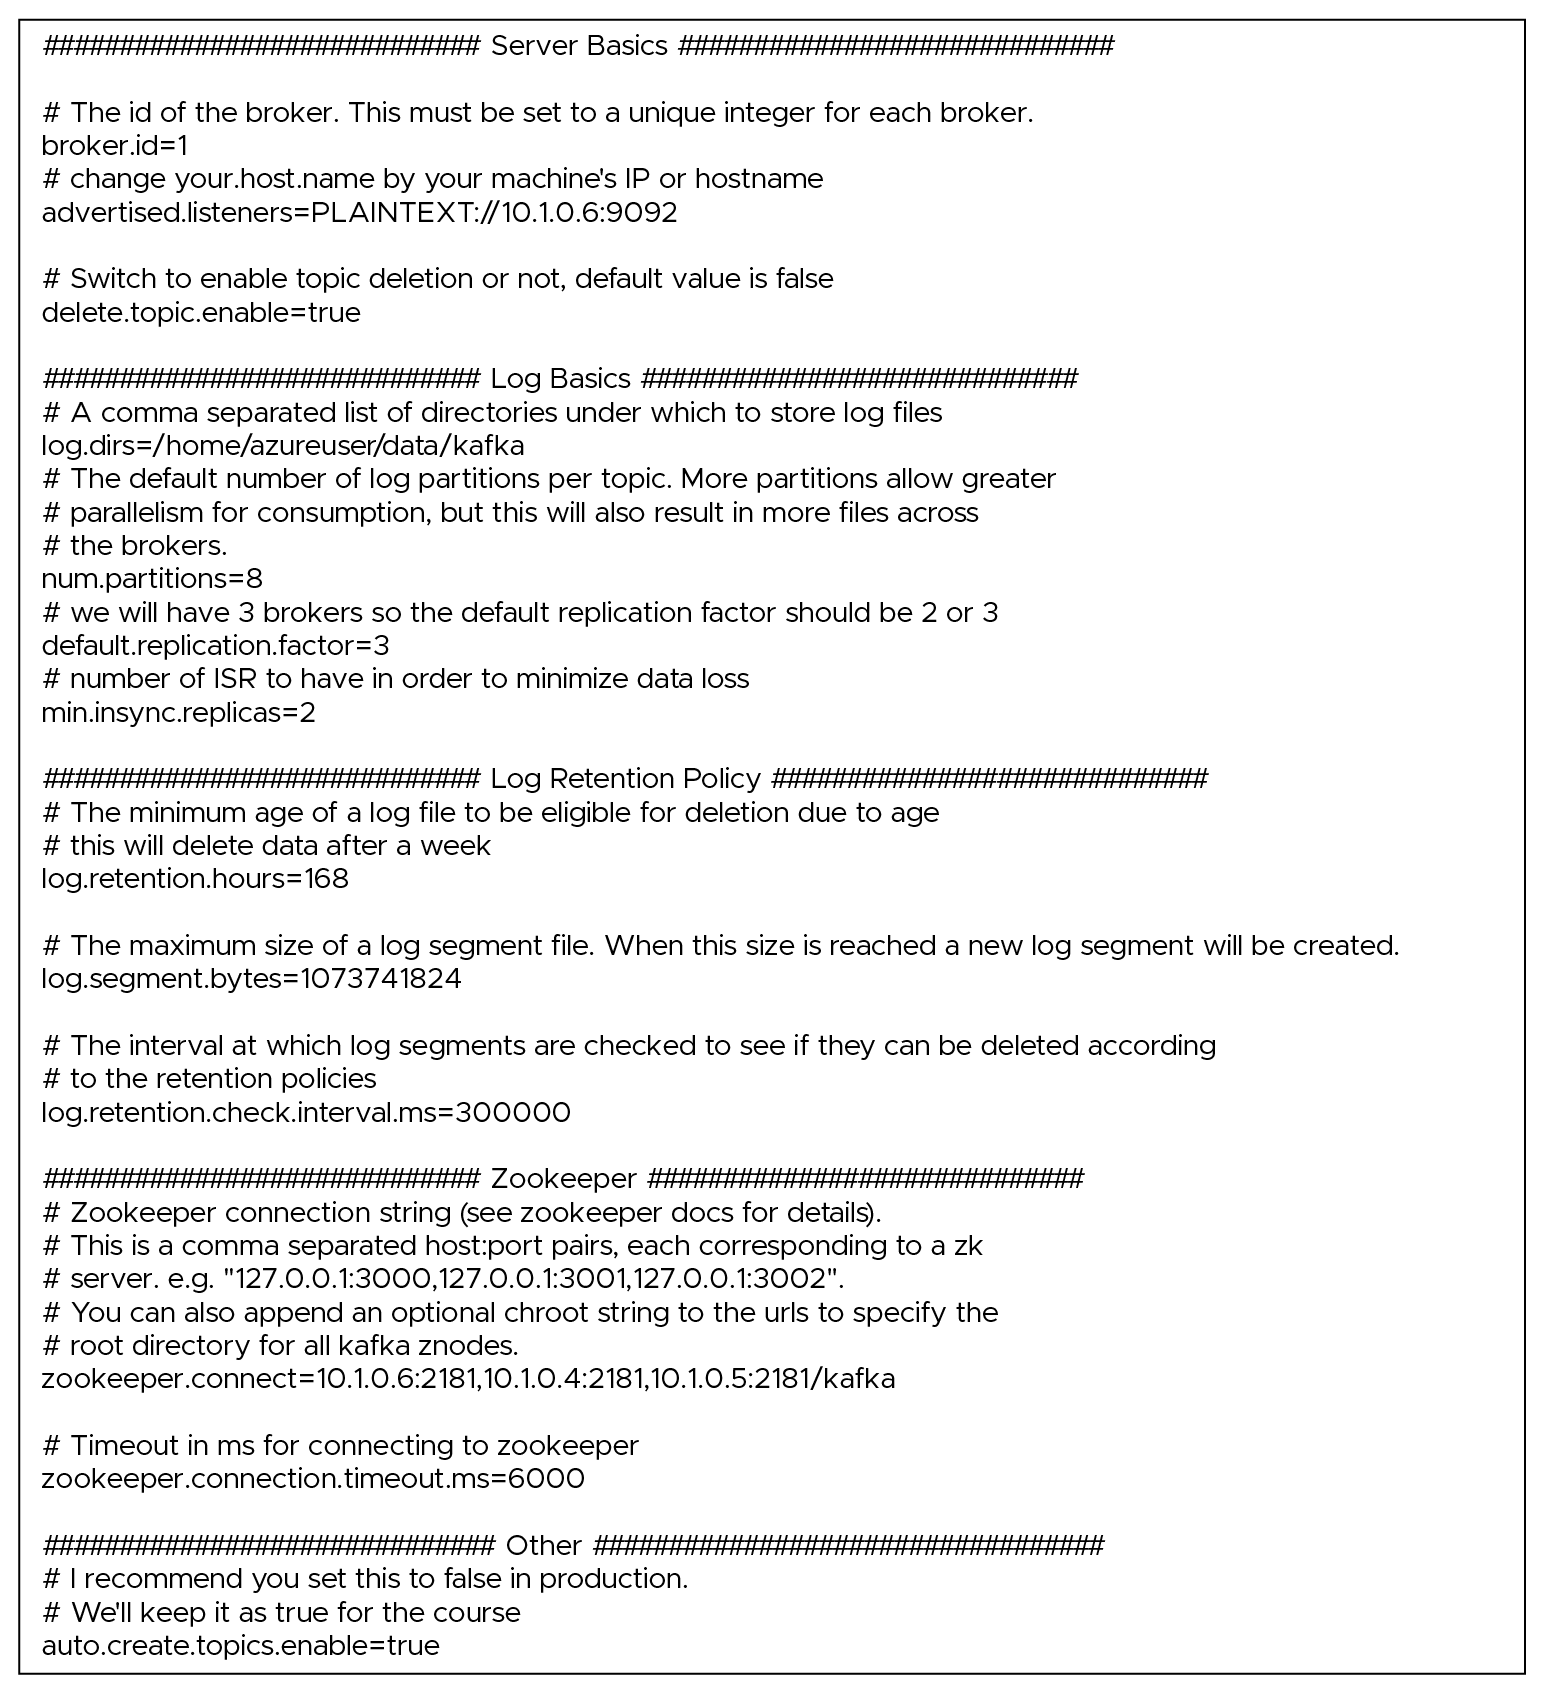
Create a new server.properties file for Kafka.
vim config/server.properties
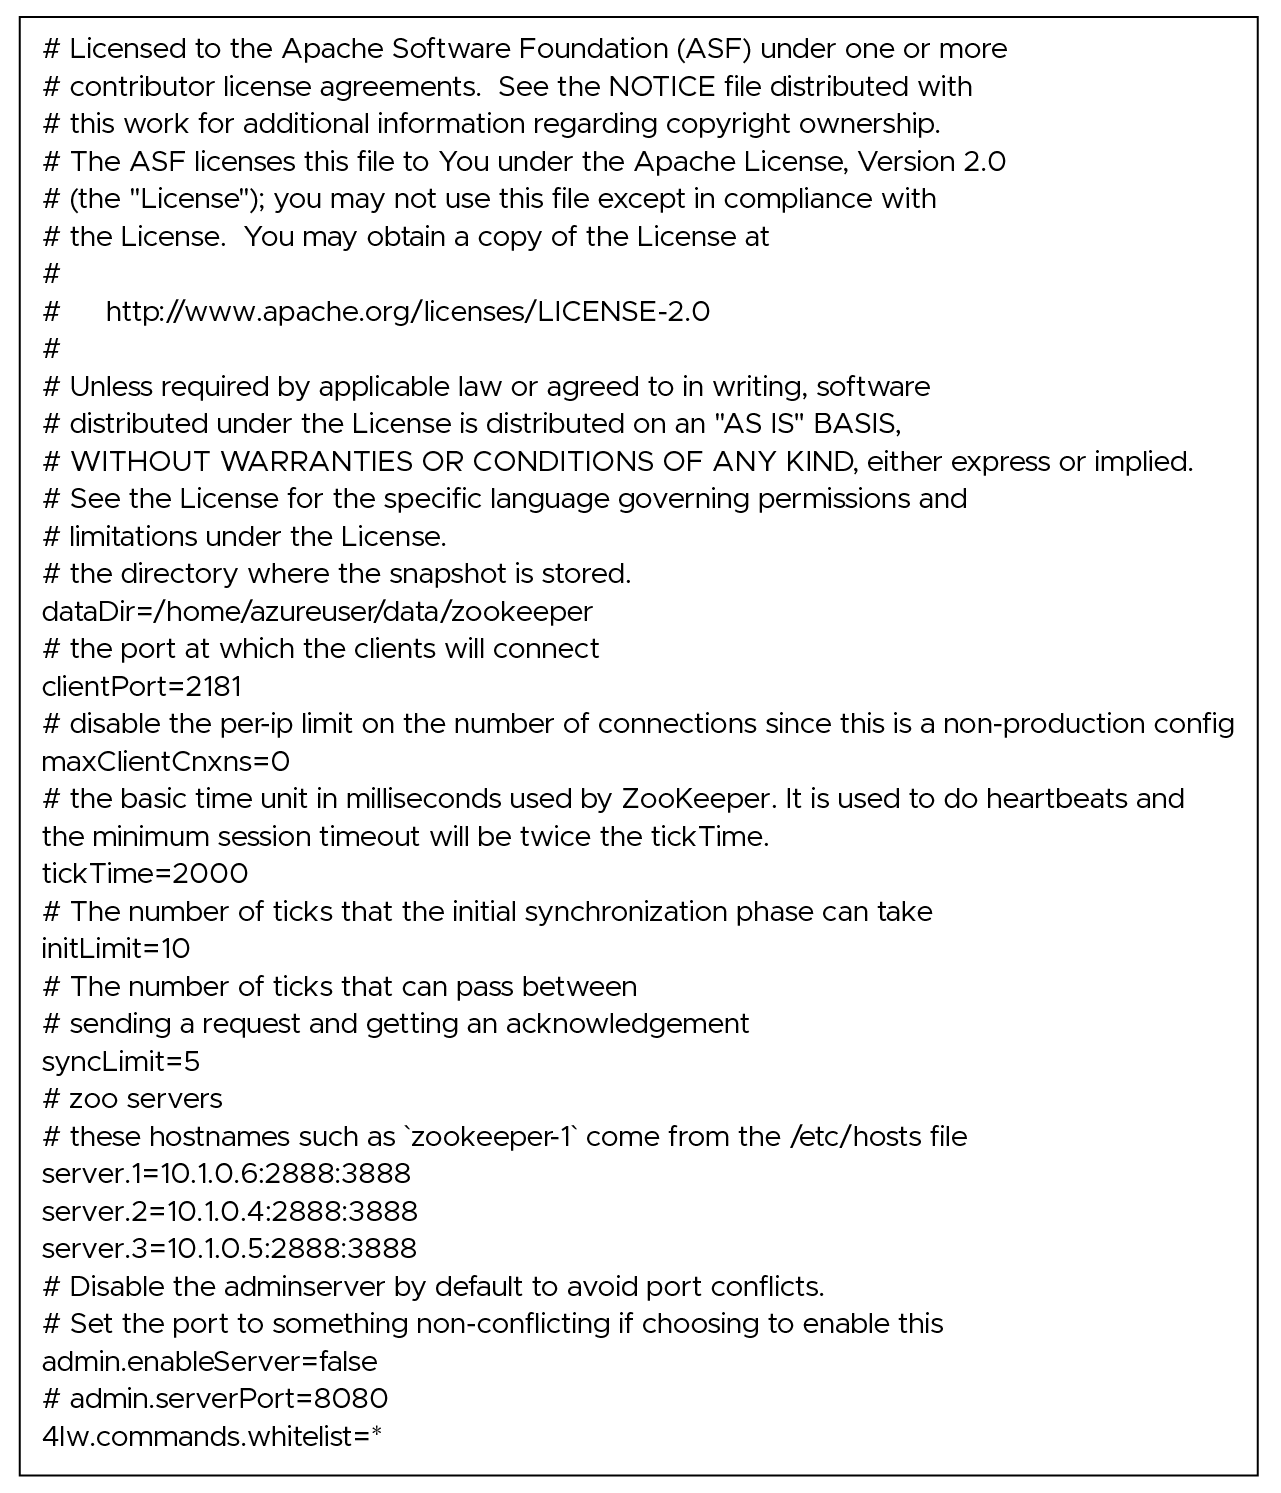
Enter the following configurations in that file:
MAKE SURE TO USE ANOTHER BROKER ID AND `advertised.listeners` IN ALL THE MEMBERS OF THE CLUSTER
Launch Kafka - make sure things look okay
bin/kafka-server-start.sh config/server.properties
Install Kafka boot scripts
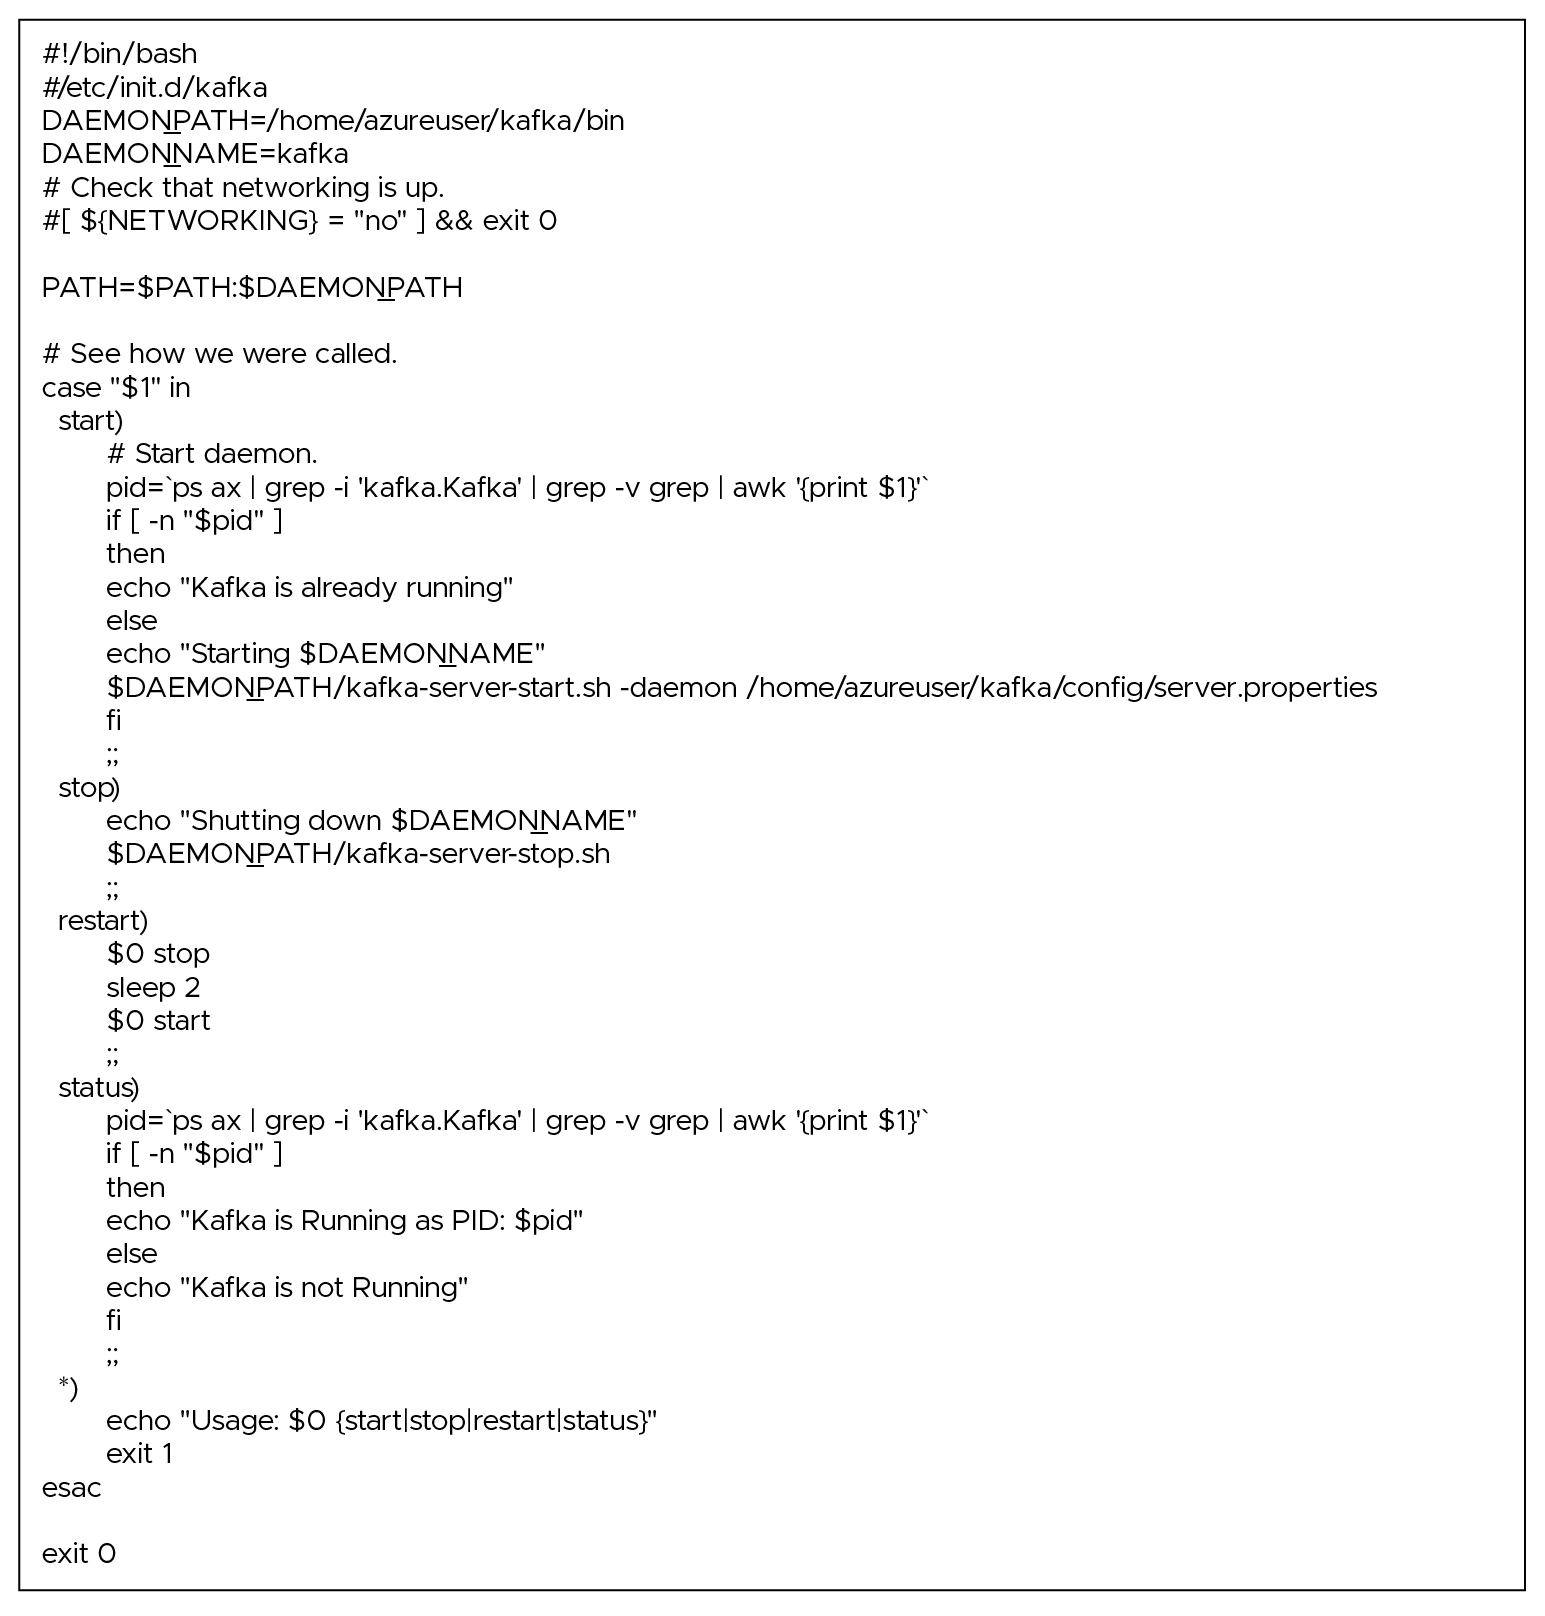
sudo vim /etc/init.d/kafka
Use the following script:
Make the /etc/init.d/kafka script executable. The system must run it as a service.
sudo chmod +x /etc/init.d/kafka
Change the ownership of the /etc/init.d/kafka script to the root user and root group.
sudo chown root: root /etc/init.d/kafka
Add the Kafka script to the default runlevels, which means that Kafka will start automatically when your system boots. The update-rc.d tool manages the symlinks in the /etc/rc*.d/ directories to control service execution during system startup and shutdown.
sudo update-rc.d kafka defaults
Start the Kafka service using the system's service management utility. Once configured and added to the default runlevels, you can start the service this way.
sudo service kafka start
Check the status of the Kafka service, indicating whether it's running, stopped, or encountering any issues.
sudo service kafka status
Verify that it is working
nc -vz localhost 9092

View the last few lines of the "server.log" file located in the "/home/azureuser/kafka/logs" directory.
tail /home/azureuser/kafka/logs/server.log

Open the zookeeper shell
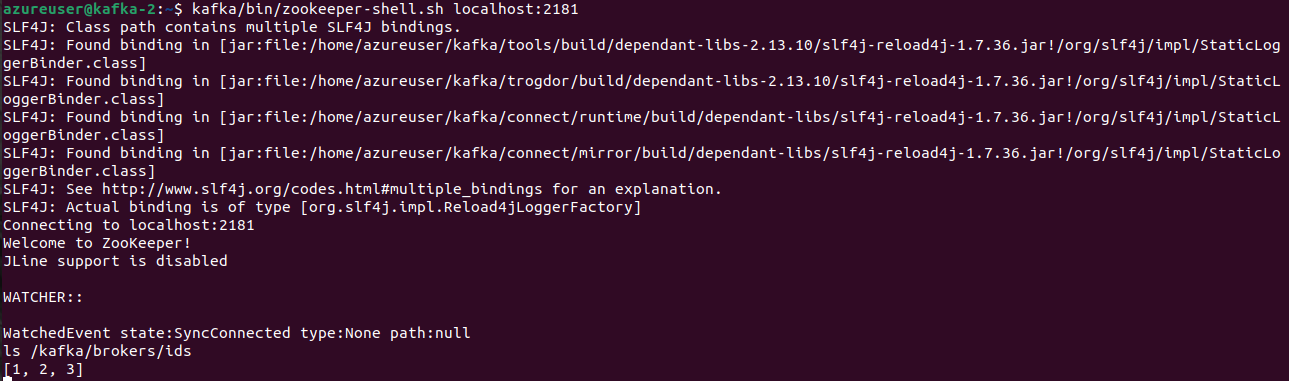
kafka/bin/zookeeper-shell.sh localhost:2181
List the children of the /kafka/brokers/ids znode, which typically stores information about Kafka broker registrations.
ls /kafka/brokers/ids
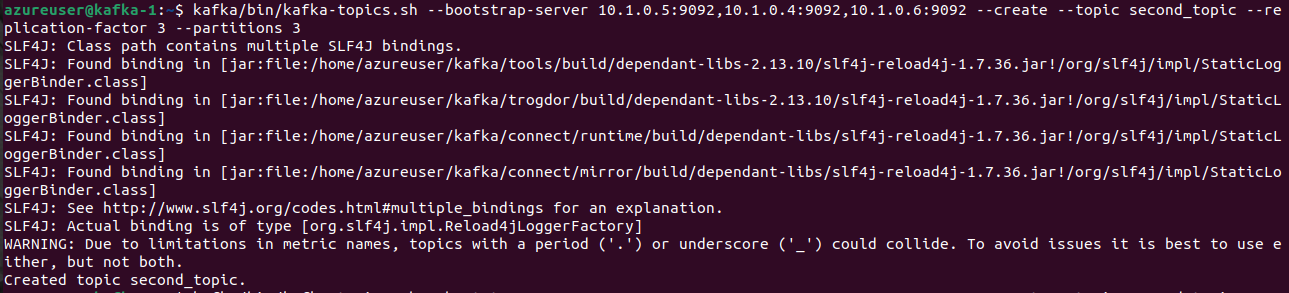
Create a topic named "second_topic" with the specified replication factor and number of partitions on your Kafka cluster.
kafka/bin/kafka-topics.sh --bootstrap-server 10.1.0.5:9092,10.1.0.4:9092,10.1.0.6:9092 --create --topic second_topic --replication-factor 3 --partitions 3
Now, list all the topics that currently exist in your Kafka cluster.
kafka/bin/kafka-topics.sh --bootstrap-server 10.1.0.5:9092,10.1.0.4:9092,10.1.0.6:9092 --list

Now delete the `second_topic`
kafka/bin/kafka-topics.sh --bootstrap-server 10.1.0.5:9092,10.1.0.4:9092,10.1.0.6:9092 --delete --topic second_topic

List all the topics again
kafka/bin/kafka-topics.sh --bootstrap-server 10.1.0.5:9092,10.1.0.4:9092,10.1.0.6:9092 --list

Note: Follow these steps on all the machines inside the Kafka cluster to check the connectivity and synchronization of data.

99% of companies saved up to 15% monthly with this plan & achieved peak performance.