Every VM with port 22 or 3389 open to the internet is a target, because automated scanners probe these ports around the clock. Azure Bastion lets your team reach VMs without exposing those ports at all. In this blog, we'll cover what Azure Bastion is, how it works, how to set it up, which SKU to choose, and how to keep costs under control.
What is Azure Bastion?
Have you ever needed to troubleshoot a VM that only has a private IP, or install dependencies on it, and had to set up a jump server first just to get in? That's where Azure Bastion comes in. Bastion is a managed Azure service that gives you RDP and SSH access to your VMs without attaching a public IP to them or building, patching, or monitoring a jump server.
You deploy Bastion into your virtual network, and it can reach every VM in that network through its private IP address. It comes in four SKUs: Developer, Basic, Standard, and Premium. You choose one based on your use case, and later in this blog we'll look at examples of which SKU suits which scenario.
How does Azure Bastion work?
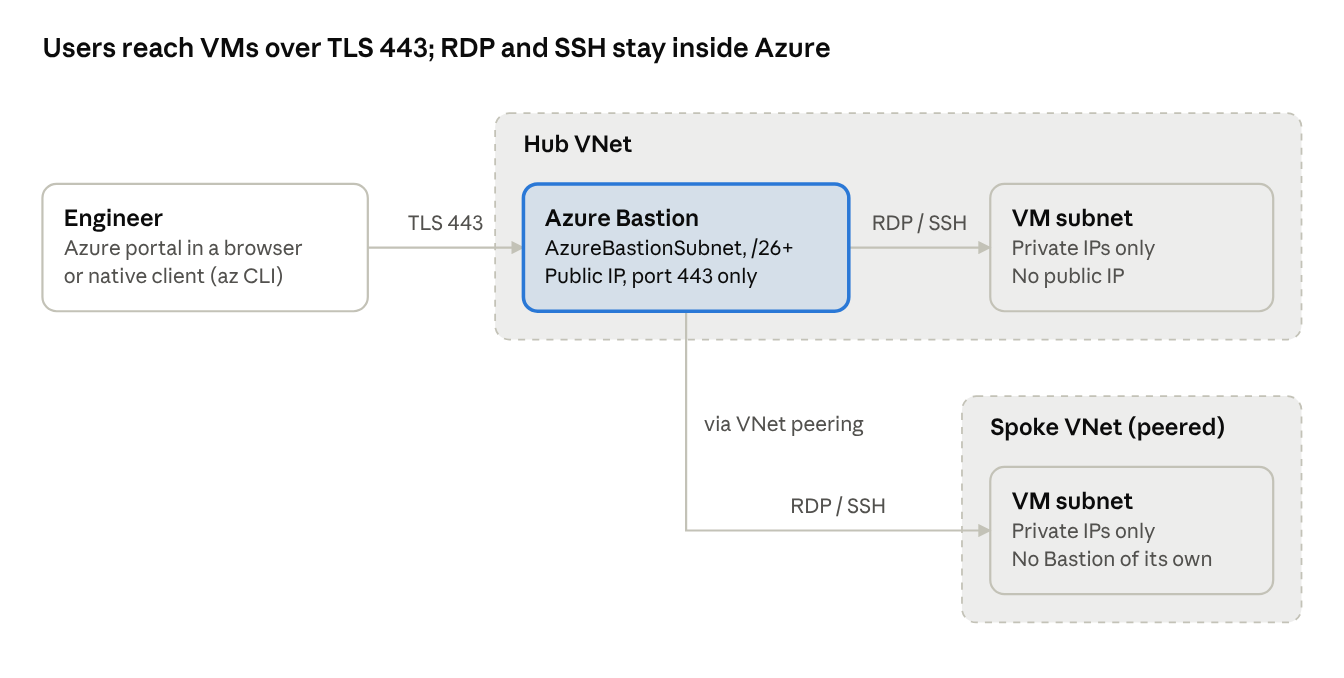
Azure Bastion is a managed service that sits between the user and the VMs in your infrastructure. Your engineers never connect to a VM directly. They connect to Bastion over TLS on port 443, and Bastion then opens the RDP (port 3389) or SSH (port 22) session to the VM's private IP address from inside your virtual network.
Figure 1: Users reach Bastion over TLS 443; Bastion reaches VMs over their private IPs, including VMs in peered spokes.
This means ports 22 and 3389 never need to be open to the internet. They only need to be reachable from inside the virtual network, which Azure's default AllowVnetInBound network security group (NSG) rule already allows:
Figure 2: Default inbound NSG rules. AllowVnetInBound (priority 65000) lets Bastion reach the VM on ports 22 and 3389 from inside the VNet.
Note: If you've added your own NSG rules that block port 22 or 3389 inside the virtual network, allow them from the AzureBastionSubnet address range. This applies to both browser and native-client connections. Never open these ports to the internet.
One major benefit of Bastion is that it supports hub-and-spoke architecture. You deploy one Bastion in a single virtual network (the hub), and it serves every VM in its own virtual network and in every peered virtual network. That includes virtual networks in other regions and in other subscriptions of the same tenant. To reach peered networks, you need the Basic SKU or higher.
How to set up your Bastion host in 10 minutes?
If you already have a virtual network with a VM in it, you can have Bastion running in about 10 minutes. Most of that time is Azure deploying the host while you wait.
Prerequisites
A dedicated subnet named exactly AzureBastionSubnet, with a size of /26 or larger. You need it for the Basic, Standard, and Premium SKUs. If it doesn't exist yet, you can create it from the Create a Bastion page.
A Standard public IP address, which users reach on port 443. You can create it during setup. The Premium SKU can also run private-only, with no public IP, for teams that connect over VPN or ExpressRoute.
Permissions. Users who connect need the Reader role on the VM, on its network interface, and on the Bastion resource.
Portal steps to create your own Bastion host
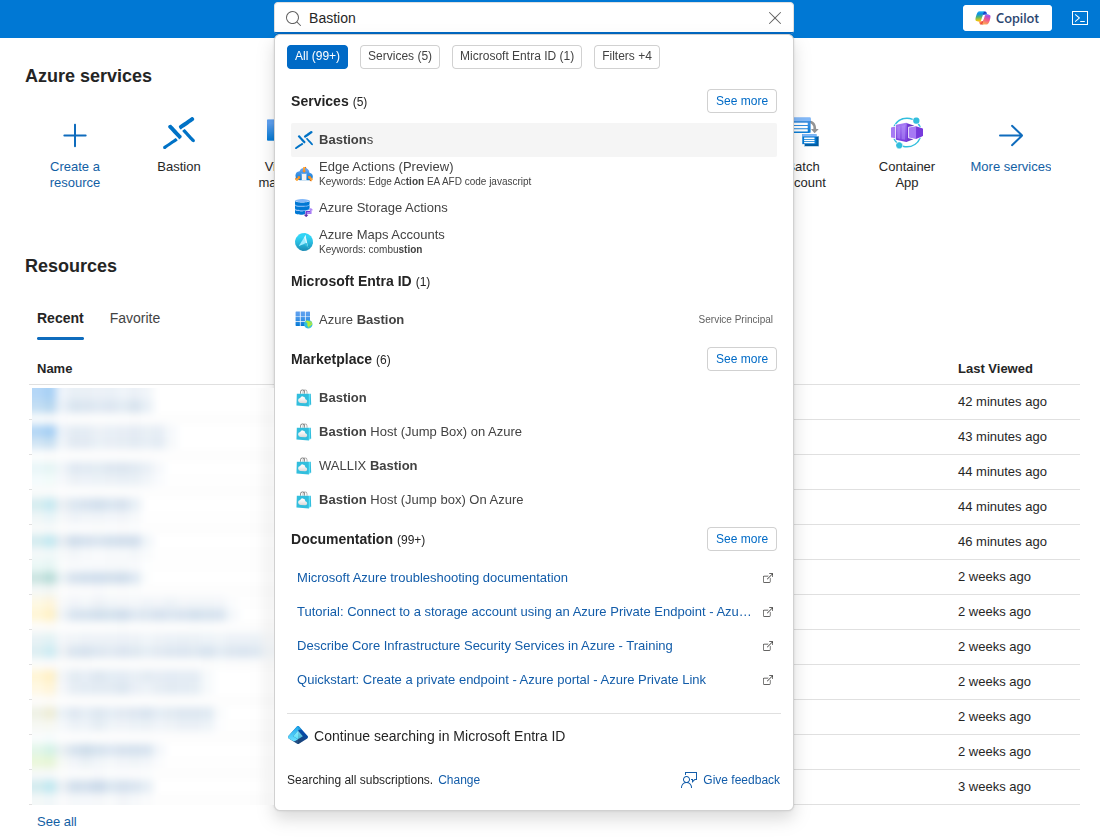
Open the Azure portal, type Bastions in the search bar, and select Bastions under Service
Figure 3: Search for "Bastions" in the Azure portal.
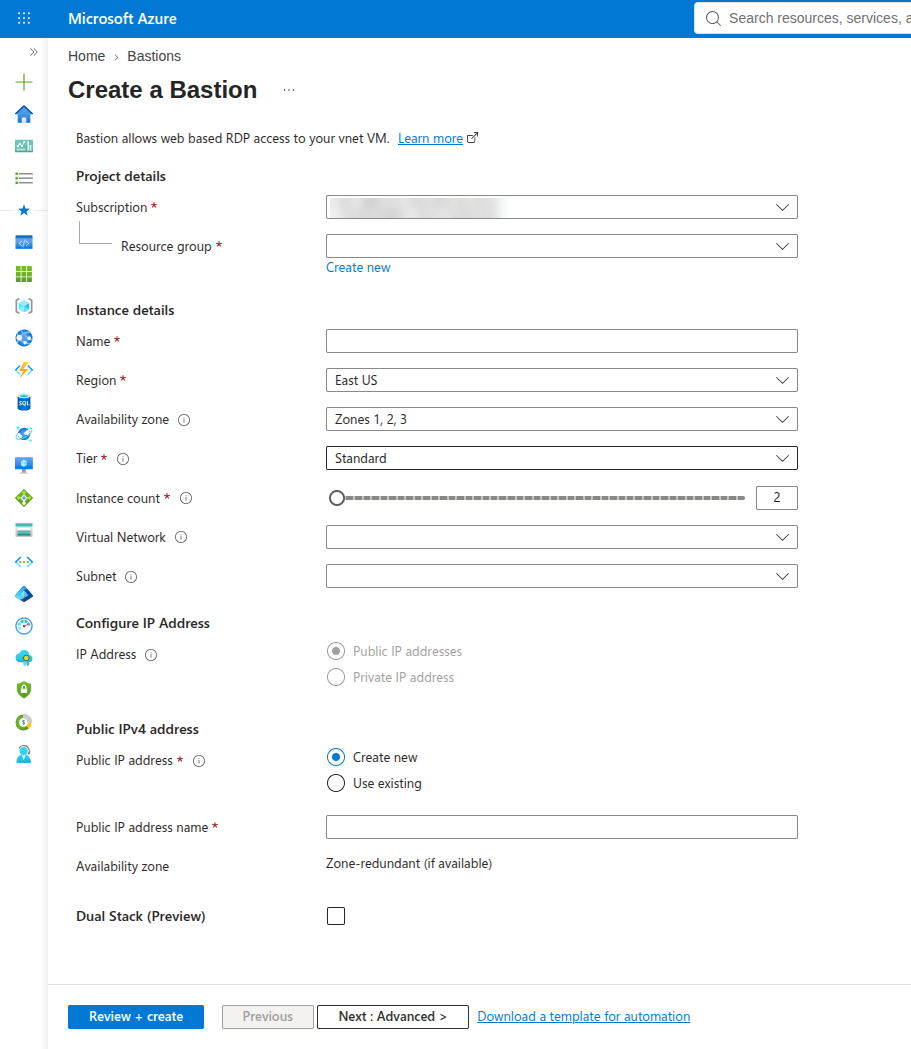
Select Create, then fill in the details: subscription, resource group, name, region, tier (SKU) and instance count (the number of Bastion instances you need). Make sure you select the correct virtual network and the AzureBastionSubnet subnet.
Figure 4: The Create a Bastion page.
Under Public IPv4 address, select Create new and give the IP a name.
Optionally, open the Advanced tab to turn on features such as native client support, IP-based connection or shareable links (Standard and Premium). Turn on only what you need.
Select Review + create, then Create. Deployment takes about 10 minutes.
To connect, open your VM, select Connect > Bastion, enter your credentials, and select Connect. The session opens in a new browser tab.
If the VM has a public IP, remove it. Bastion connects over the private IP, so the public IP is now the only attack surface.
And voila: your Bastion is ready to serve your VMs.
Connection methods: how you connect to a VM using Bastion
Azure Bastion supports several ways to connect:
Browser-based connections. You connect to the VM from the Azure portal, using an HTML5 web client in your browser. This works with every SKU, and you don't need any extra software.
Native client connections. You connect with the SSH or RDP client already installed on your own computer, through the Azure CLI (az network bastion ssh, rdp, or tunnel). This method also supports Microsoft Entra ID sign-in and file transfer. Available on Standard and Premium.
IP-based connection. You connect to a machine by its private IP address instead of selecting the Azure VM. This also works for on-premises servers reachable over ExpressRoute or a site-to-site VPN. Available on Standard and Premium.
Shareable links. You create a link that lets someone connect to a specific VM without access to the Azure portal, which is handy for vendors or contractors. Links can be set to expire. Available on Standard and Premium. Current limitations: links don't work across tenants, over Virtual WAN, or for on-premises VMs.
When should you use Azure Bastion?
You can use Bastion when you find yourself in any of the following situations:
You want your VMs to have no public IP, with ports 22 and 3389 closed to the internet.
You want to replace a self-managed jump server that you have to patch and monitor.
Several engineers need to connect to VMs at the same time (Basic SKU and above).
Vendors or contractors need temporary access to a specific VM. Shareable links (Standard and Premium) can be set to expire.
You spin up VMs for dev/test labs that need connectivity but no public IPs.
Choosing among the SKUs
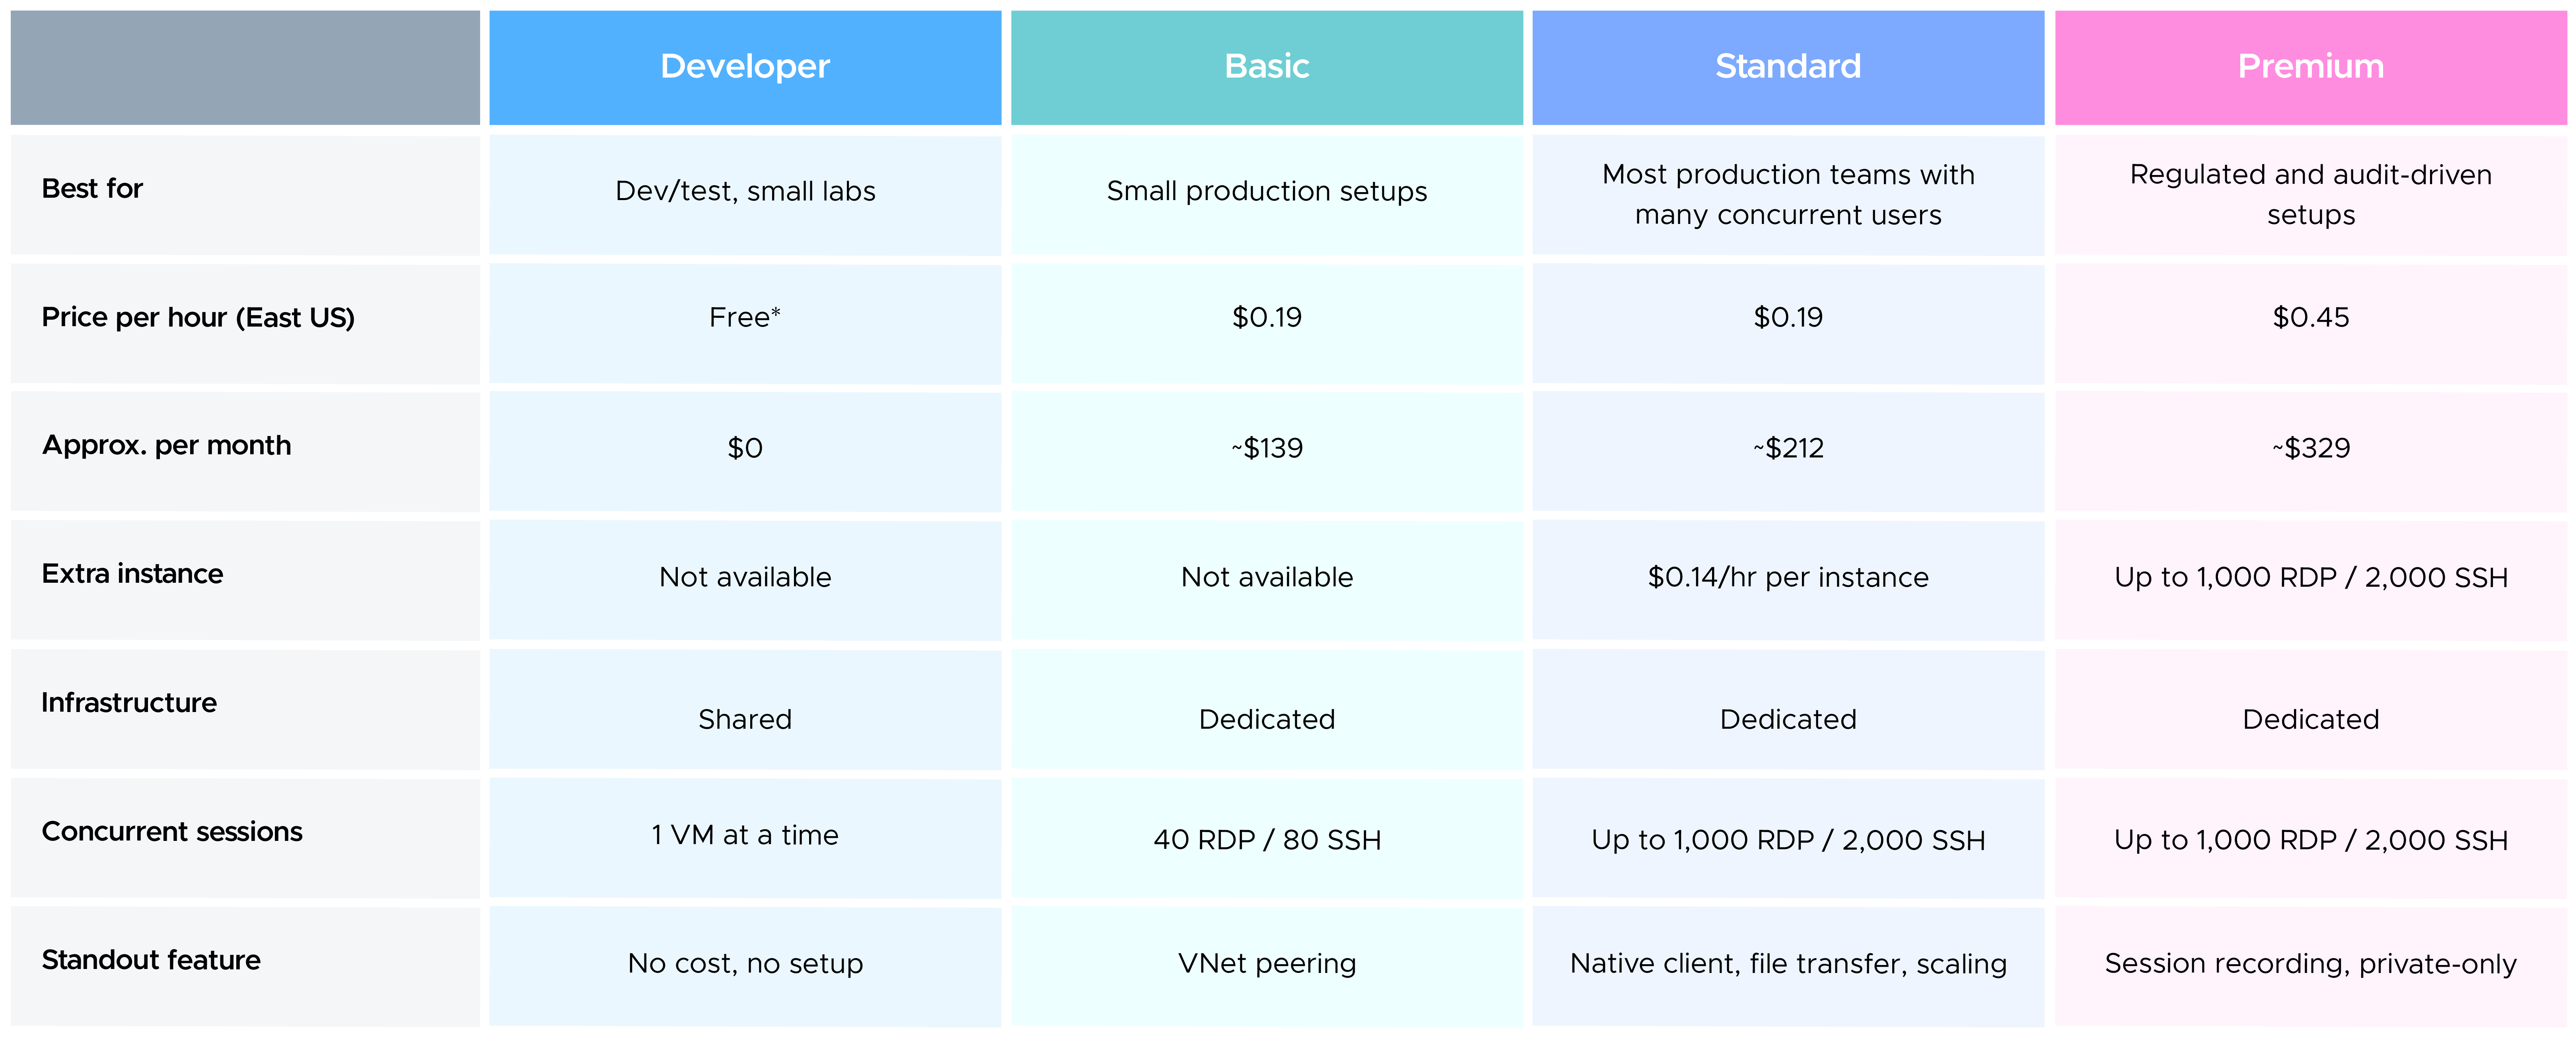
The following table lists the four SKU tiers and some of their features for comparison:
Pay-as-you-go list prices for East US as of October 2026, for the base host (2 instances on Basic, Standard and Premium) and 730 hours a month. *Developer is free but only available in select regions, and East US isn't one of them. Check the Azure Bastion pricing page for your region.
Choose Developer for a quick dev/test lab or experiments. It's free, but it connects to one VM at a time, has no VNet peering, and is available only in select regions. You deploy it from the VM's or virtual network's Connect > Bastion pane, or with the Azure CLI.
Choose Basic for production when several people need to connect at the same time, or you need to reach VMs in peered VNets, but you don't need extra features like native client support or session recording.
Choose Standard when you need host scaling, connections from your own computer (native client), file transfer, IP-based connection, or shareable links.
Choose Premium when you need everything in Standard plus session recording or a private-only deployment with no public IP.
Choose carefully. If you pick Standard or Premium when you don't need them, your bill grows quickly: Premium alone costs about $117 a month more per host than Standard at East US list prices. Billing starts the moment you deploy, and while you can upgrade a SKU later, you can't downgrade without deleting and recreating the Bastion host. So start with the lowest tier that meets your needs, and move up when a real need appears.
Now for the most important part. We've covered what Bastion is, why to use it, how it works and the different SKUs, so let's look at how pricing works beyond the hourly charge and how to optimize it. A Bastion bill has two parts:
Hourly SKU charge. Billing starts the moment you deploy Bastion and runs until you delete it, whether anyone connects or not. Standard and Premium include two instances in the base price, and each extra instance costs less than the base host ($0.14/hr on Standard, $0.22/hr on Premium).
Outbound data transfer. Data sent from Bastion to your computer is billed per GB after the first 5 GB each month, which is free. In East US it's $0.087/GB up to 10 TB. Data coming in is free.
There are no reservations or savings plans for Bastion, so the savings come from how you design and run it. Follow these practices:
Use one Bastion in the hub instead of one per VNet. Basic and above can reach VMs in peered virtual networks, so a single host can serve your whole hub-and-spoke network. See the example below.
Use the free Developer SKU for dev/test where your region supports it.
Delete dev/test Bastion hosts once you're done with them. If you leave them running, you pay for them whether you use them or not.
Delete and redeploy if you only need Bastion for a few hours a day. A new Bastion host takes about 10 minutes to deploy, and you save every idle hour. For example, a Standard host used only 10 hours a day on 22 working days saves about $148 a month, around 70%.
Reduce the instance count on Standard and Premium if you don't need it. Check peak sessions first with the Session Count metric in Azure Monitor; each instance handles about 20 RDP and 40 SSH sessions.
Don't pay for Premium unless you need it. It costs 55% more than Standard, so choose it only for session recording or private-only deployment.
Clean up public IPs left over after deleting a Bastion host. Each Standard public IP costs about $3.65 a month for as long as it exists.
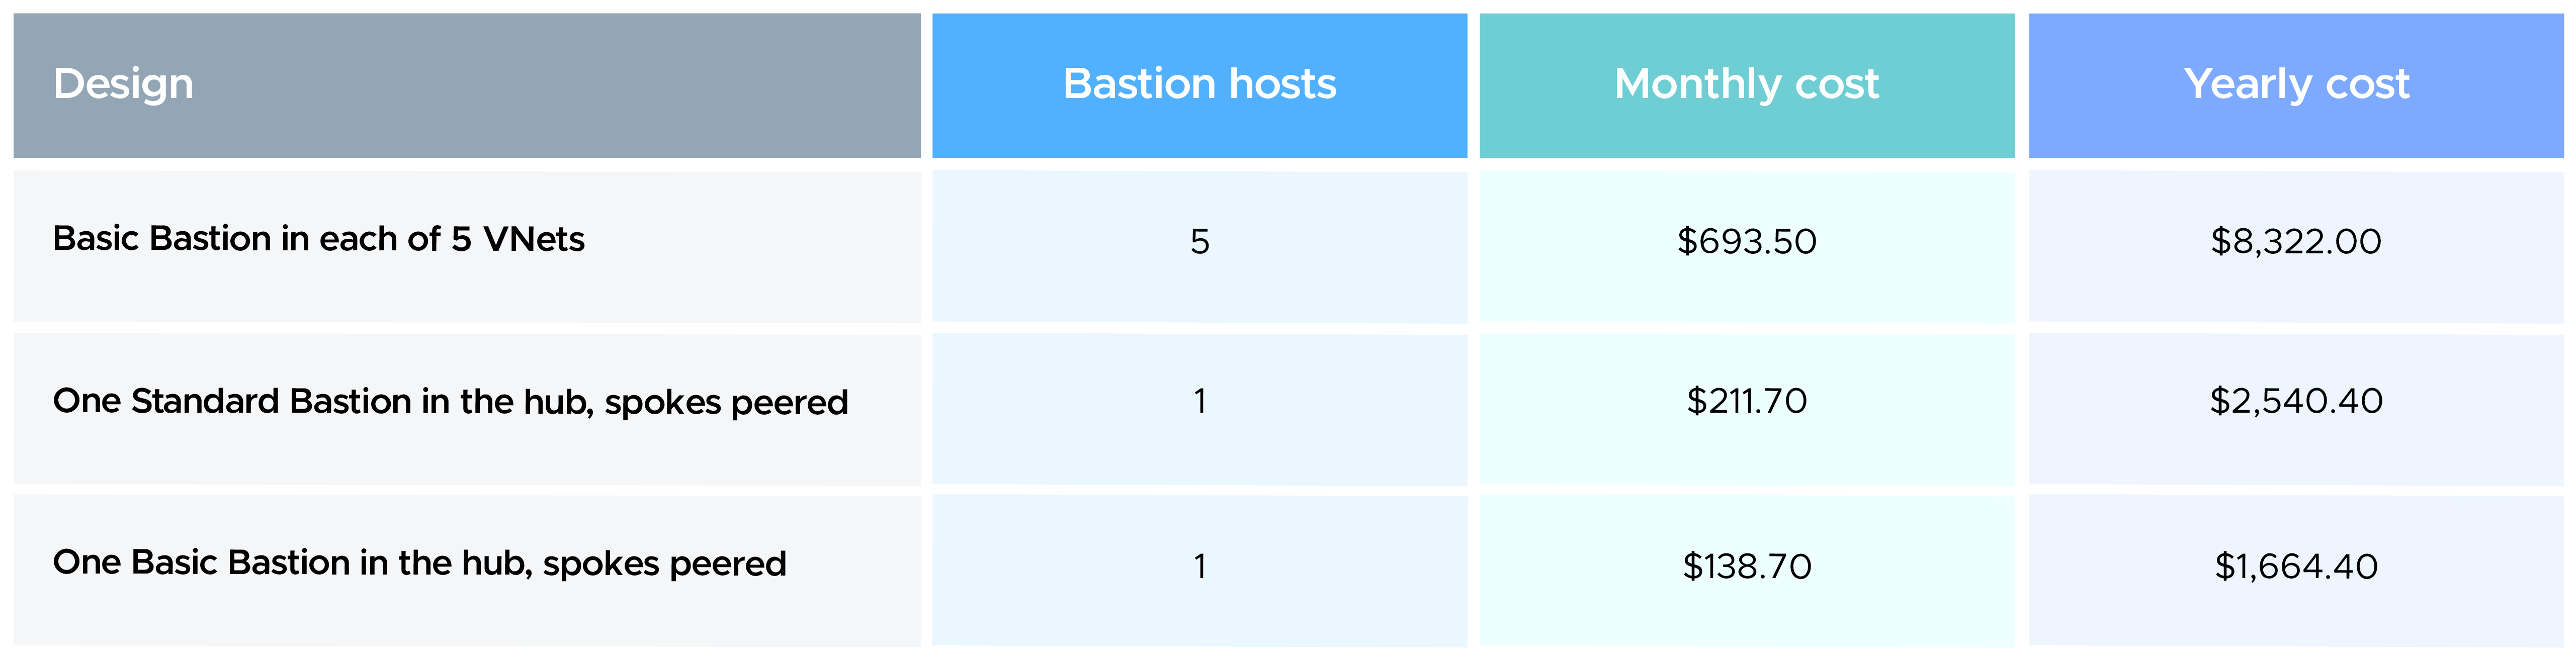
Example: one hub instead of five Bastions
A company has a hub-and-spoke network with five VNets, each running its own Basic Bastion. Here's what consolidating into the hub does to the bill (East US list prices): Consolidating on one Basic host cuts the bill by 80%, about $6,660 a year. Even upgrading the hub host to Standard for native-client access saves about $5,780 a year.
Security best practices
Bastion removes the open ports, but a few settings decide how secure your access really is:
Allow ports 22 and 3389 on your VM subnets only from the AzureBastionSubnet range, never from the internet.
Give users least-privilege access. Reader on the VM, its network interface, and the Bastion resource is enough to connect.
Sign in with Microsoft Entra ID instead of local passwords where you can.
Turn off features you don't use, such as shareable links, and disable copy/paste for sensitive environments (Standard and Premium).
Send Bastion's audit logs to Log Analytics so you know who connected to which VM and when. On Premium, turn on session recording if auditors need it.
Conclusion
If you need quick, secure access to VMs without public IPs, Azure Bastion is the go-to service. There's no jump server to build or maintain: a few clicks and about 10 minutes later, you can connect to your VMs from the browser or your own terminal.
To get the most from it, pick the lowest SKU that meets your needs, deploy one Bastion in your hub instead of one per VNet, and review your hosts regularly so you don't pay for Bastions nobody uses.
Be the first to know the latest FinOps insights and news!
You may also like
Proven AI FinOps strategies to optimize spending across your entire AI stack.
Piyush helps enterprises get more value from their cloud spend, specializing in Azure and combining FinOps practice with an engineering-first approach to automate cost analysis and deliver sa
FOUND THIS USEFUL? SHARE IT
No Comments Yet
Leave a Comment
Related Resources
Certified. Trusted. Industry Recognized.
Stop paying for cloud tools. Start paying for outcomes.