

Senior Devops Engineer
Neetesh specializes in designing, automating, and managing scalable DevOps pipelines across cloud-native infrastructures.
12 Jun, 2026 | 8 Min read

This article is part of a five-blog series where we share a real client use case — how we reimagined their cloud infrastructure strategy with Crossplane, GitOps, and a hybrid approach with Terraform.
Missed earlier posts? Start with Blog 1 – Why We Looked Beyond Terraform and Blog 2 – Designing a Hybrid Crossplane Architecture.
Bridging from Blog 2
In Blog 1, we shared why Terraform started showing cracks at scale — state chaos, drift, and slow ephemeral environments.
In Blog 2, we designed a hybrid model where Terraform built the stable runway and Crossplane, guided by GitOps, flew agile on top.
But design on paper is one thing. Running it in production was another challenge altogether.
The client’s biggest fear was clear: “Don’t break prod.”
With 50+ cloud microservices already serving millions of requests, we couldn’t afford downtime. So we approached onboarding step by step: install Crossplane carefully, create new infra safely, and adopt existing AWS resources without disruption.
Takeaway: Blogs 1 & 2 built the case and the blueprint. Blog 3 is about making it real — without breaking production.
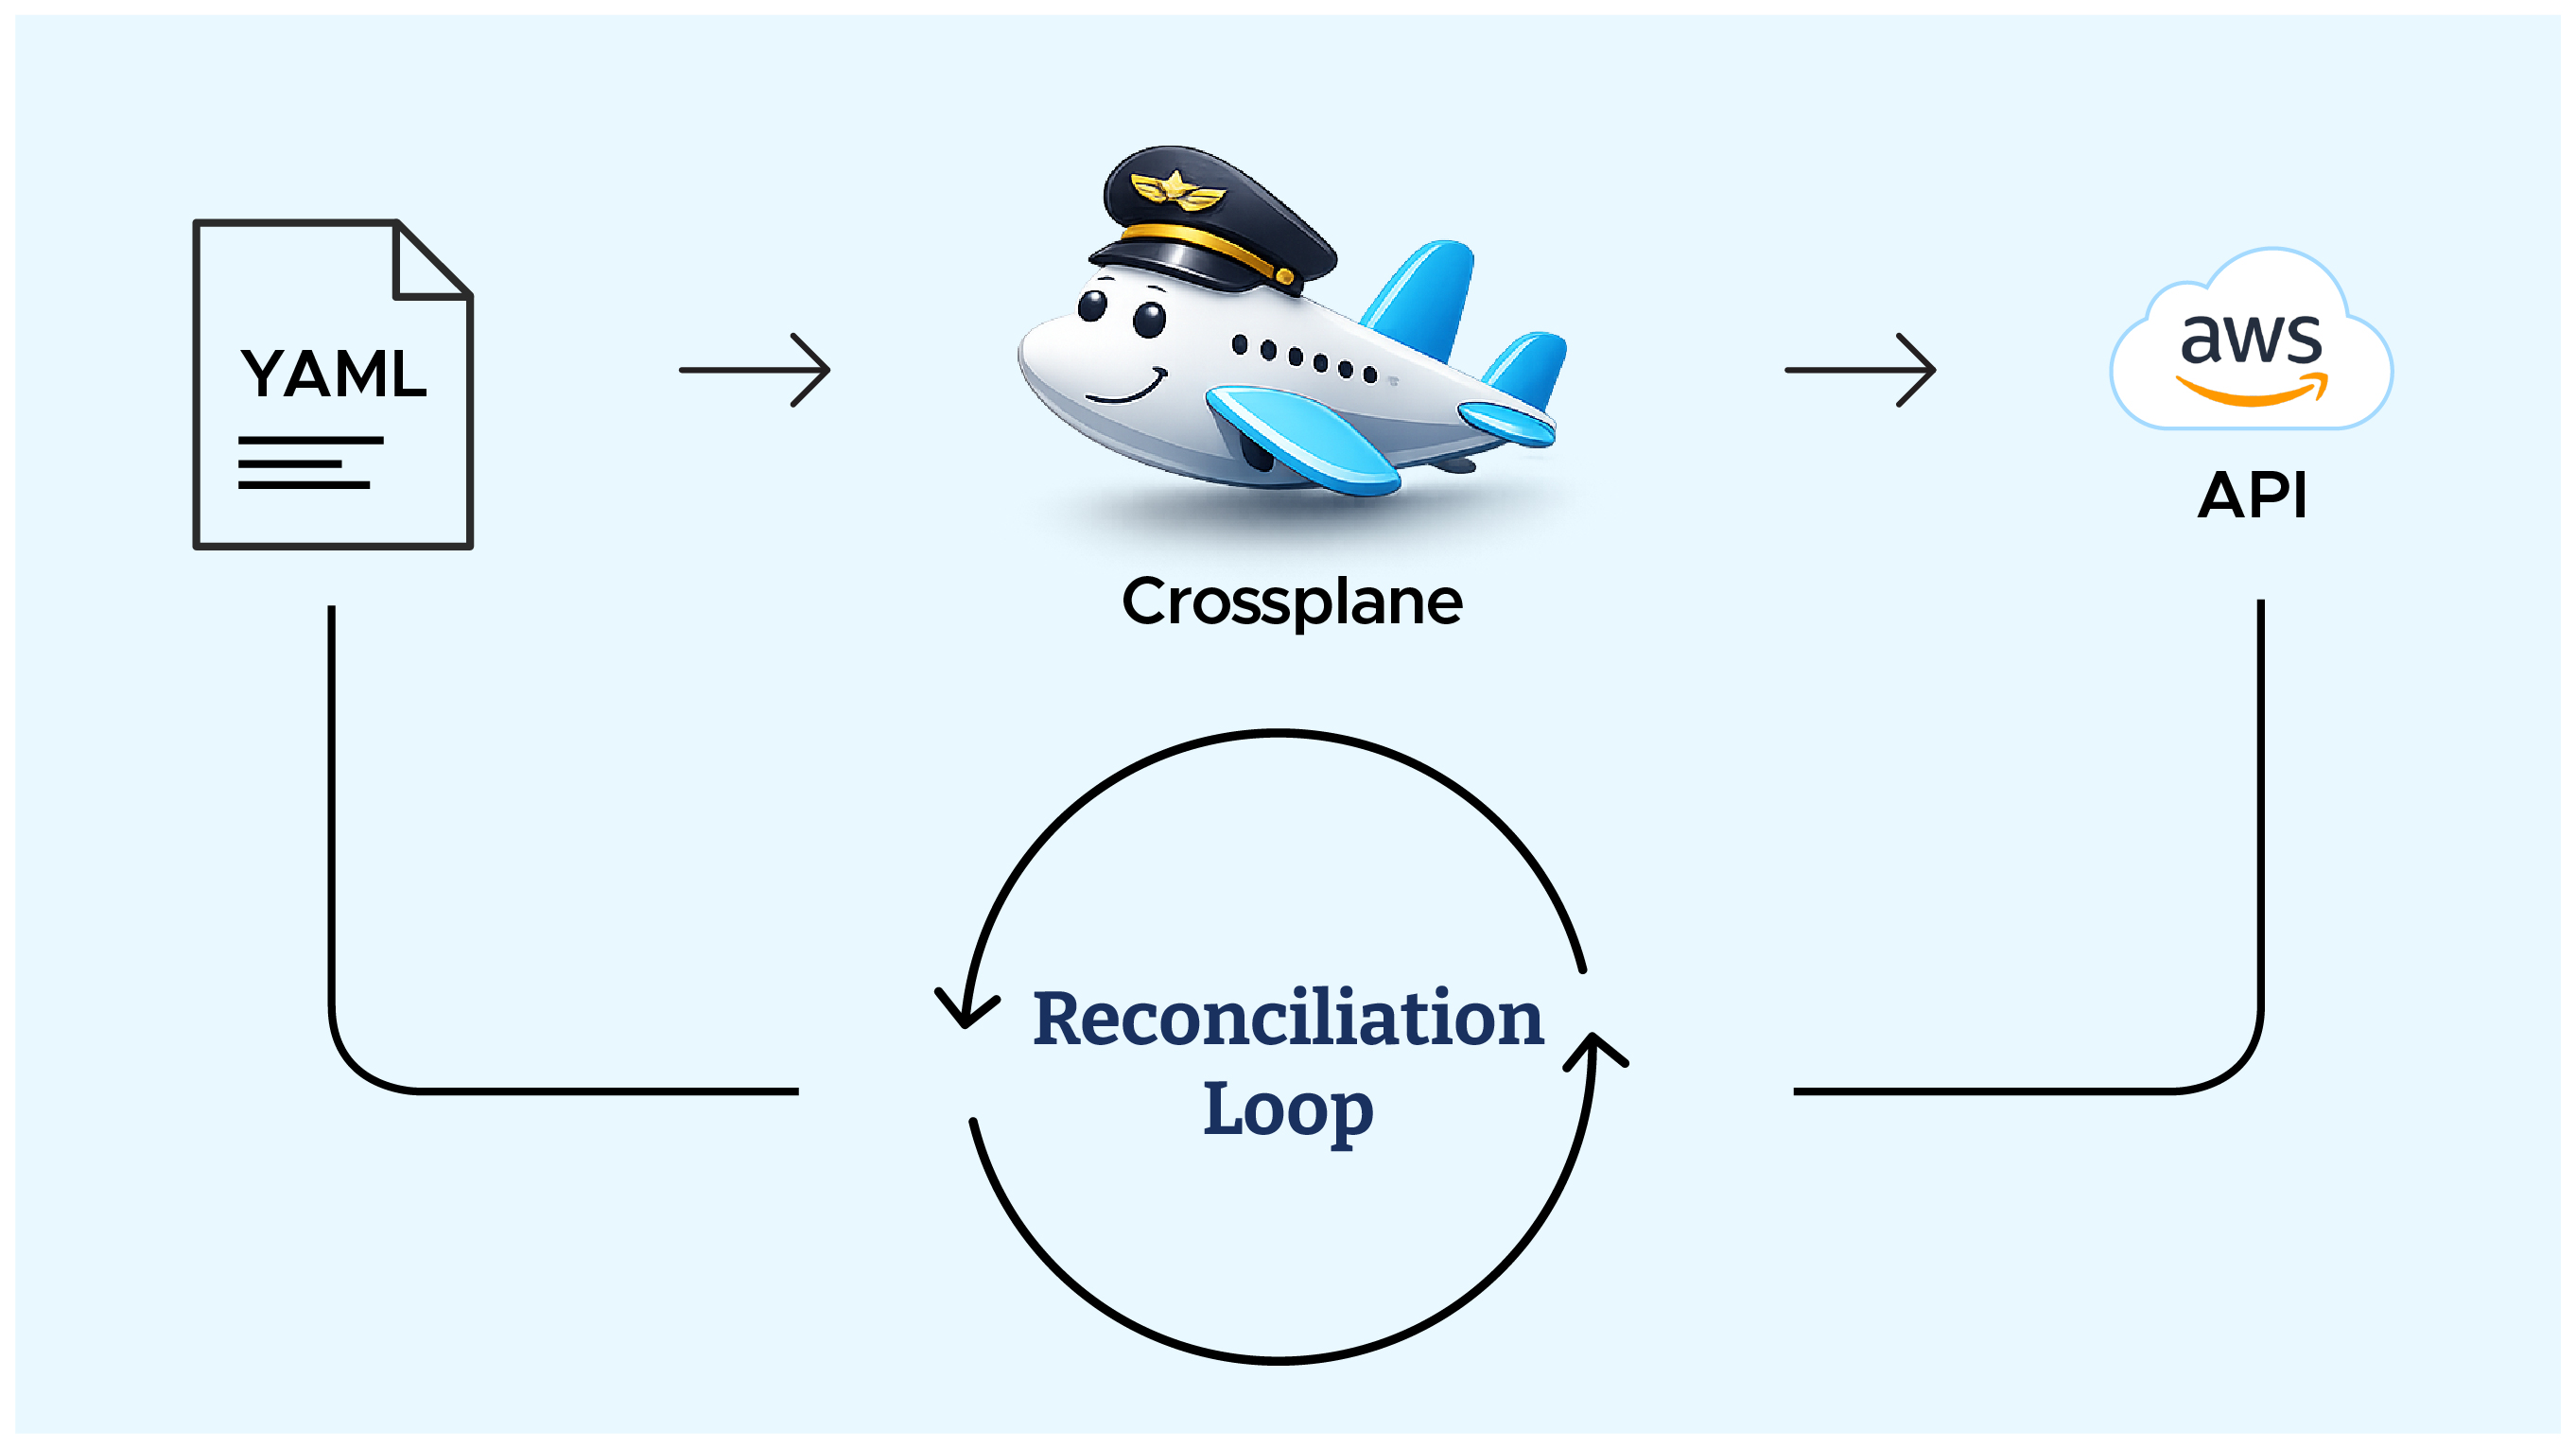
Before diving into installation, let’s recap how Crossplane actually works in production.
Unlike Terraform’s fire-and-forget model, Crossplane doesn’t just build infra and stop. It continuously babysits resources — watching for drift, fixing mismatches, and making sure infra always matches what’s declared in Git.
For a platform team nervous about importing live AWS resources, this was reassuring: Crossplane wouldn’t “recreate” or “overwrite” unless we explicitly told it to. Instead, it would adopt existing resources and keep them in sync.
In simple terms:
Takeaway: Crossplane does for cloud infra what Kubernetes does for pods — always on, always in sync.
To understand how Crossplane talks to AWS, you need to know its building blocks:
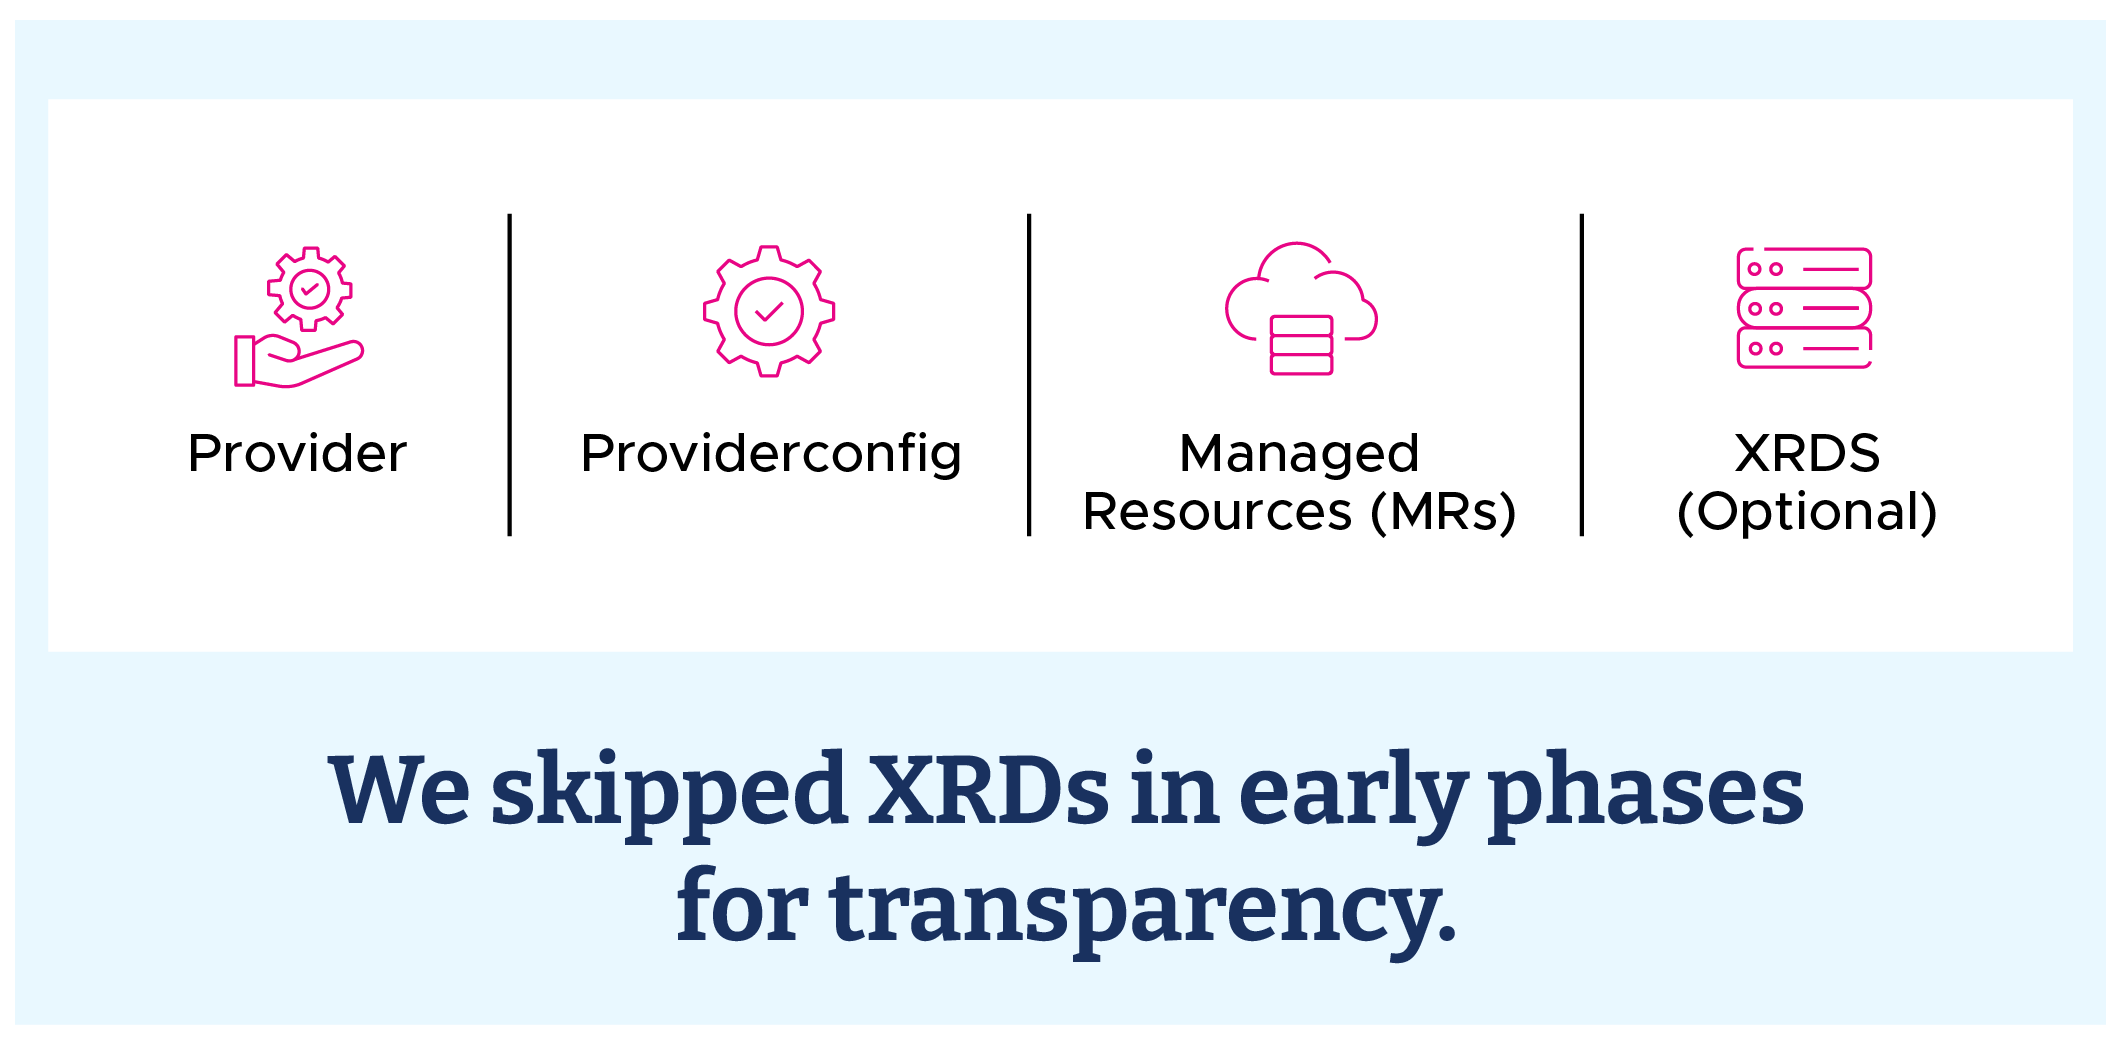
Takeaway: Providers connect, MRs define, XRDs abstract. Start raw, then layer abstractions as needed.
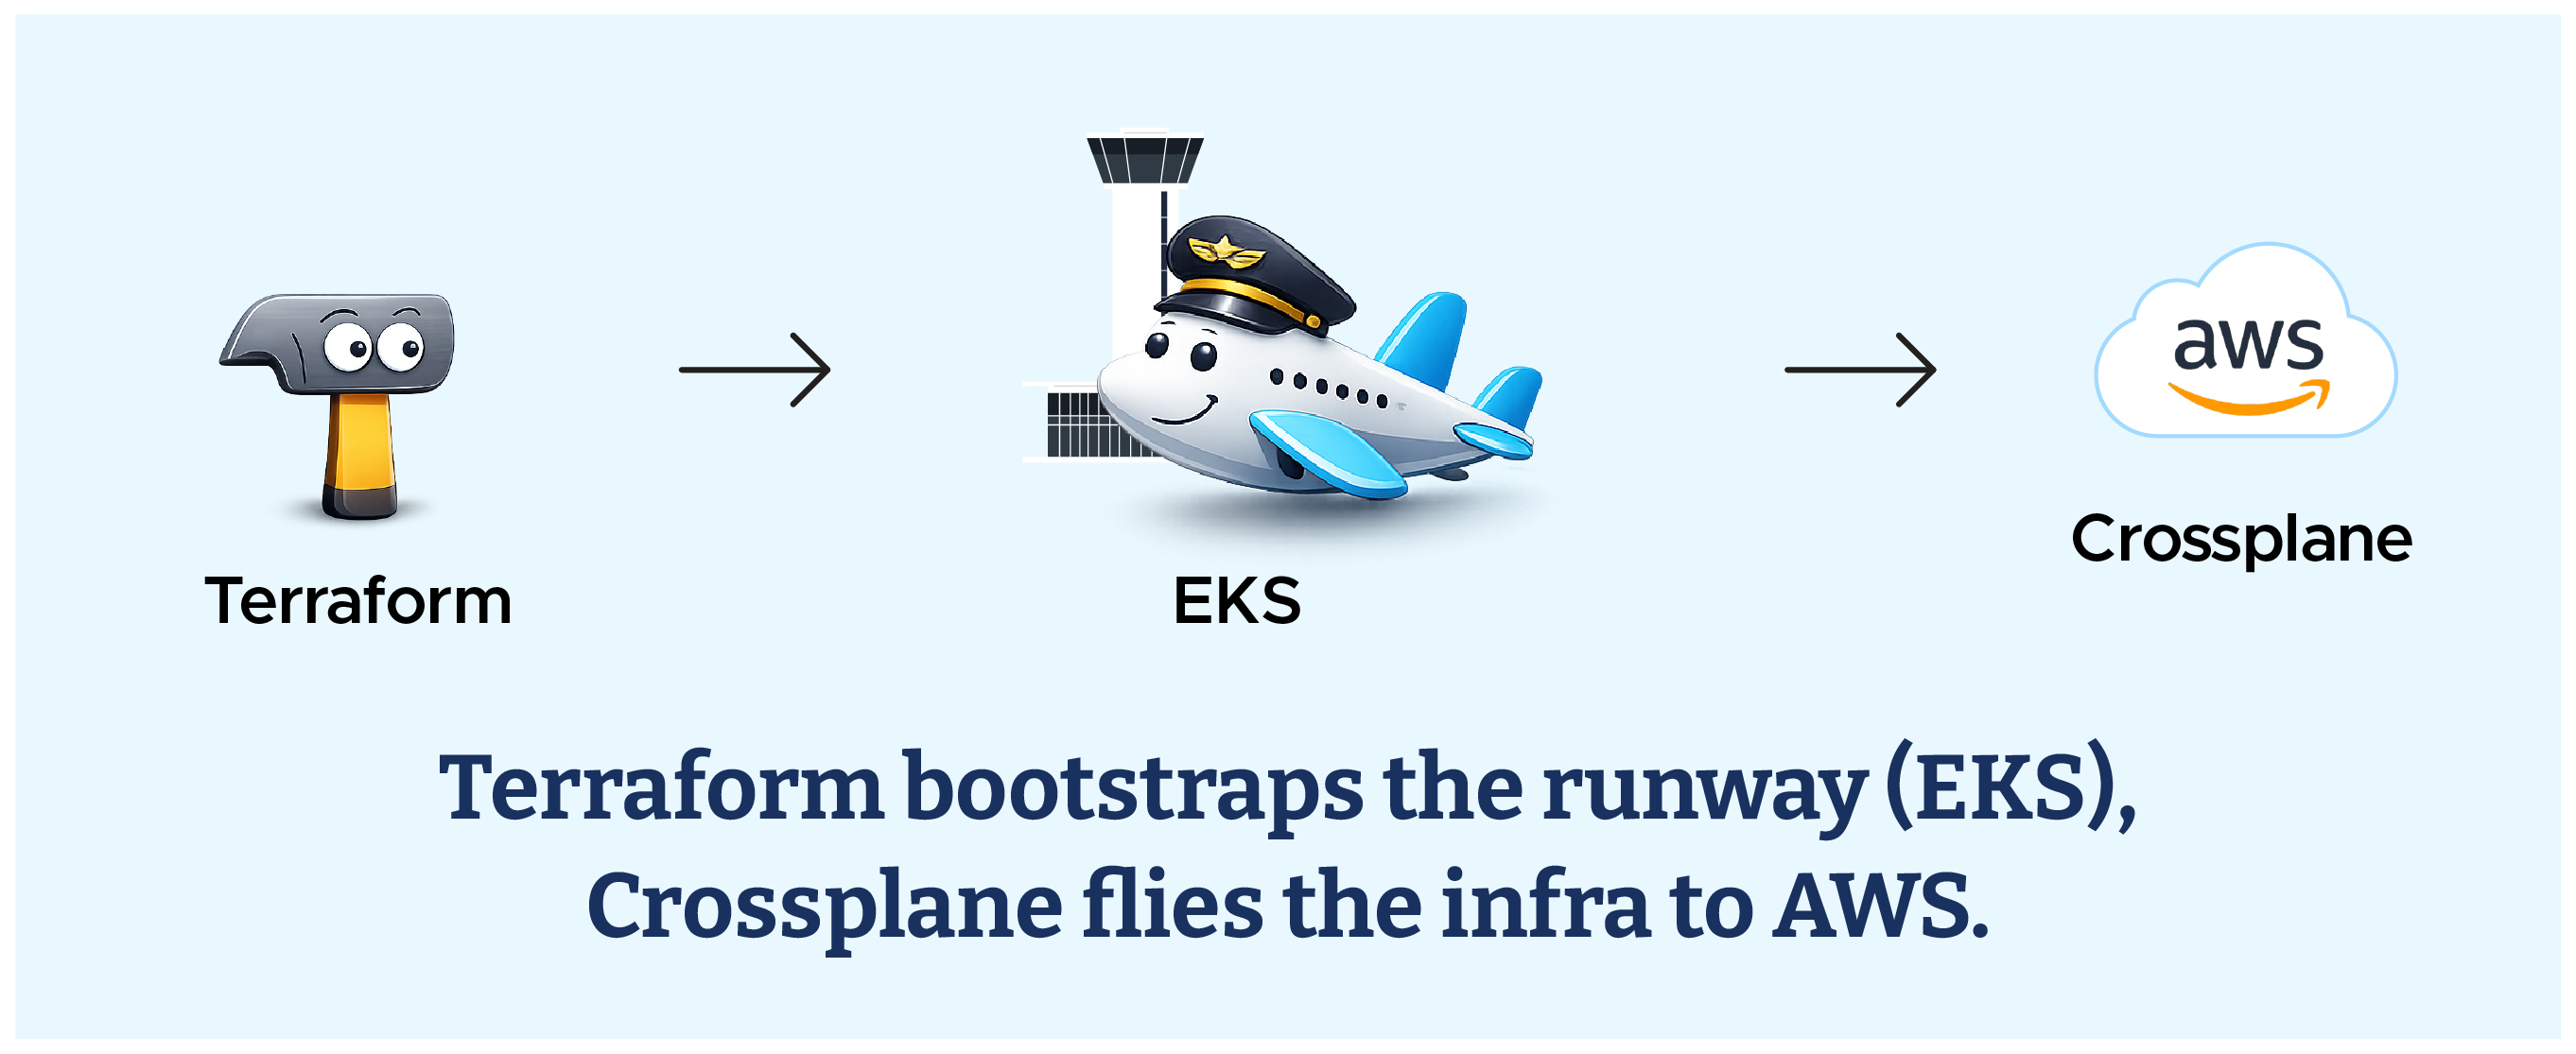
As shared in Blog 1, our hybrid model was 90% Crossplane and 10% Terraform.
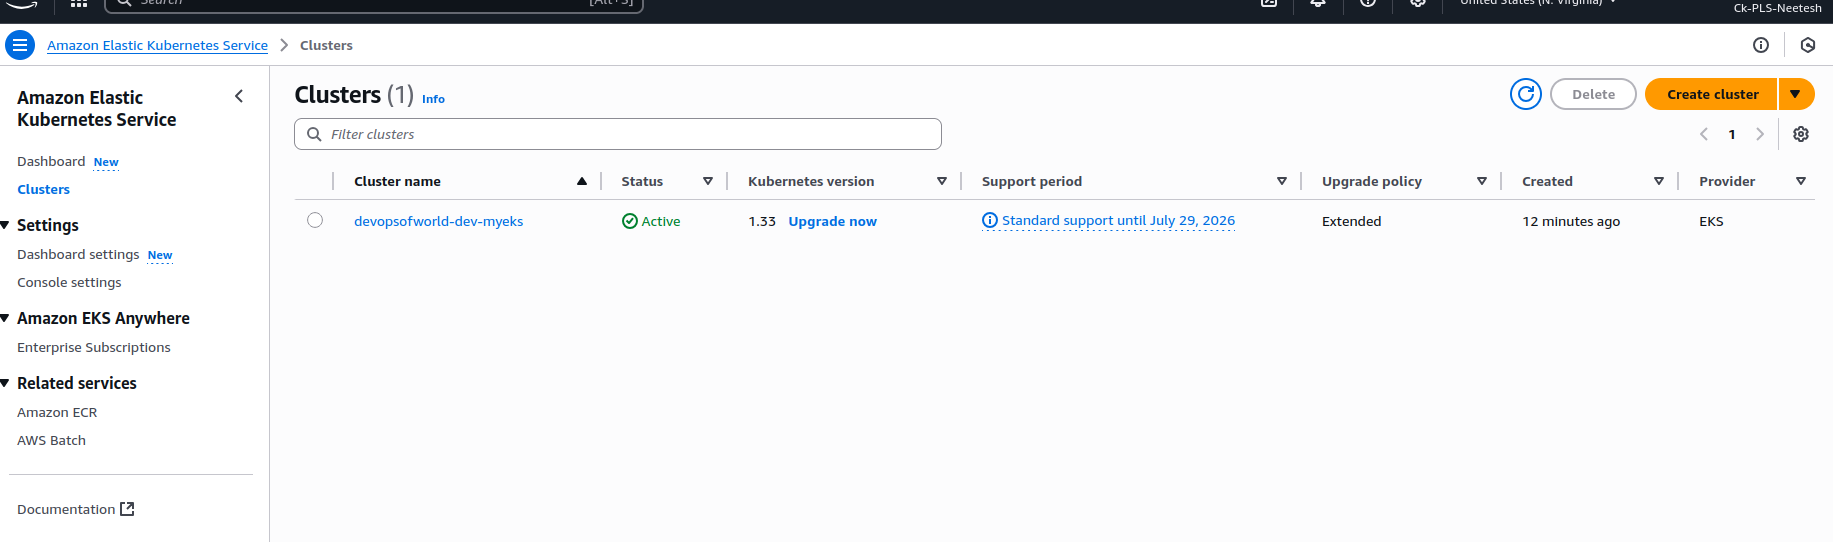
Terraform handled the foundational setup — including provisioning the AWS EKS cluster with Amazon EKS Provisioned Control Plane where Crossplane runs — while Crossplane took charge of everything above it: Virtual Private Cloud, Amazon Relational Database Service, and other cloud resources.
You can learn about Amazon RDS vs Amazon Aurora here.
This balance allowed us to keep Terraform’s stability for the base layer while leveraging Crossplane’s Kubernetes-native reconciliation for everything dynamic.
Before onboarding resources into Crossplane, the platform team set up some basics to ensure a smooth rollout:


If you see an error like:

It means your context isn’t set. Reconfigure your Amazon EKS context:


For early testing, the team went with a Kubernetes Secret (Option B):

Create the secret in your cluster:

Takeaway: Whether IRSA or Secrets, Crossplane needs a secure bridge into AWS before it can manage infra.
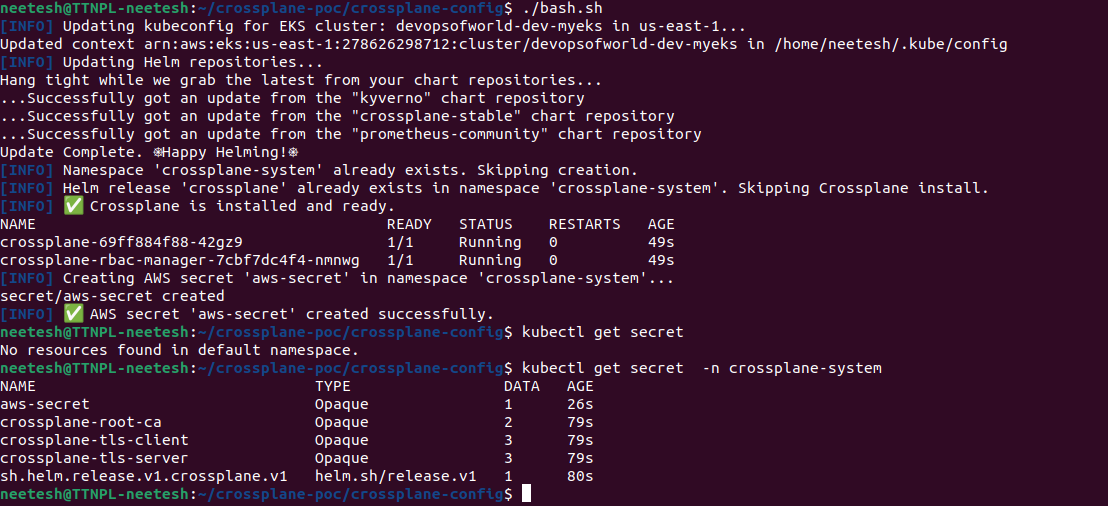
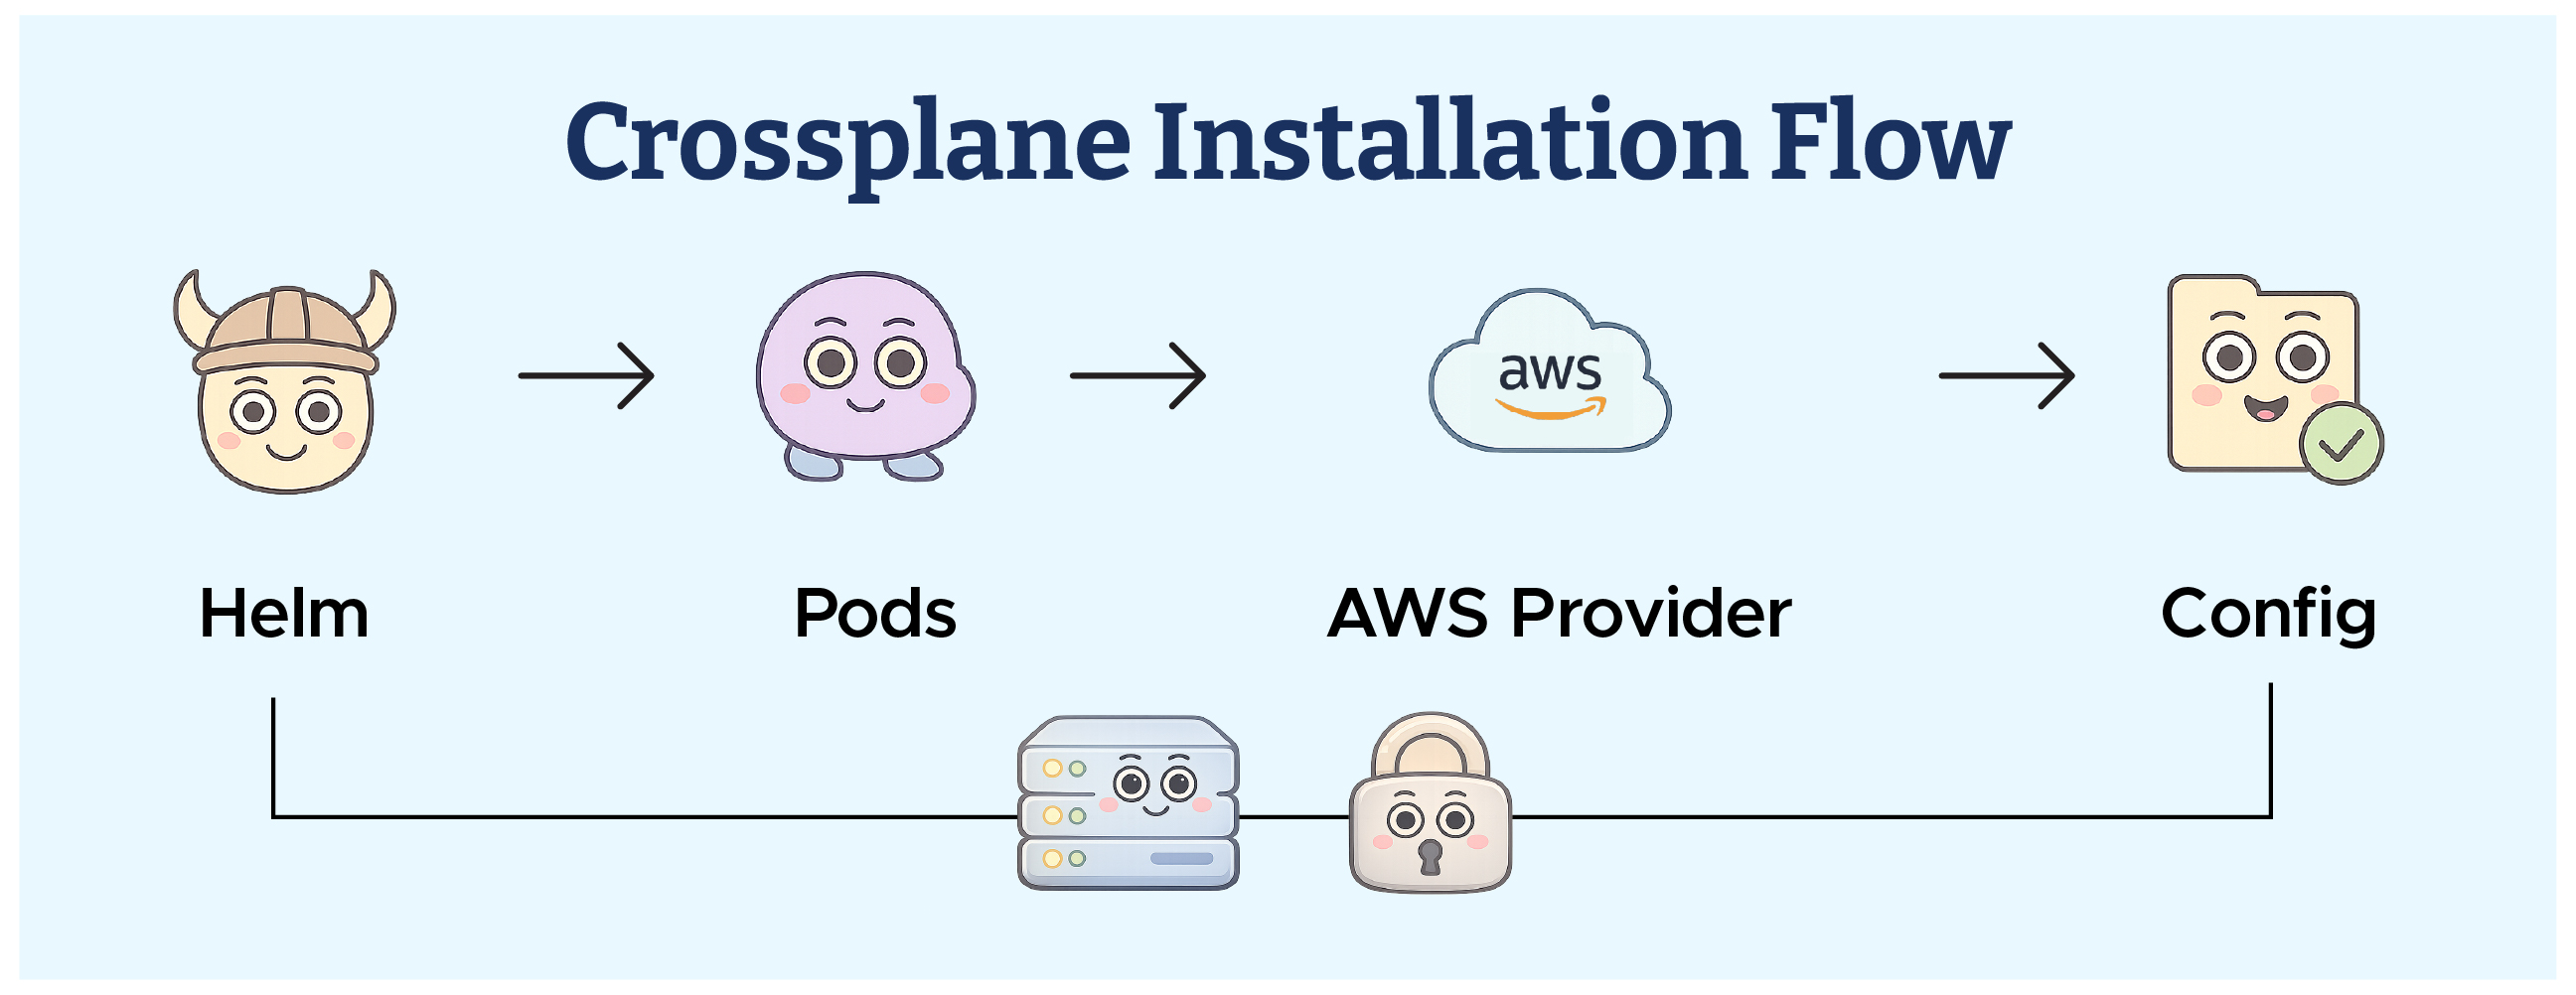
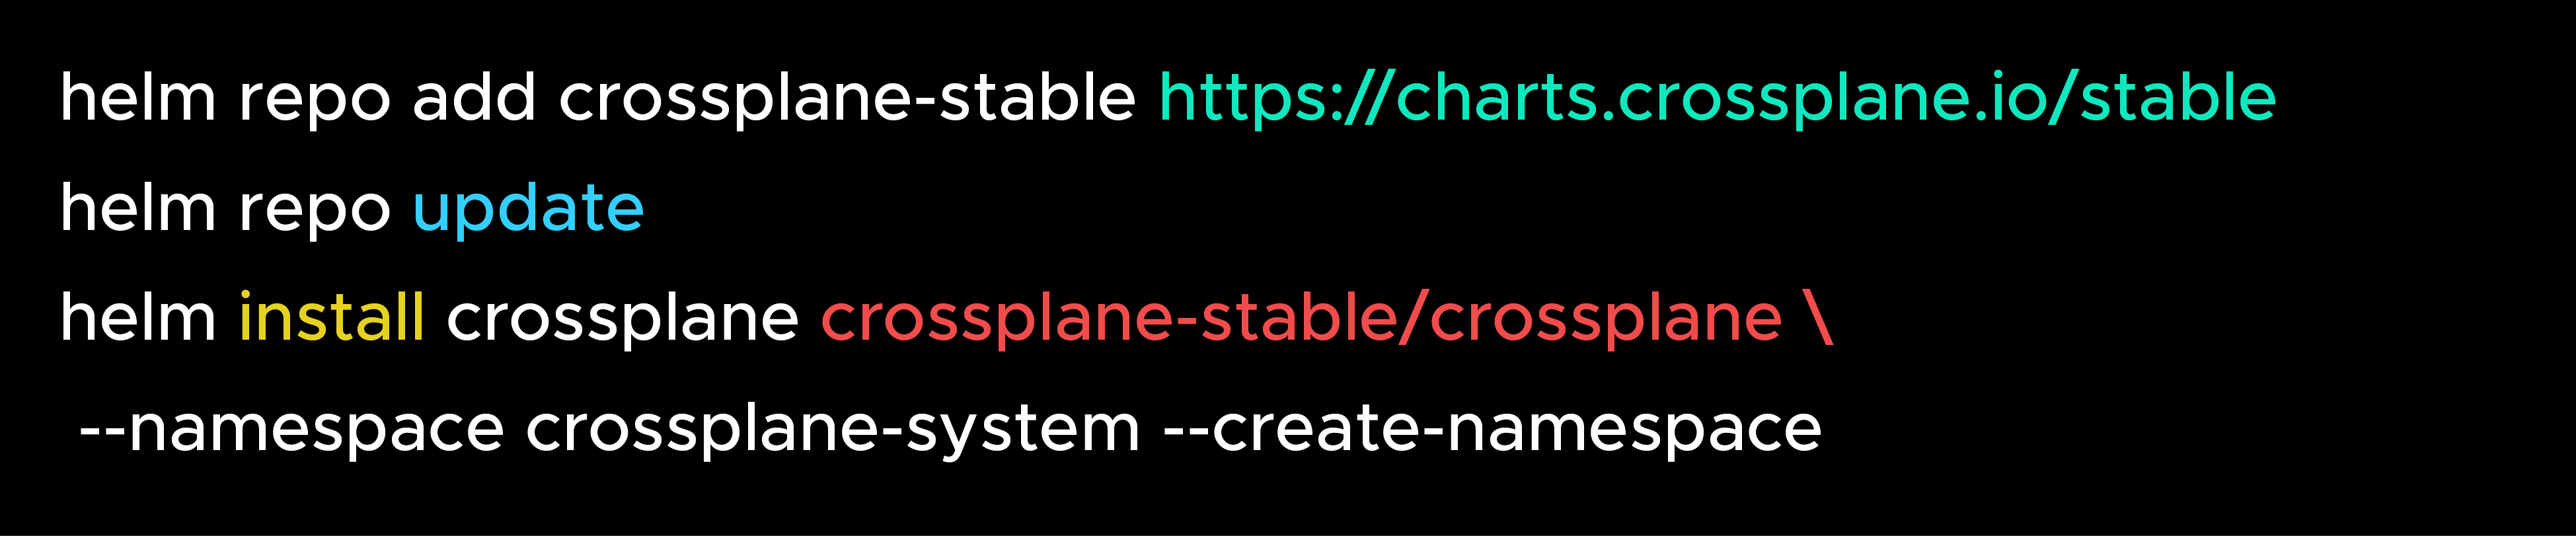
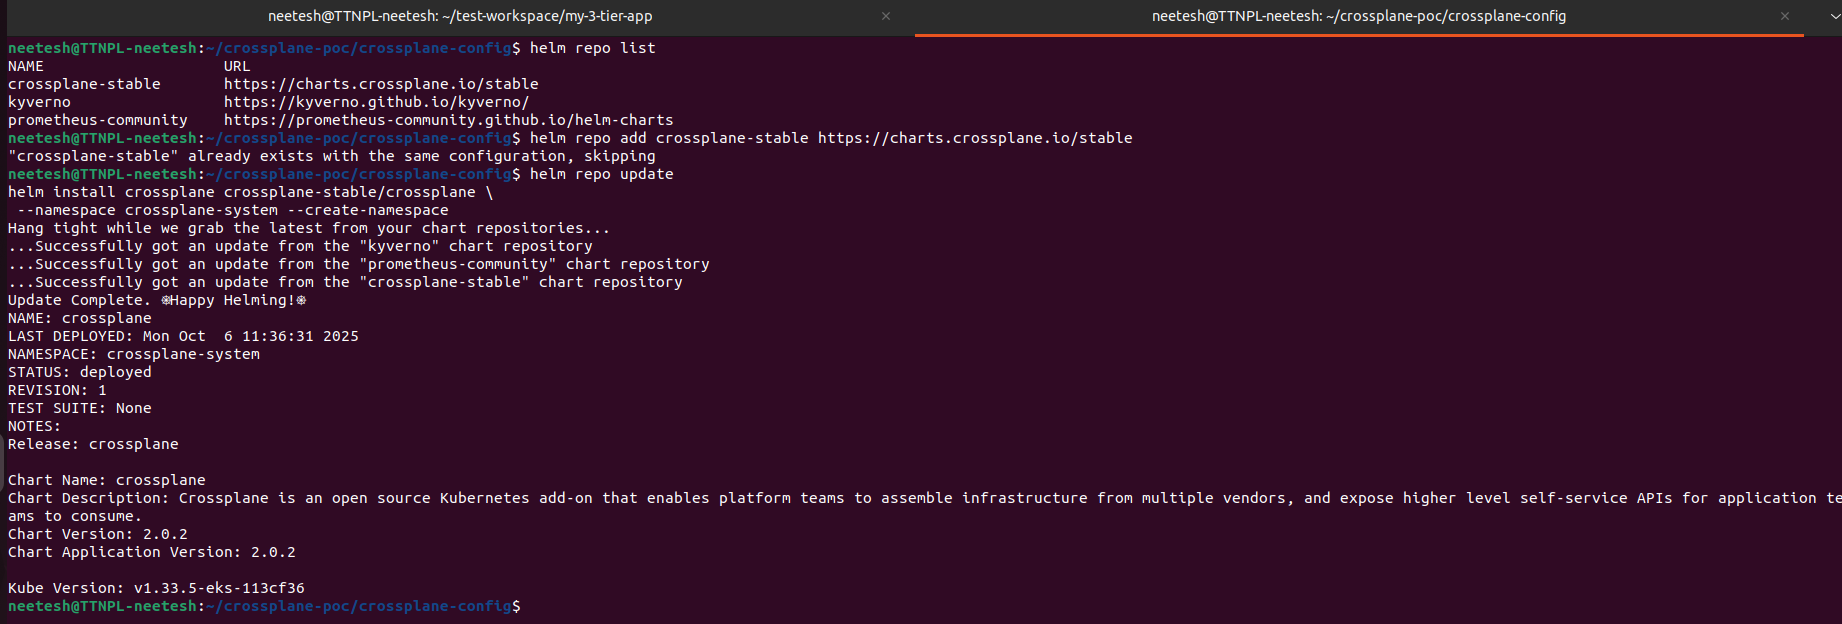
Step one in earning trust was to install Crossplane — but cautiously.
We didn’t jump straight into abstractions (XRDs). Instead, we started with just the bare essentials:
This way, Crossplane could connect to AWS, but nothing risky was created yet.
Takeaway: Helm + Provider + Config = a safe, minimal starting point.
From Helm install → pods running → AWS provider added → ProviderConfig ready.
Verify installation:
kubectl get pods -n crossplane-system

You should see crossplane pods running.
In this step, we’ll install the AWS provider for Crossplane. You can choose between three options depending on your needs — Community (Free), Official Upbound (Free), or Enterprise (Paid).
provider.yaml

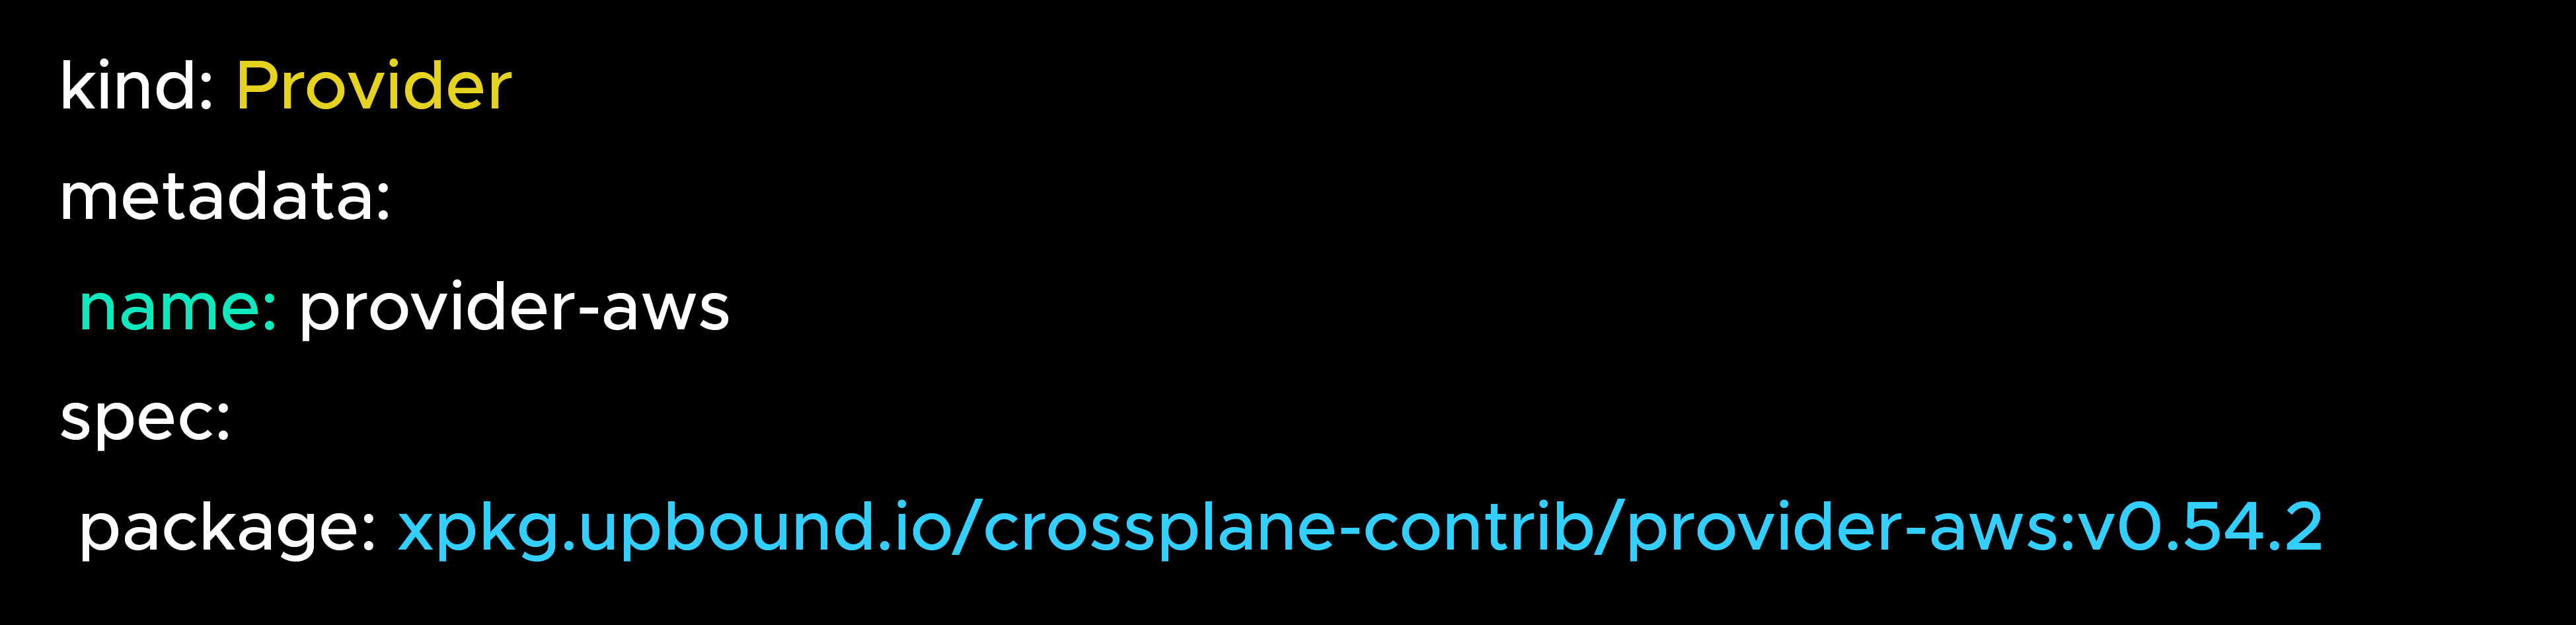
Apply it:
kubectl apply -f provider.yaml
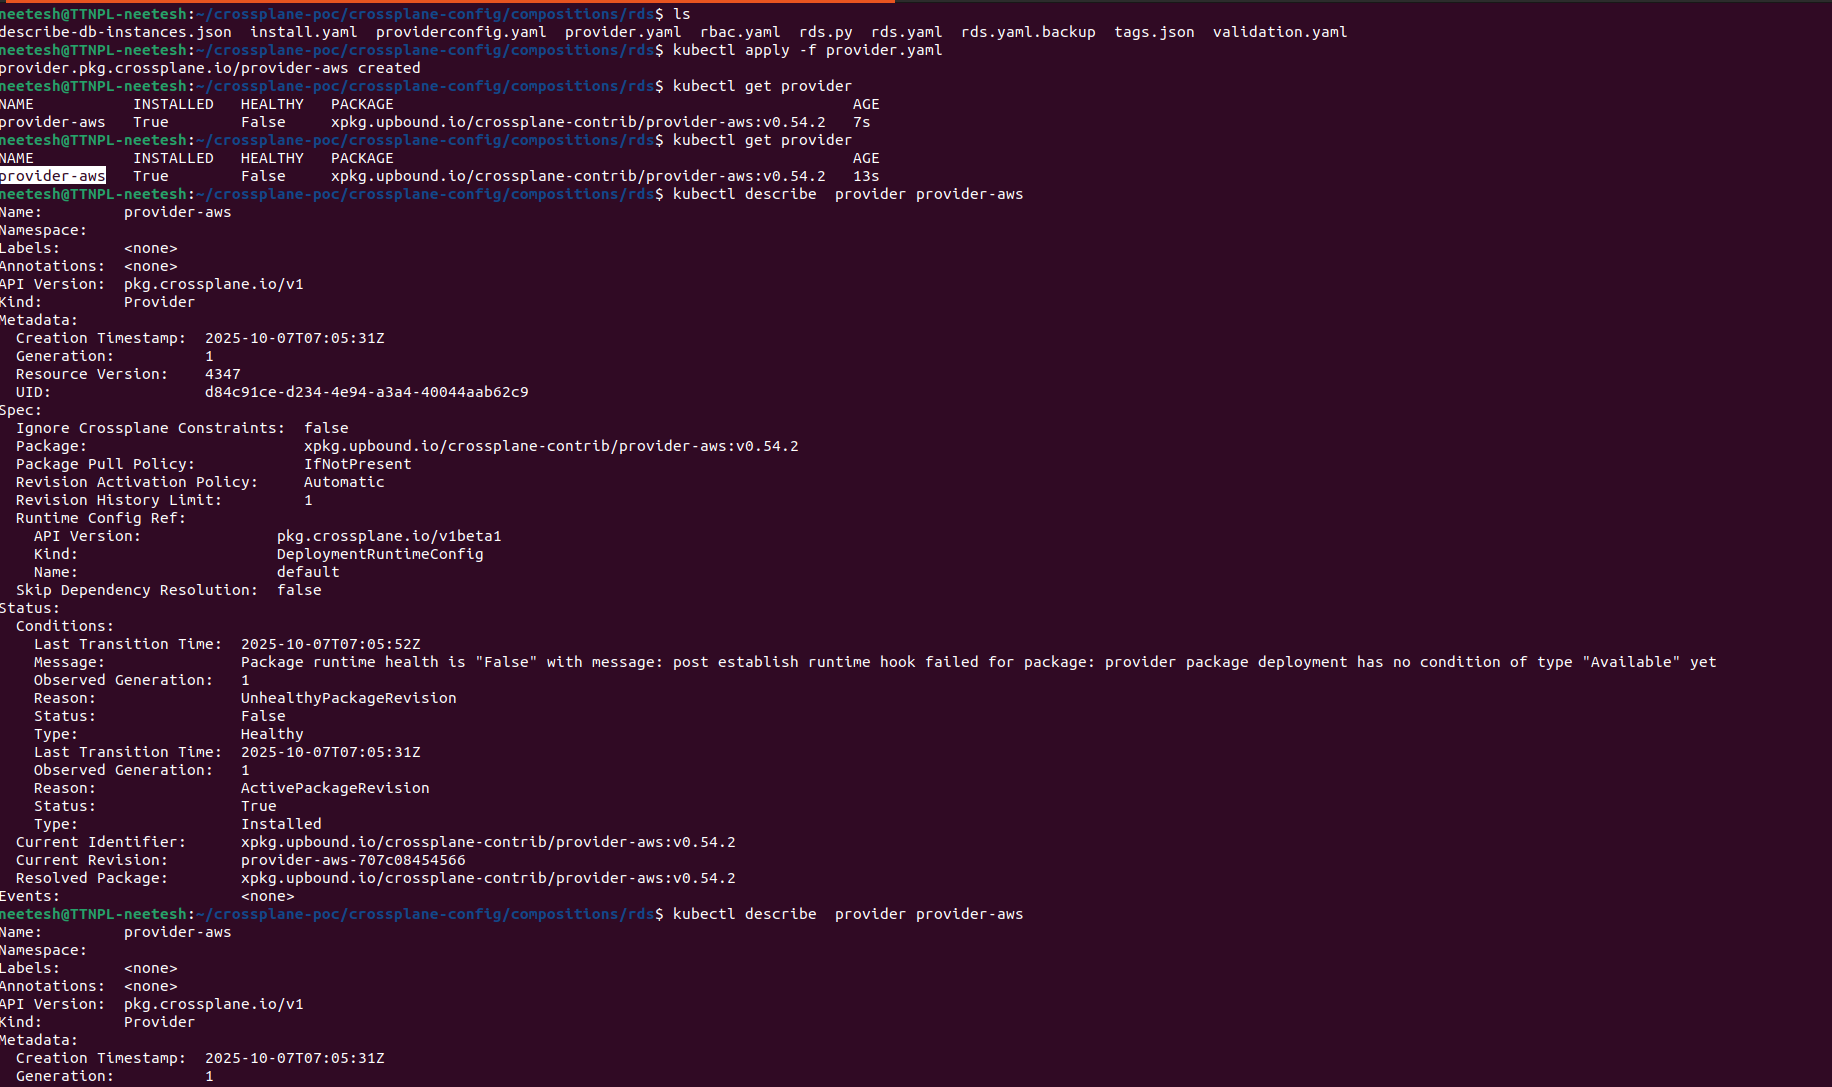
Note: In this demo, we are using the Community Provider (crossplane-contrib).
providerconfig.yaml
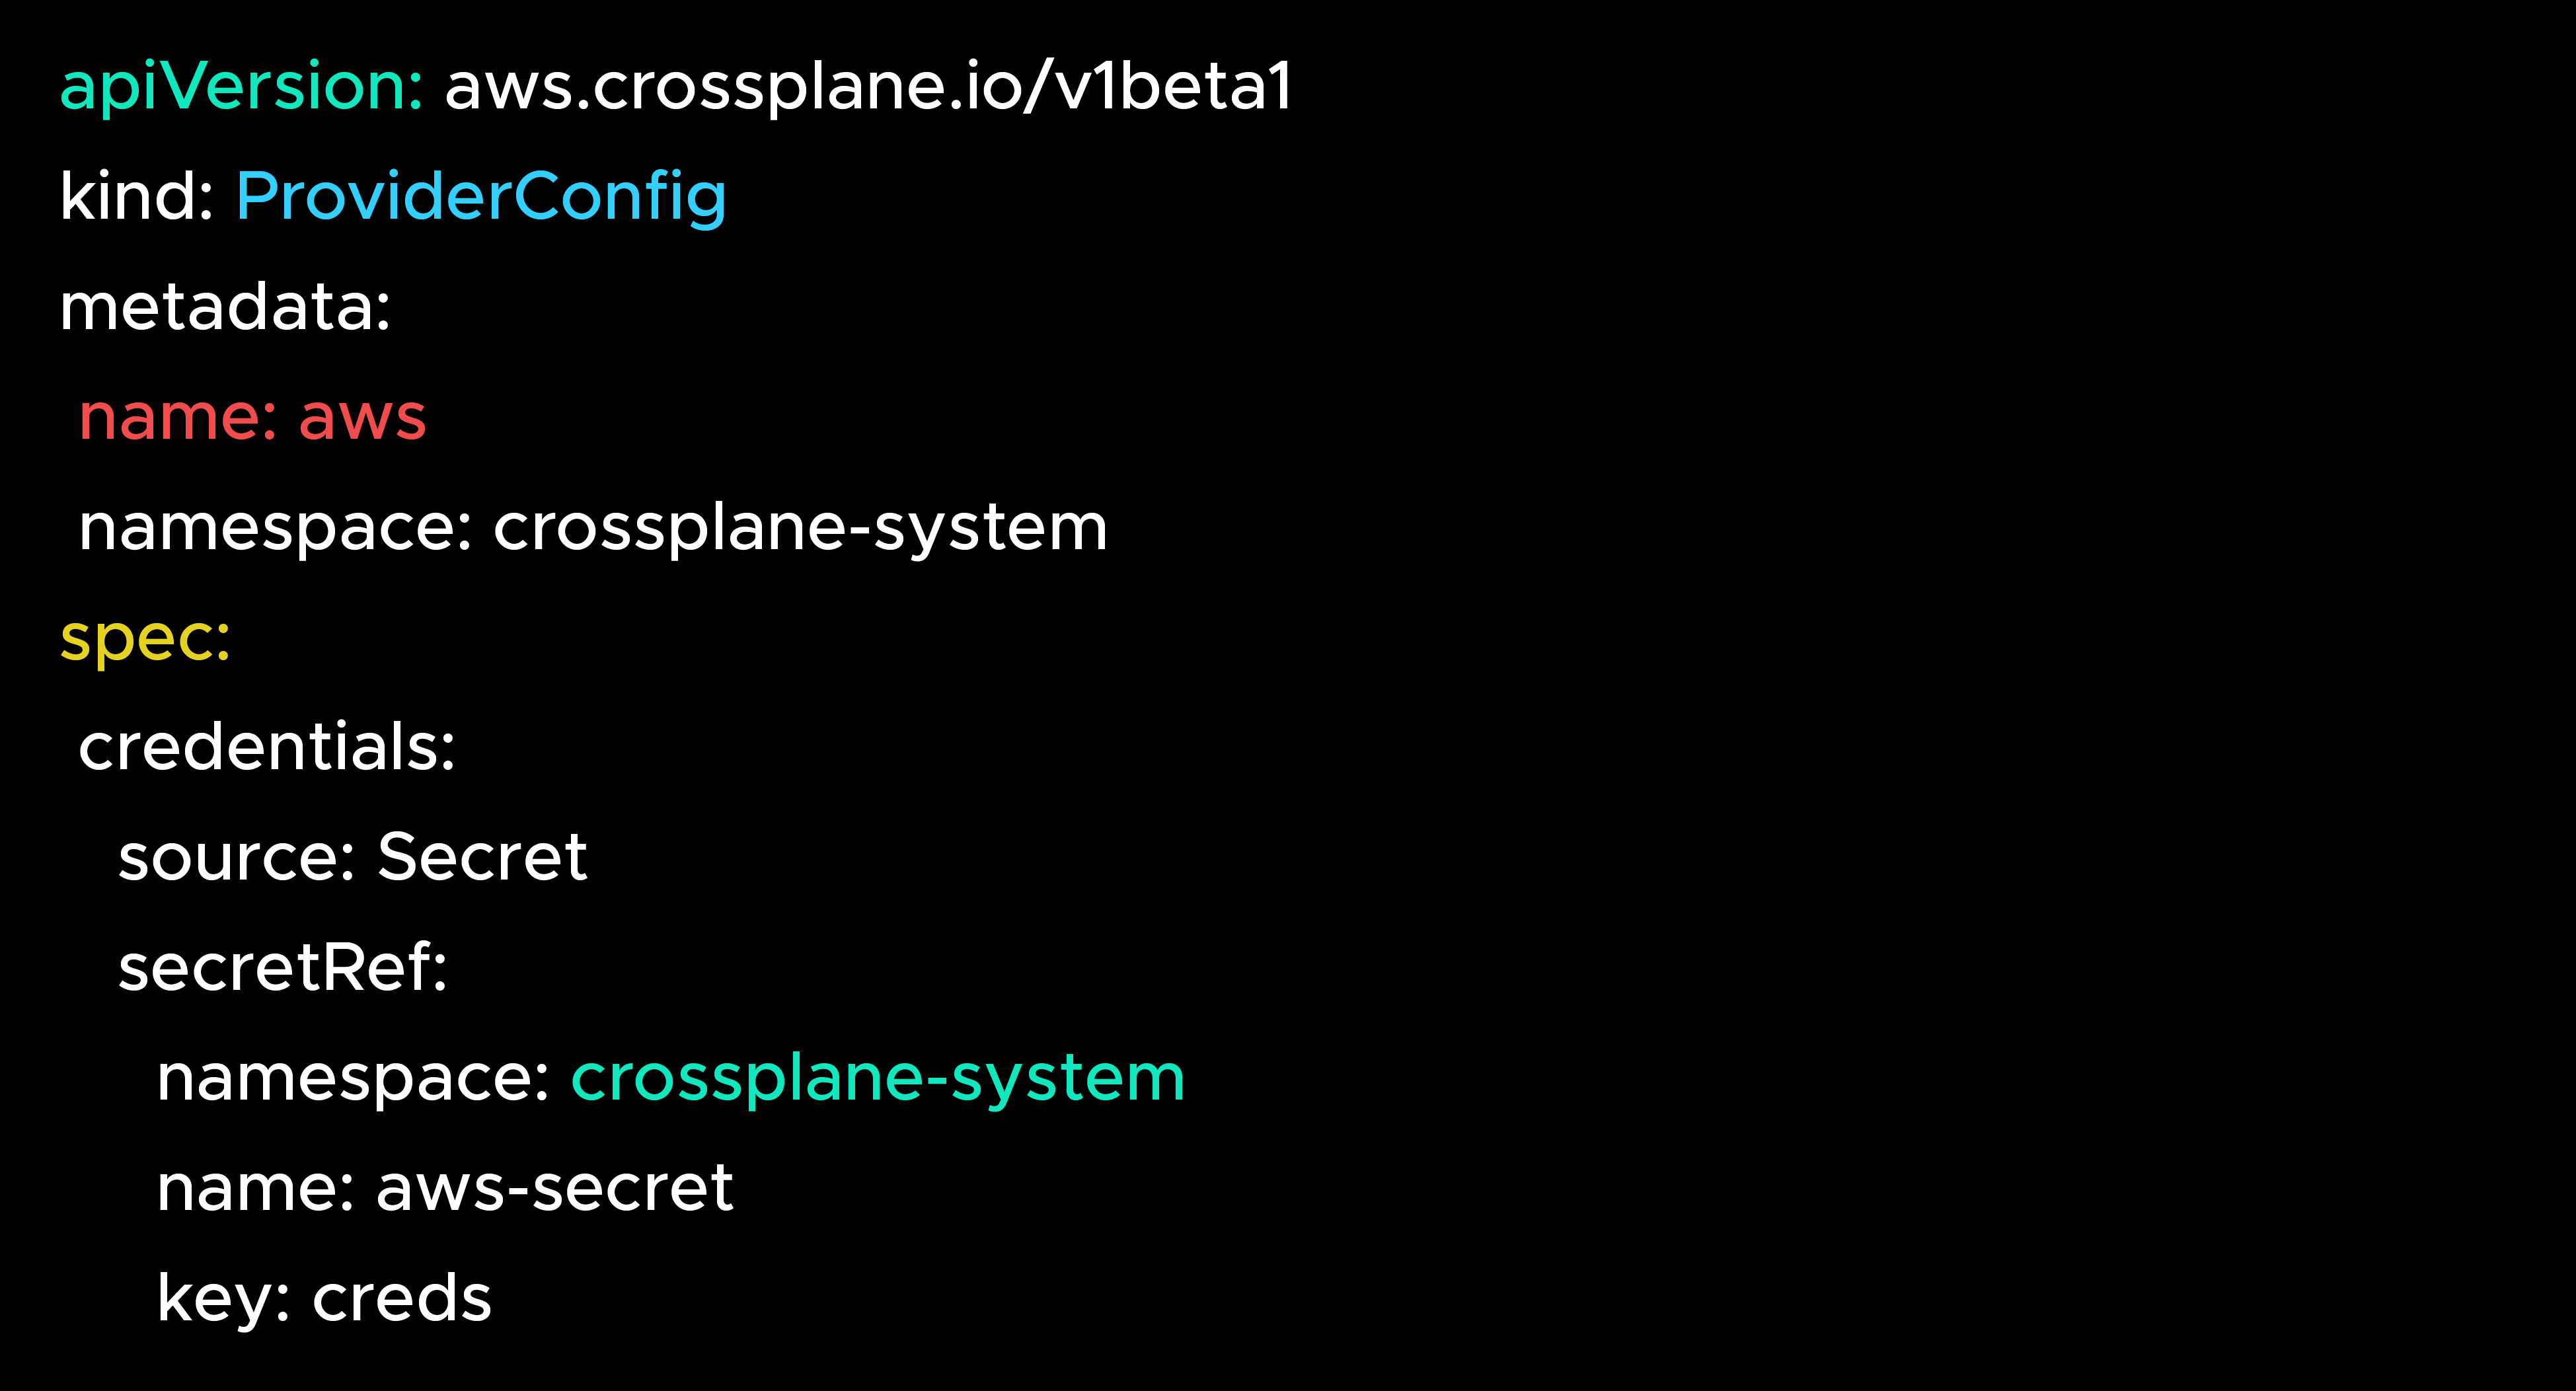
Apply it:
kubectl apply -f providerconfig.yaml

At this point, Crossplane could talk to AWS — safely, with nothing created yet.
Takeaway: Start small. Helm + Provider + Config = ready to manage AWS, without surprises.
Think of Crossplane as Kubernetes for cloud infra — always watching, always correcting. Every YAML you apply kicks off a loop, not a one-time script. Here’s how the reconciliation cycle works step by step.
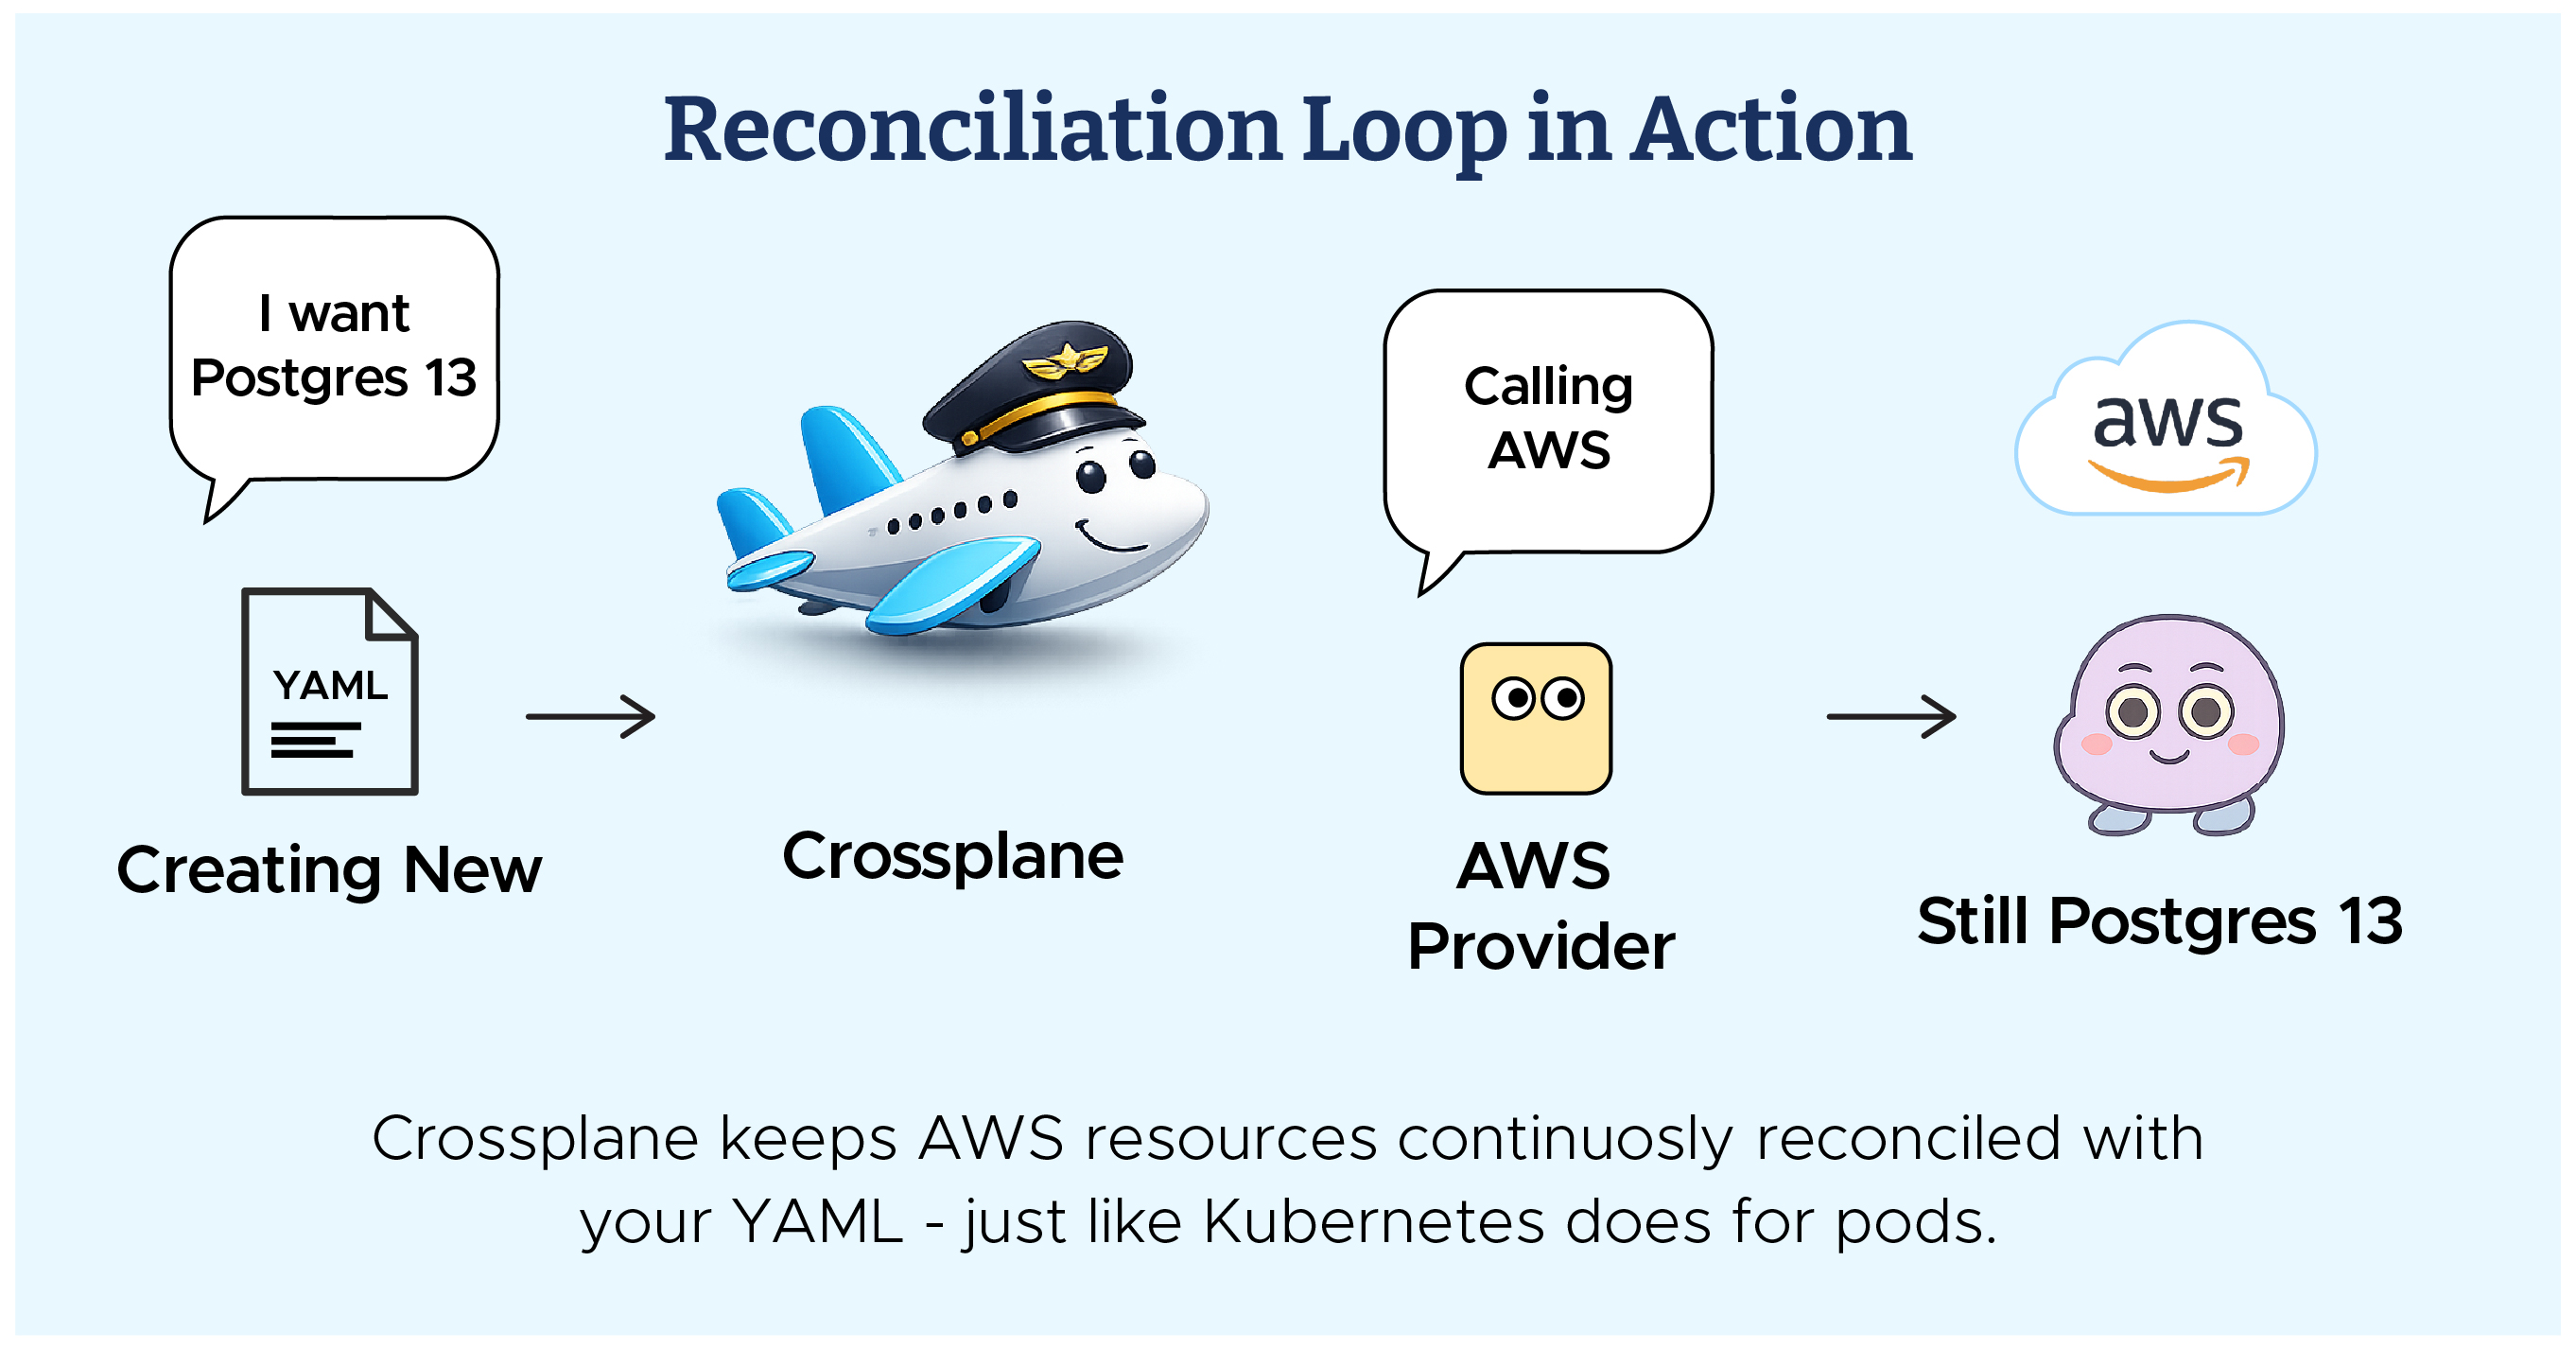
Here’s what happens under the hood:
Takeaway: Terraform builds once. Crossplane builds and babysits forever.
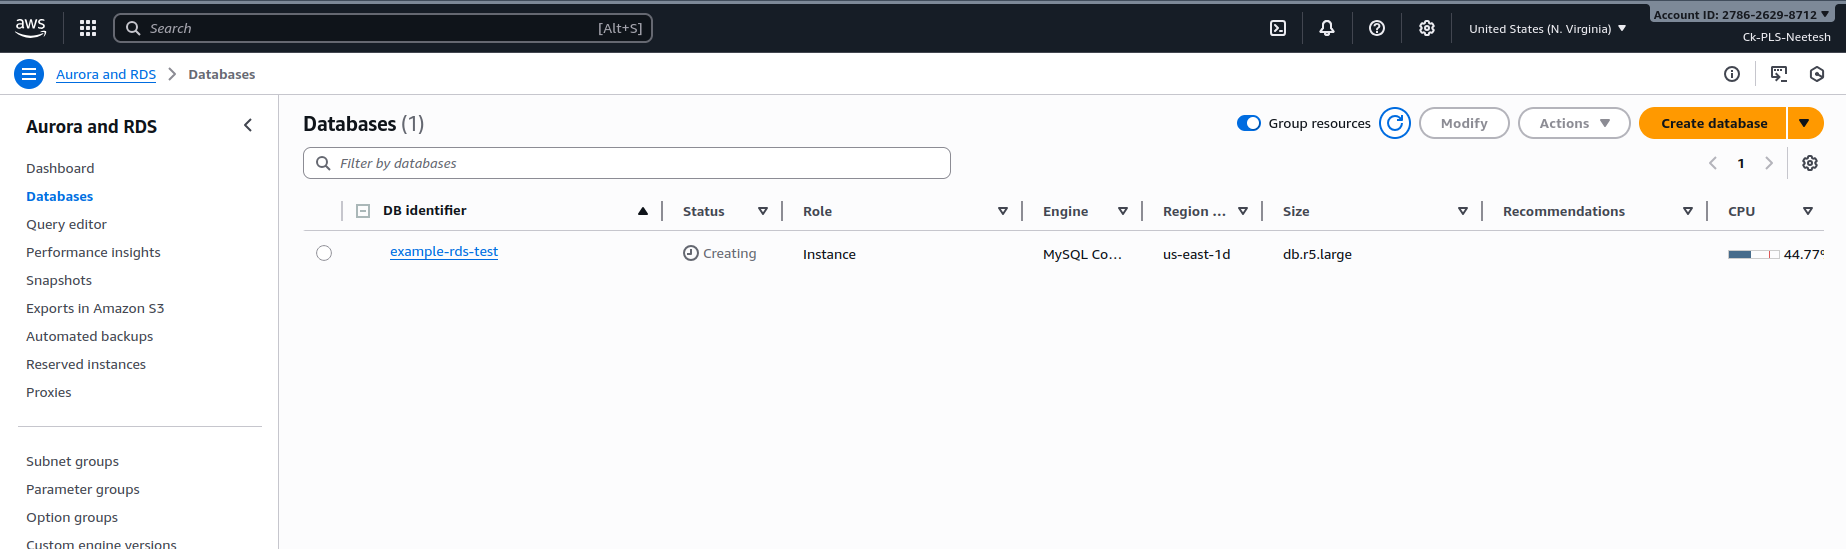
With the building blocks in place, it was time to test Crossplane in action. Instead of jumping straight into production, we started small — by creating a simple PostgreSQL database.
Docs
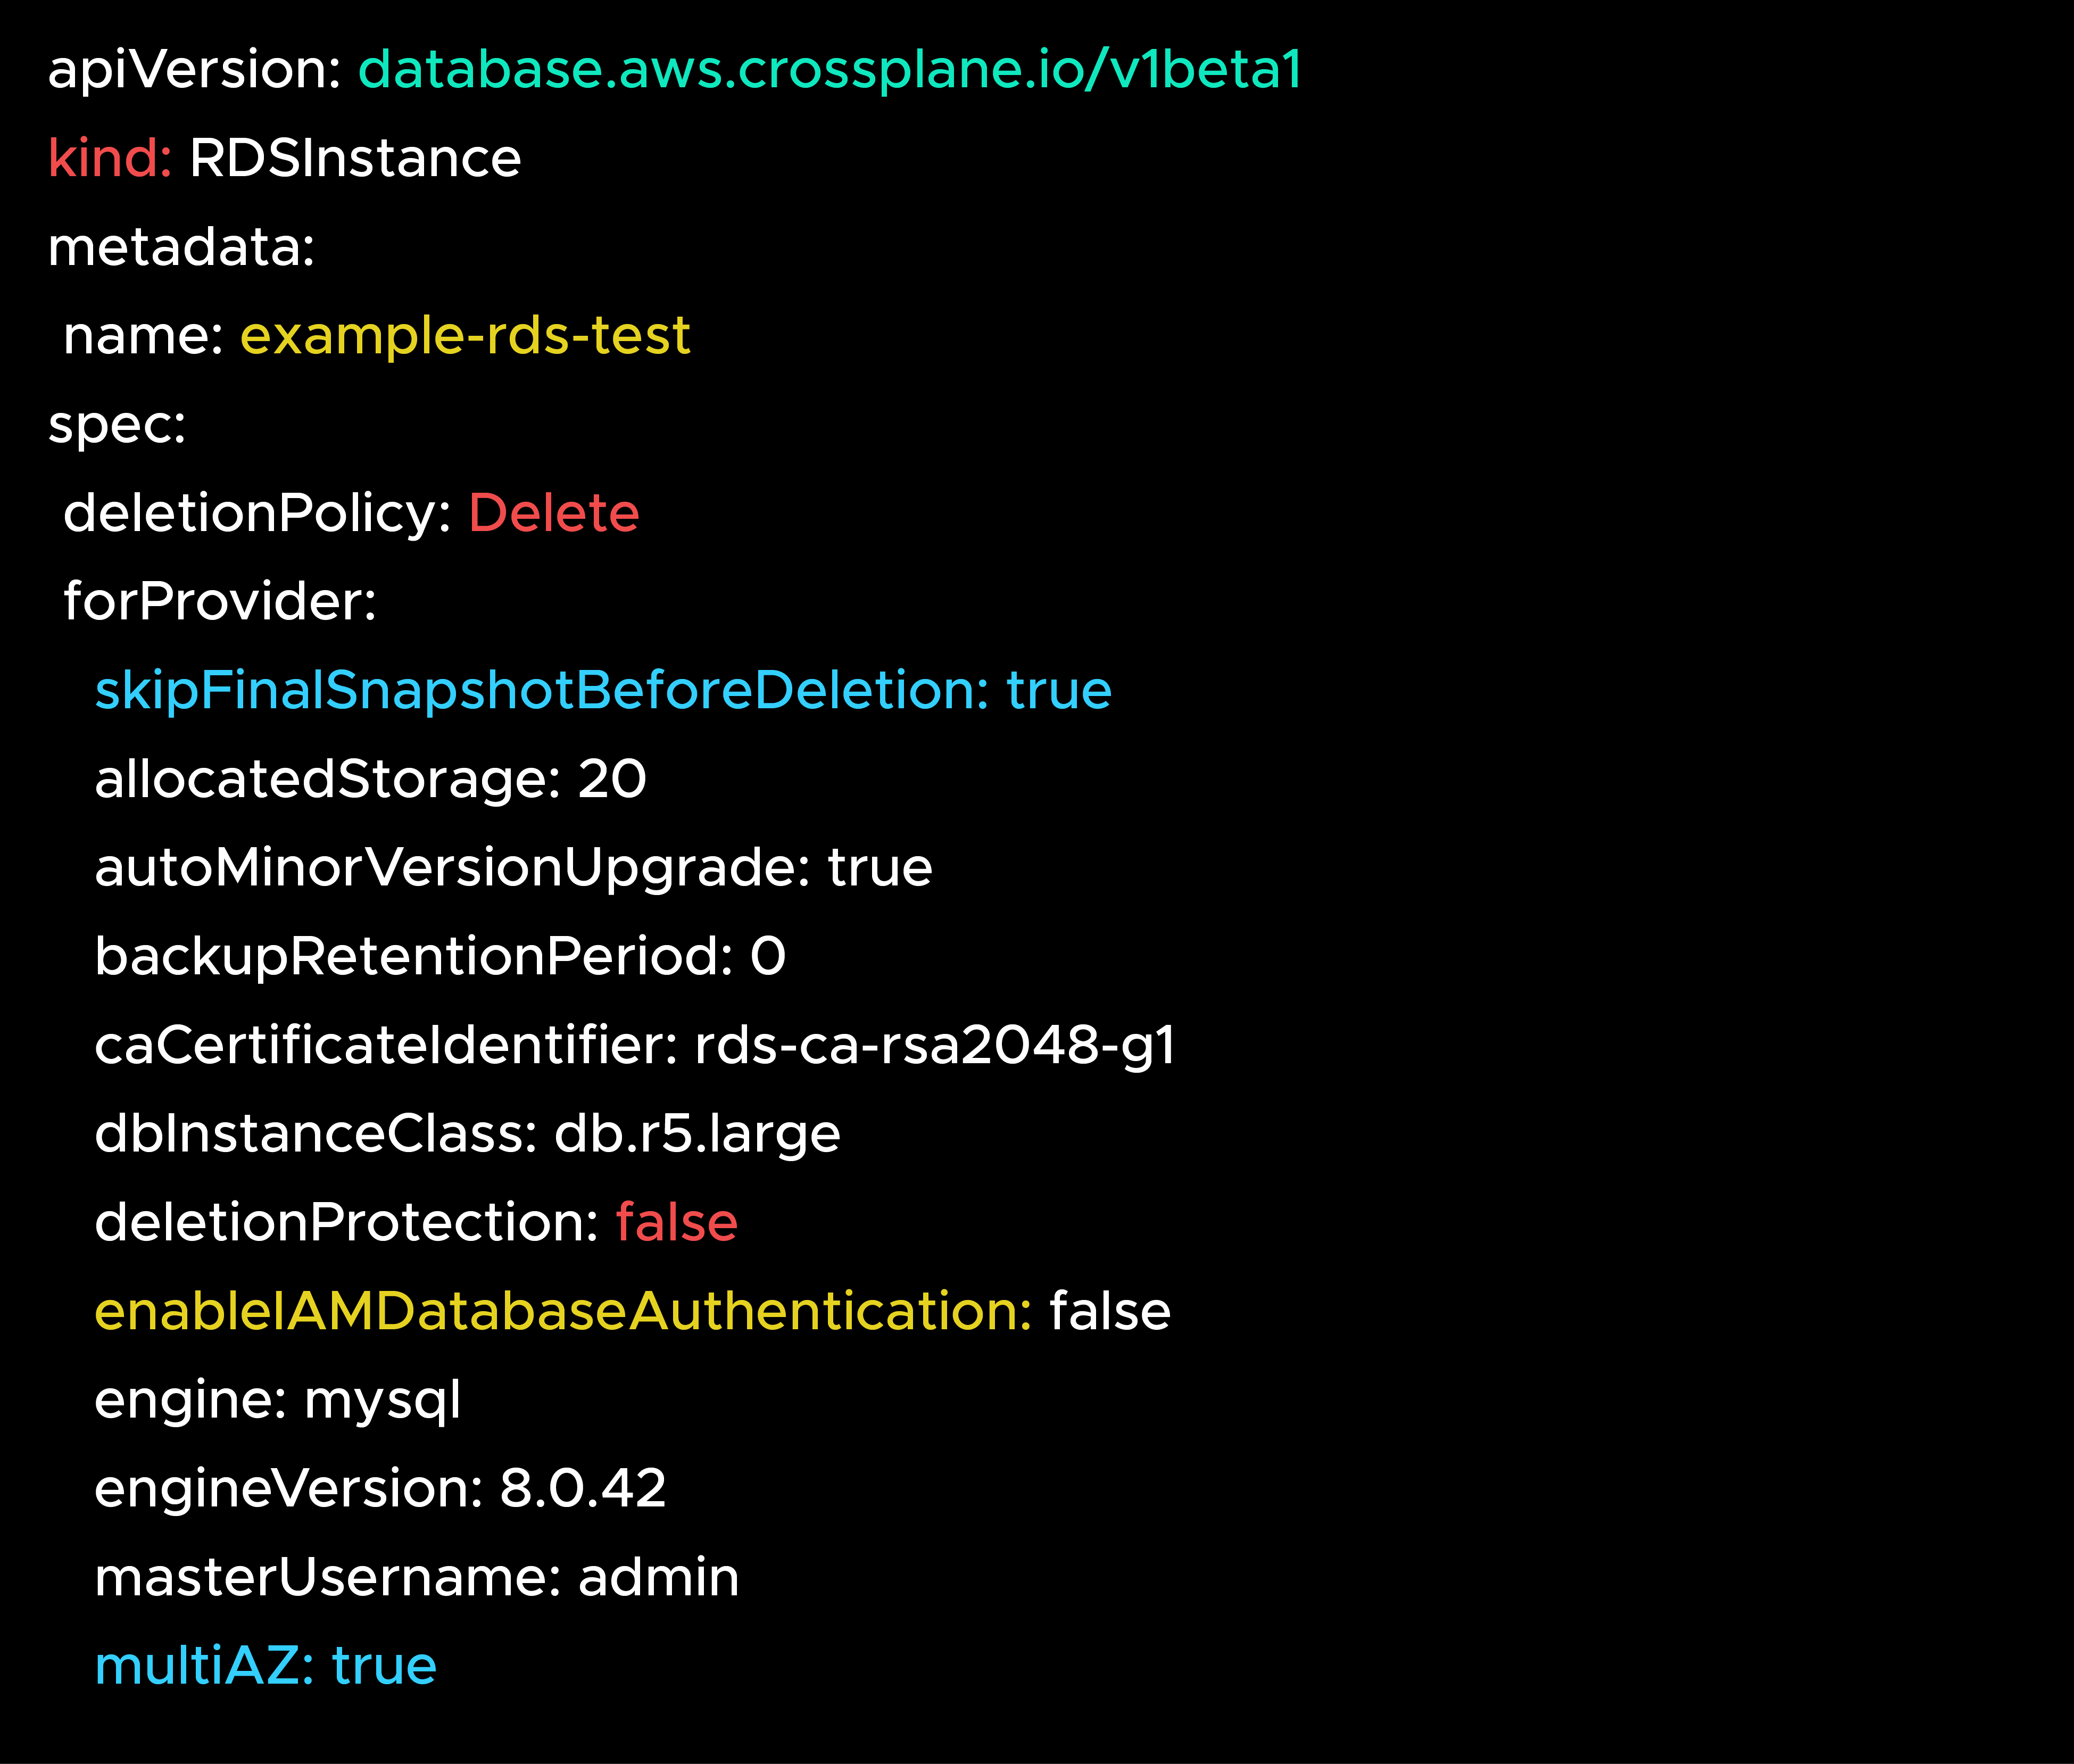
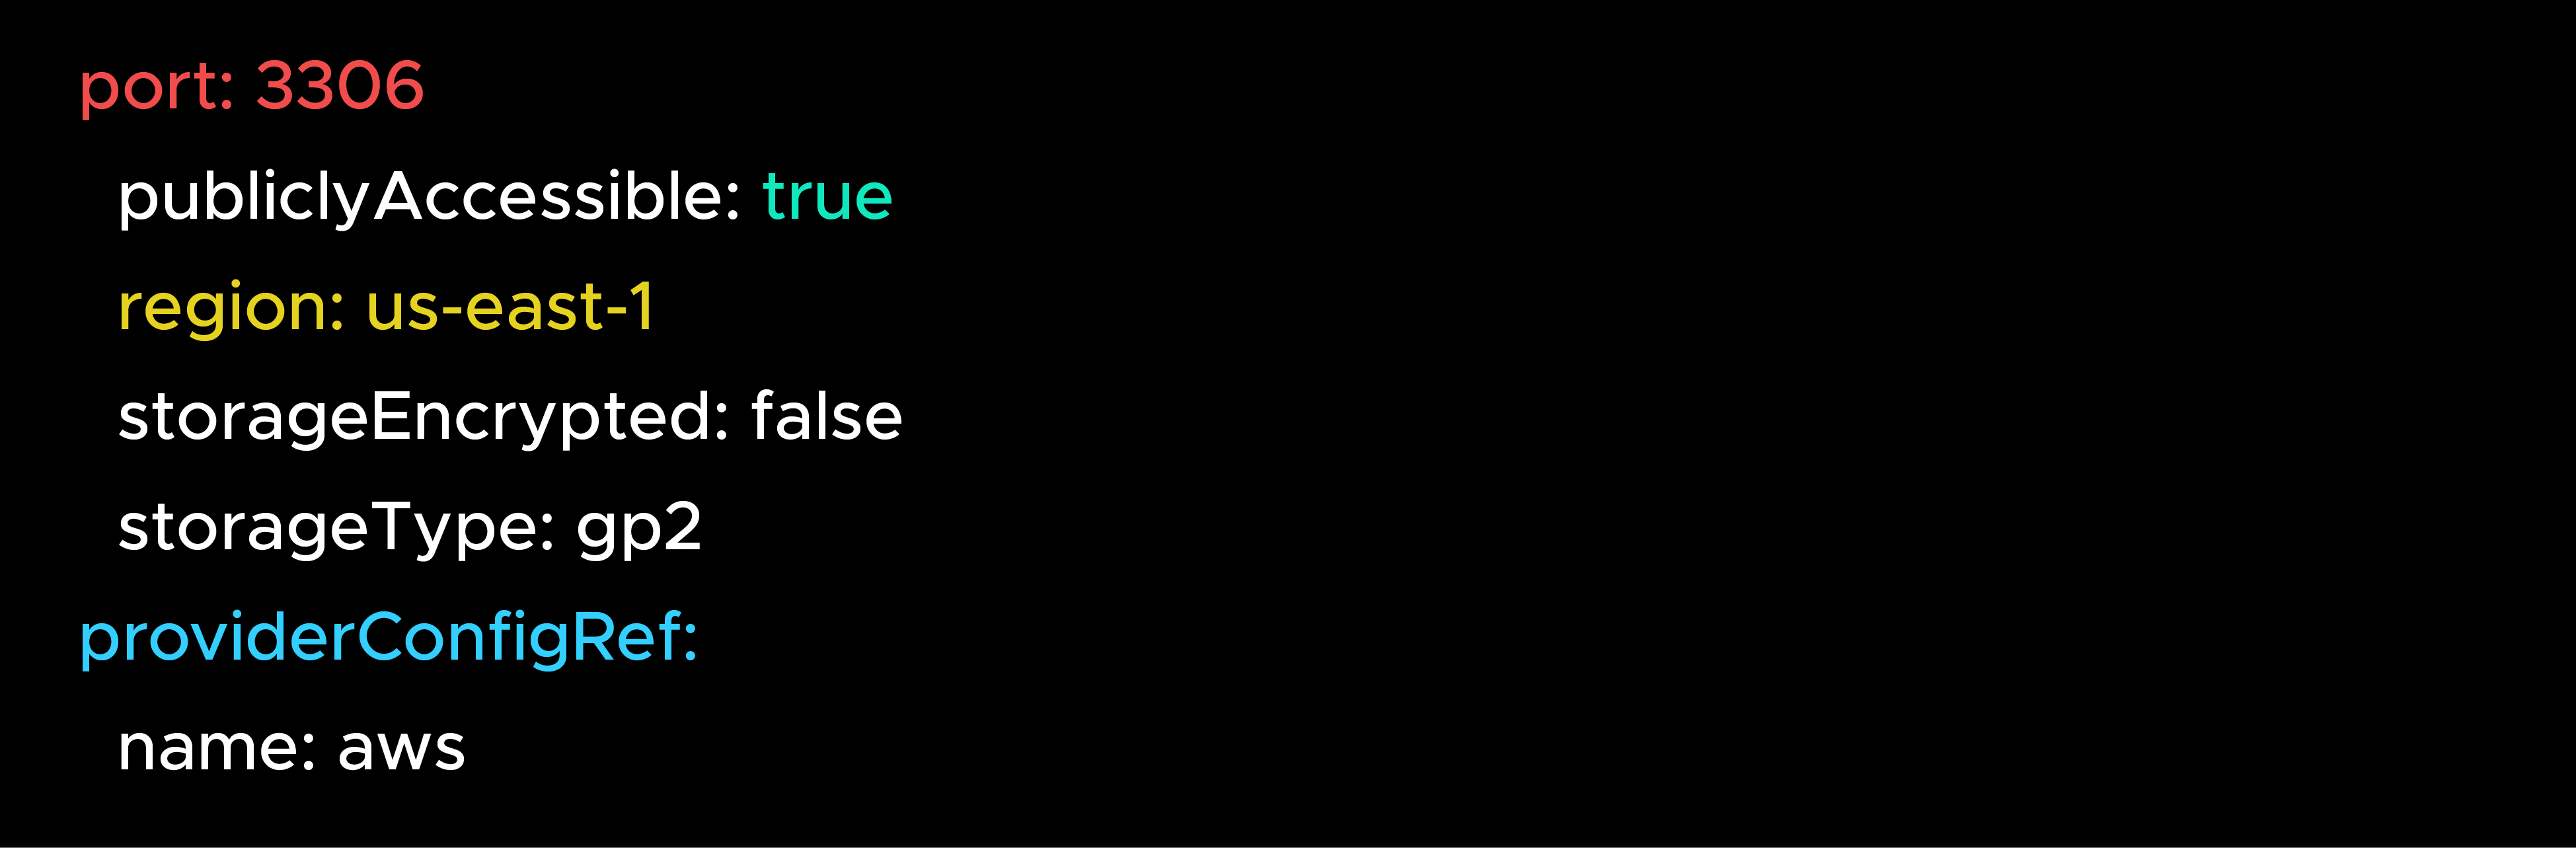
Apply it:
kubectl apply -f rds.yaml
Key Points:
Check status:

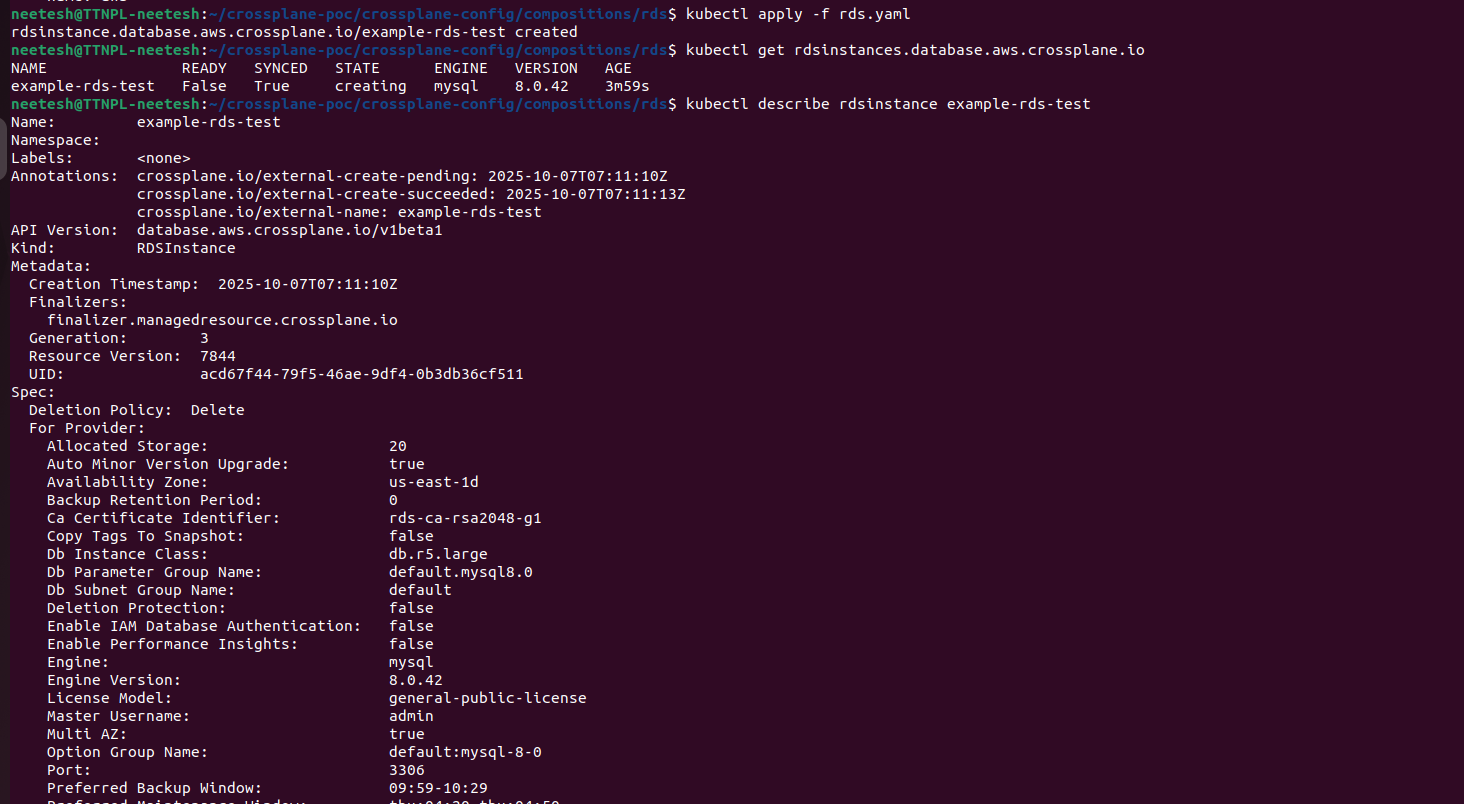
Takeaway: Start with a non-critical demo resource (like a test DB). Build trust in Crossplane before touching production.
The demo DB proved Crossplane worked — but that was a clean, greenfield resource. The real world is messier. Most enterprises don’t start fresh; they already have dozens of RDS databases, Amazon EKS clusters, and AWS Simple Storage Service buckets in production. The next challenge was to bring these under Crossplane’s management — without breaking them.
The three shields of safety when importing existing resources: external-name (adopt, don’t create), deletionPolicy: Orphan (don’t delete prod), and managementPolicy: ObserveOnly (watch, don’t touch).
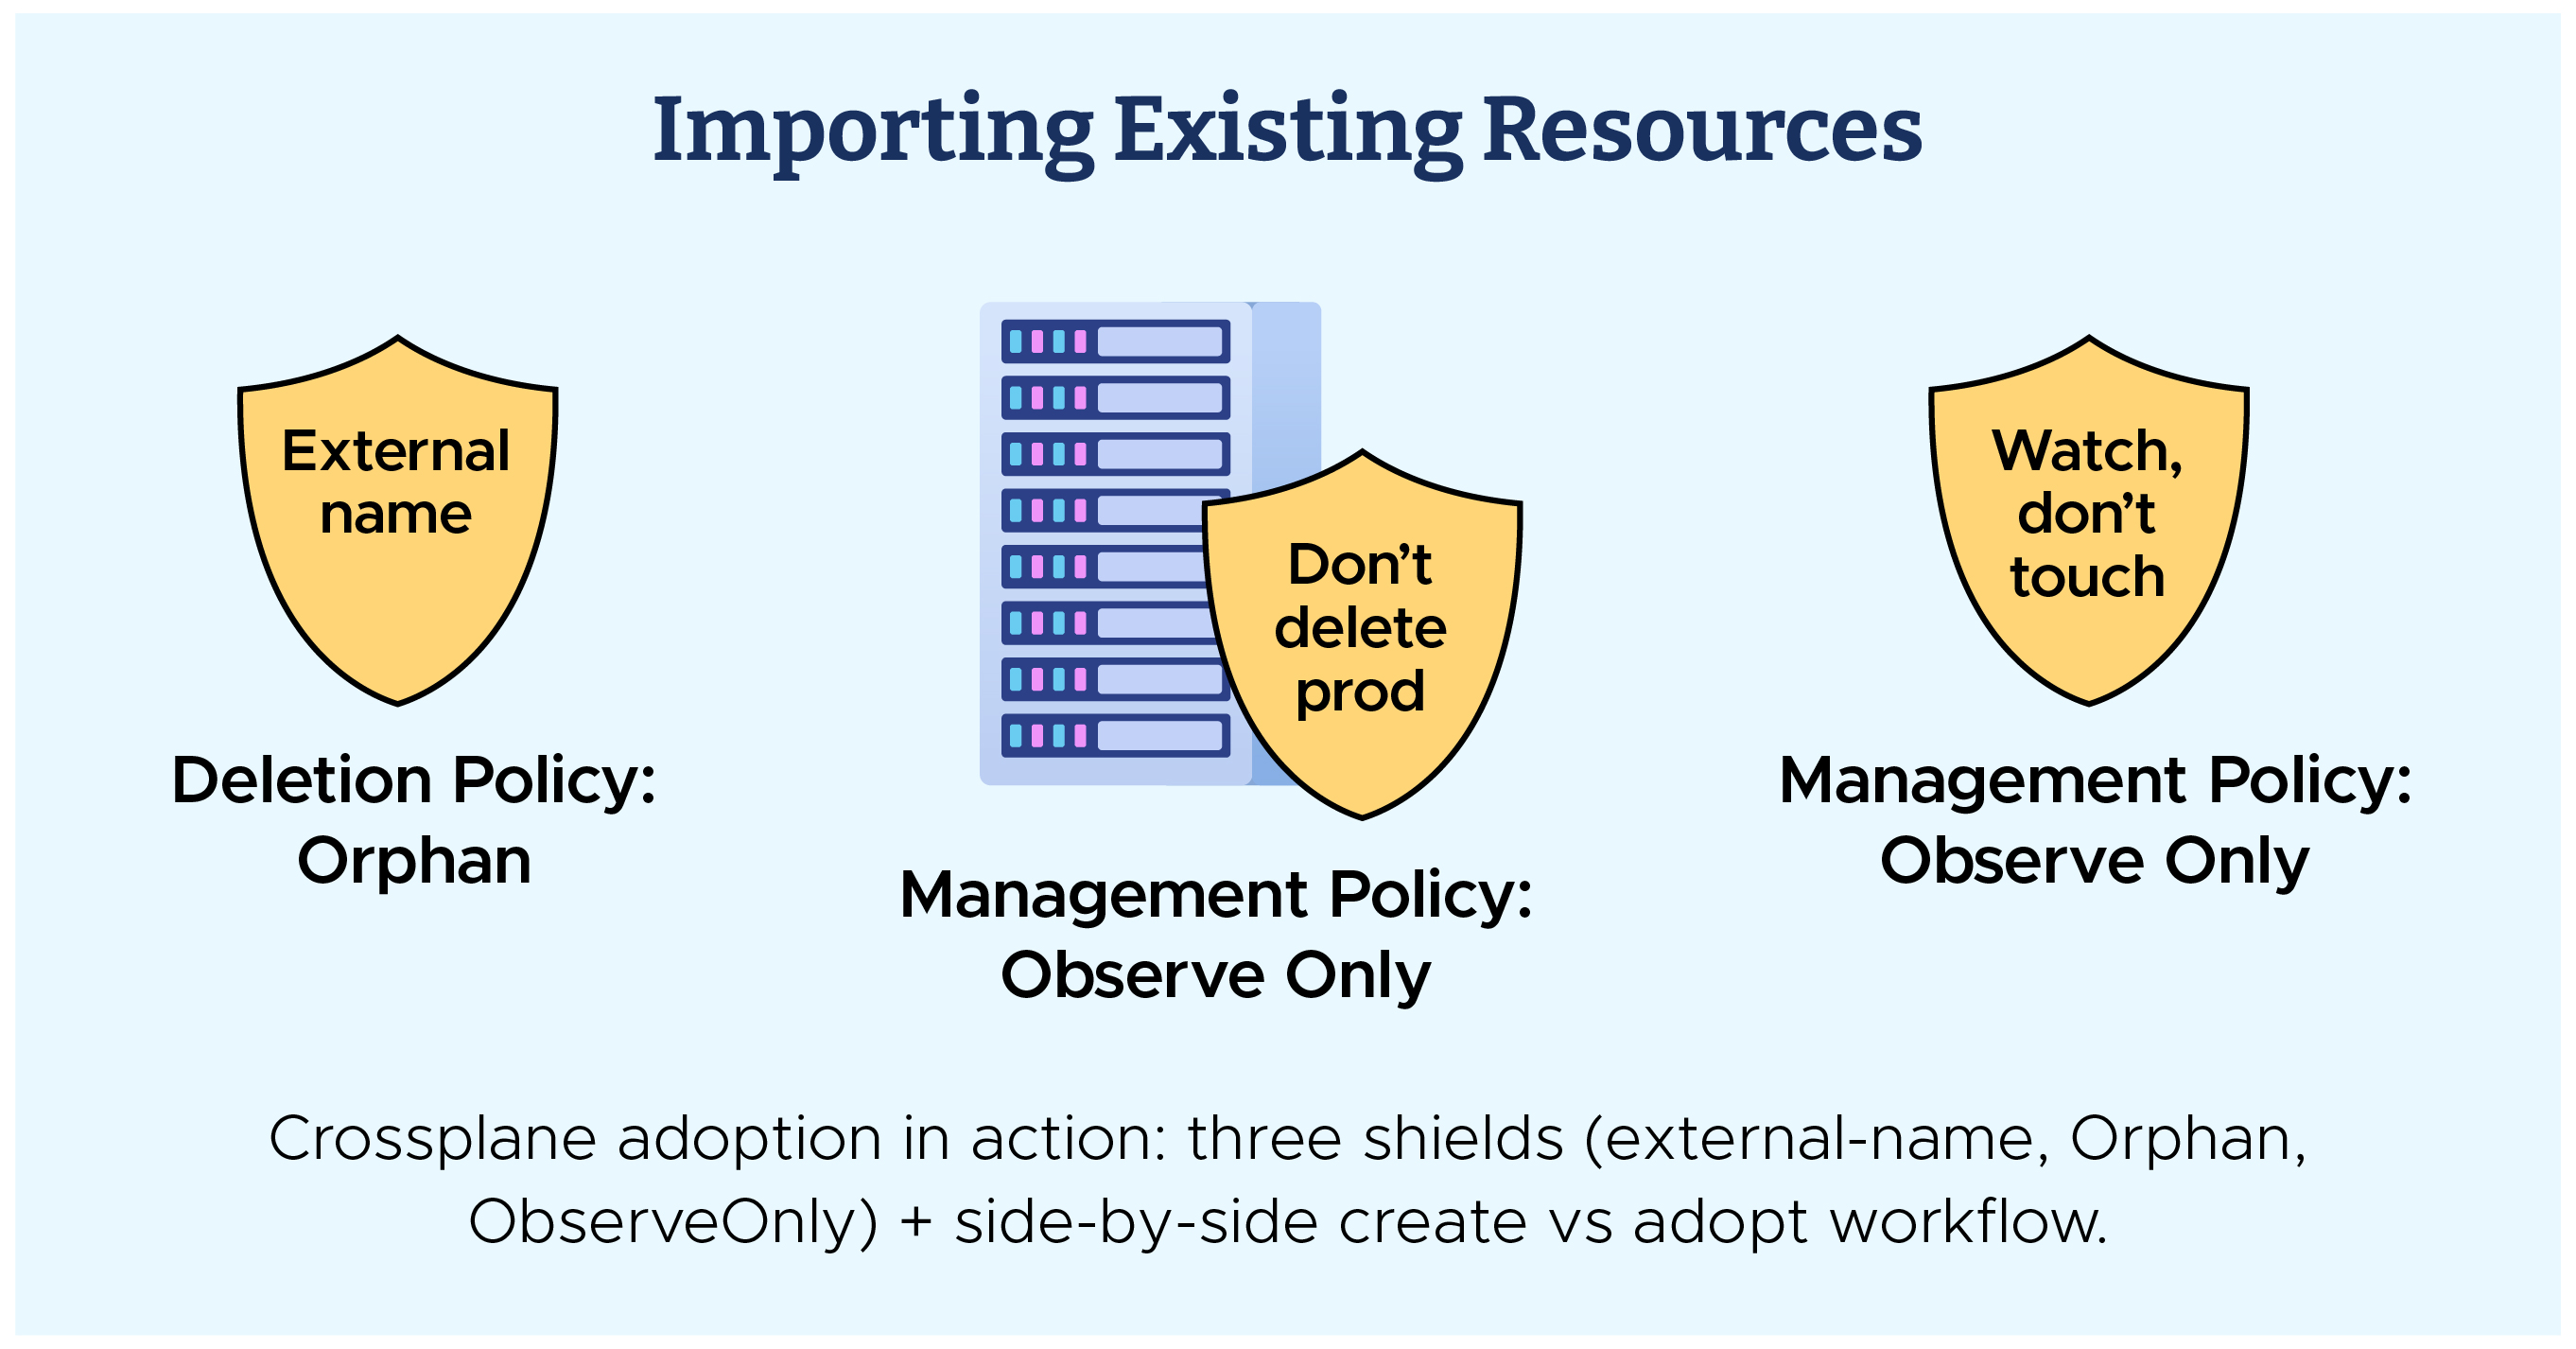
This was the make-or-break moment — we weren’t just creating new infra anymore; we were pulling existing production Amazon RDS and Amazon EKS under Crossplane’s control. One wrong step could mean downtime.
Crossplane gave us three critical safety levers to make this possible:
Example:

Real-world meaning: Instead of spinning up a duplicate DB or cluster, Crossplane “adopts” the resource you already have.
Example:

Example:

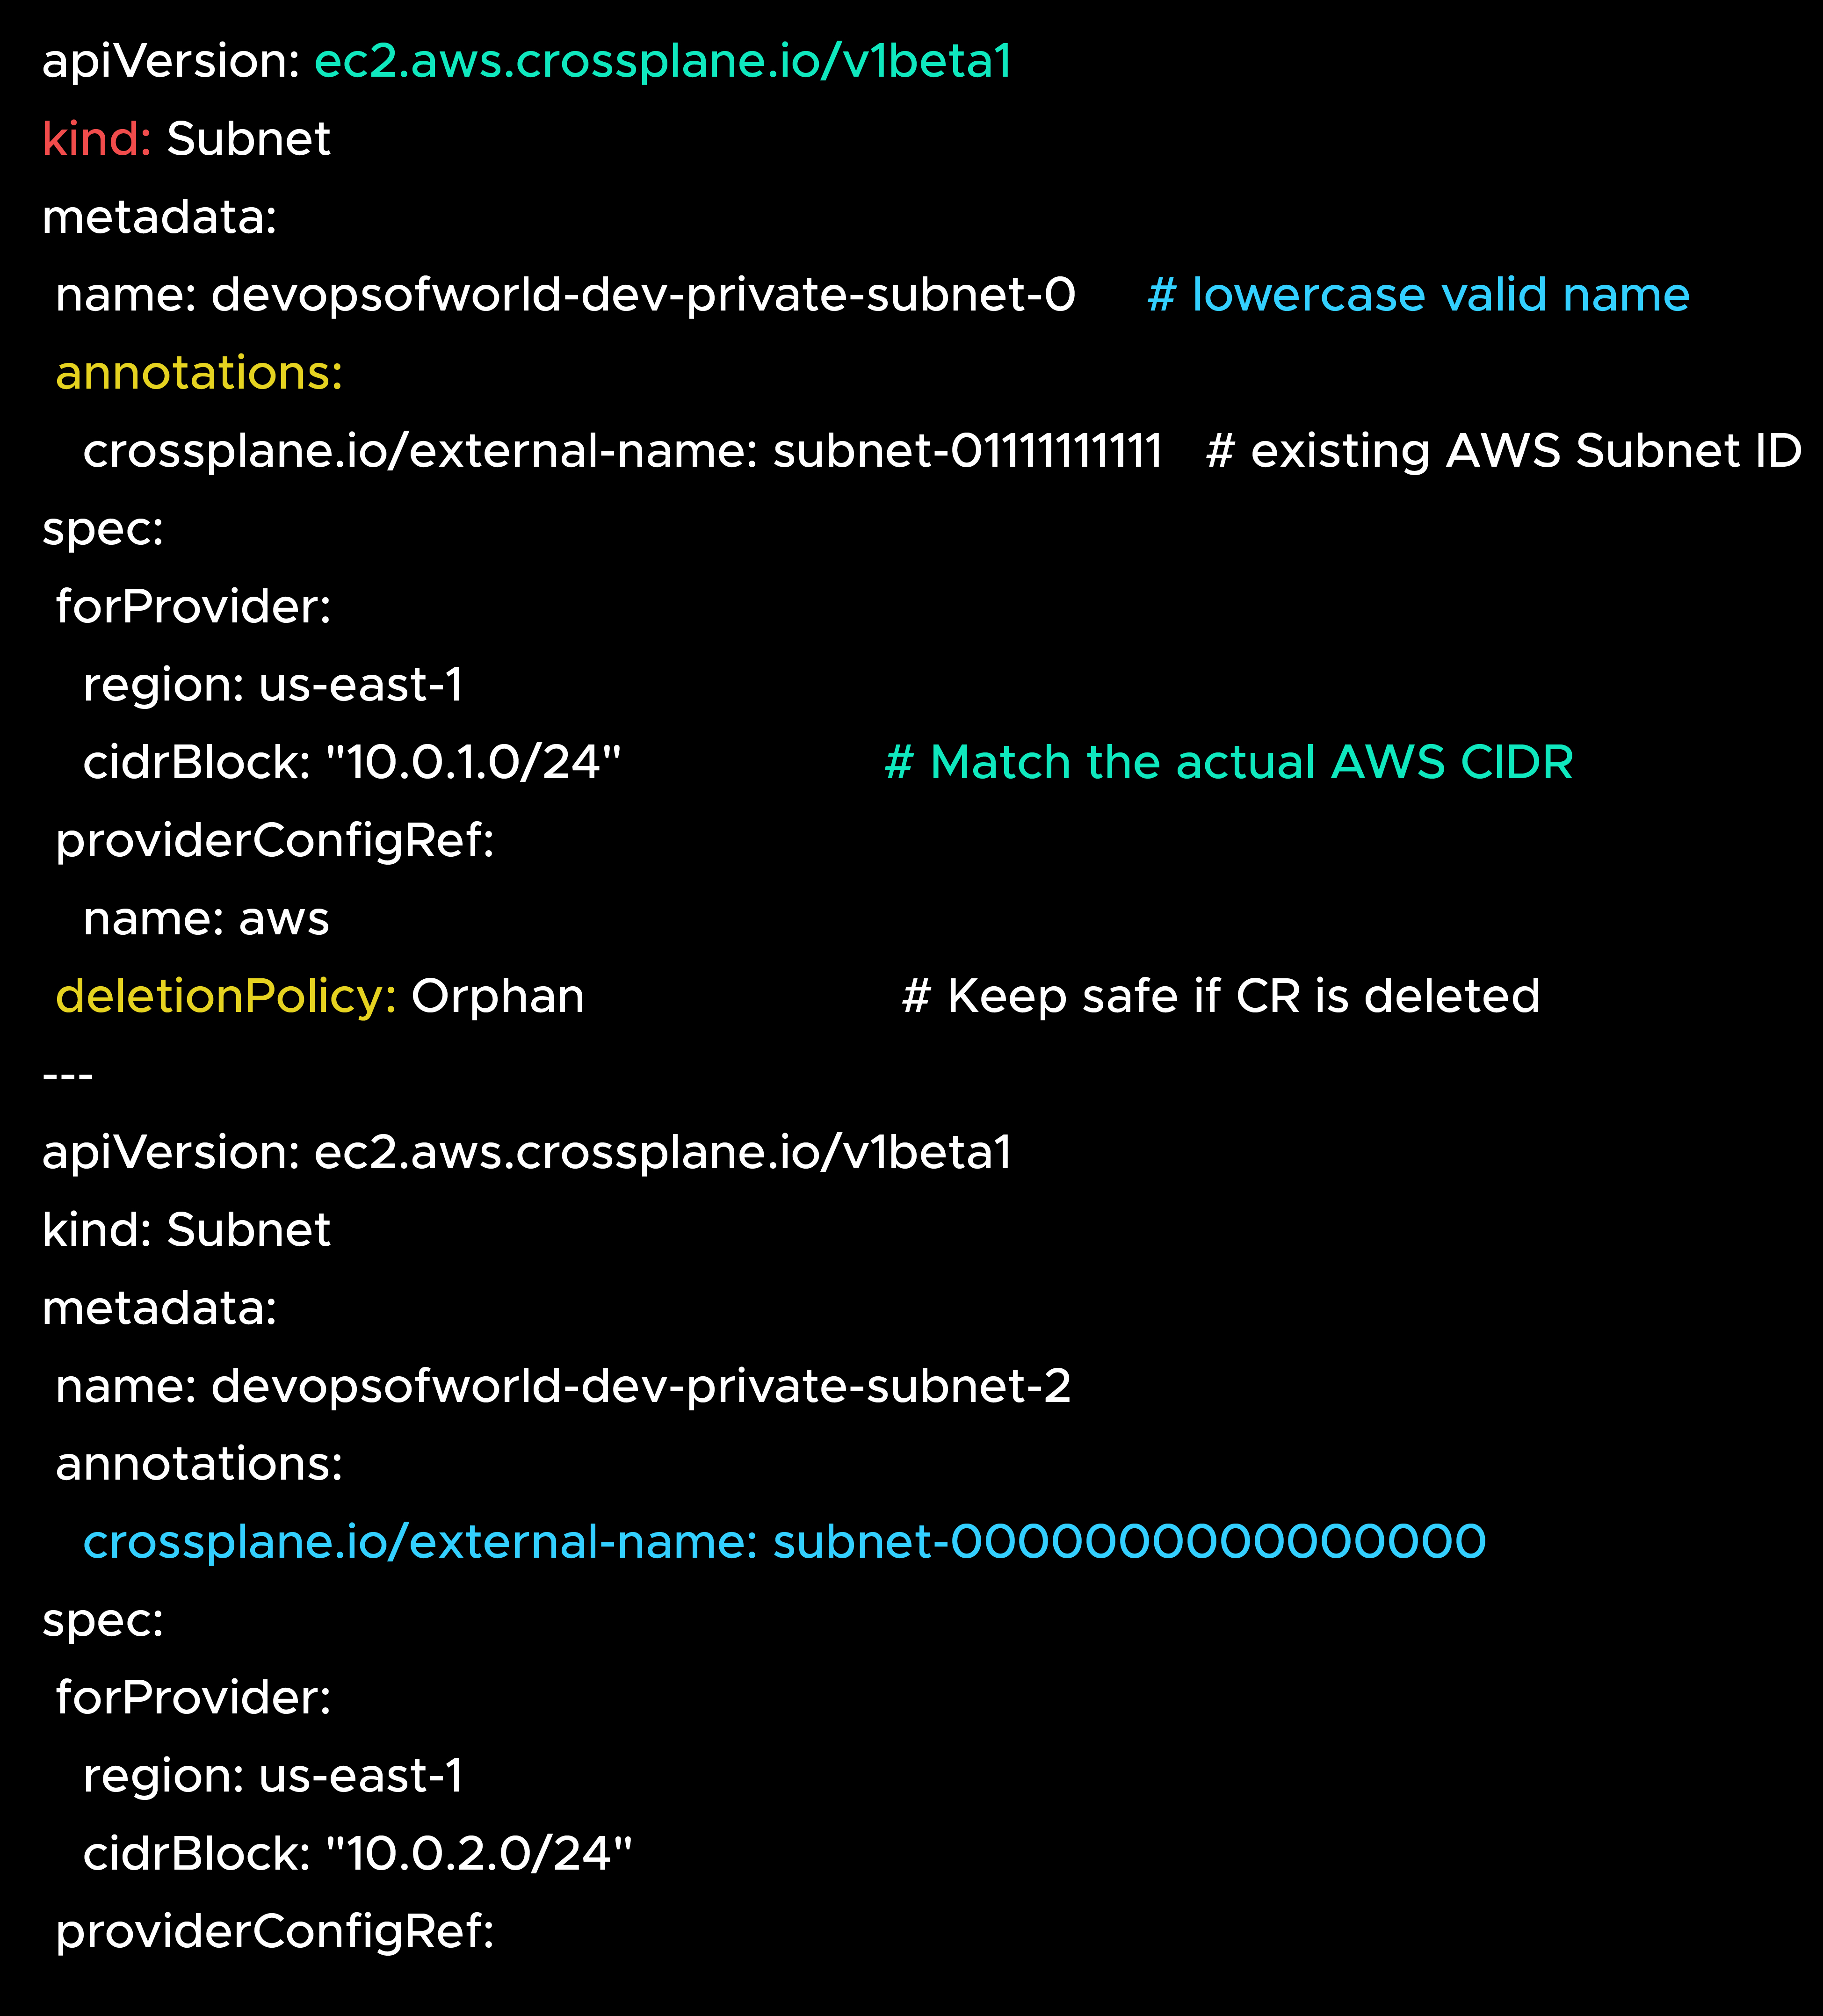
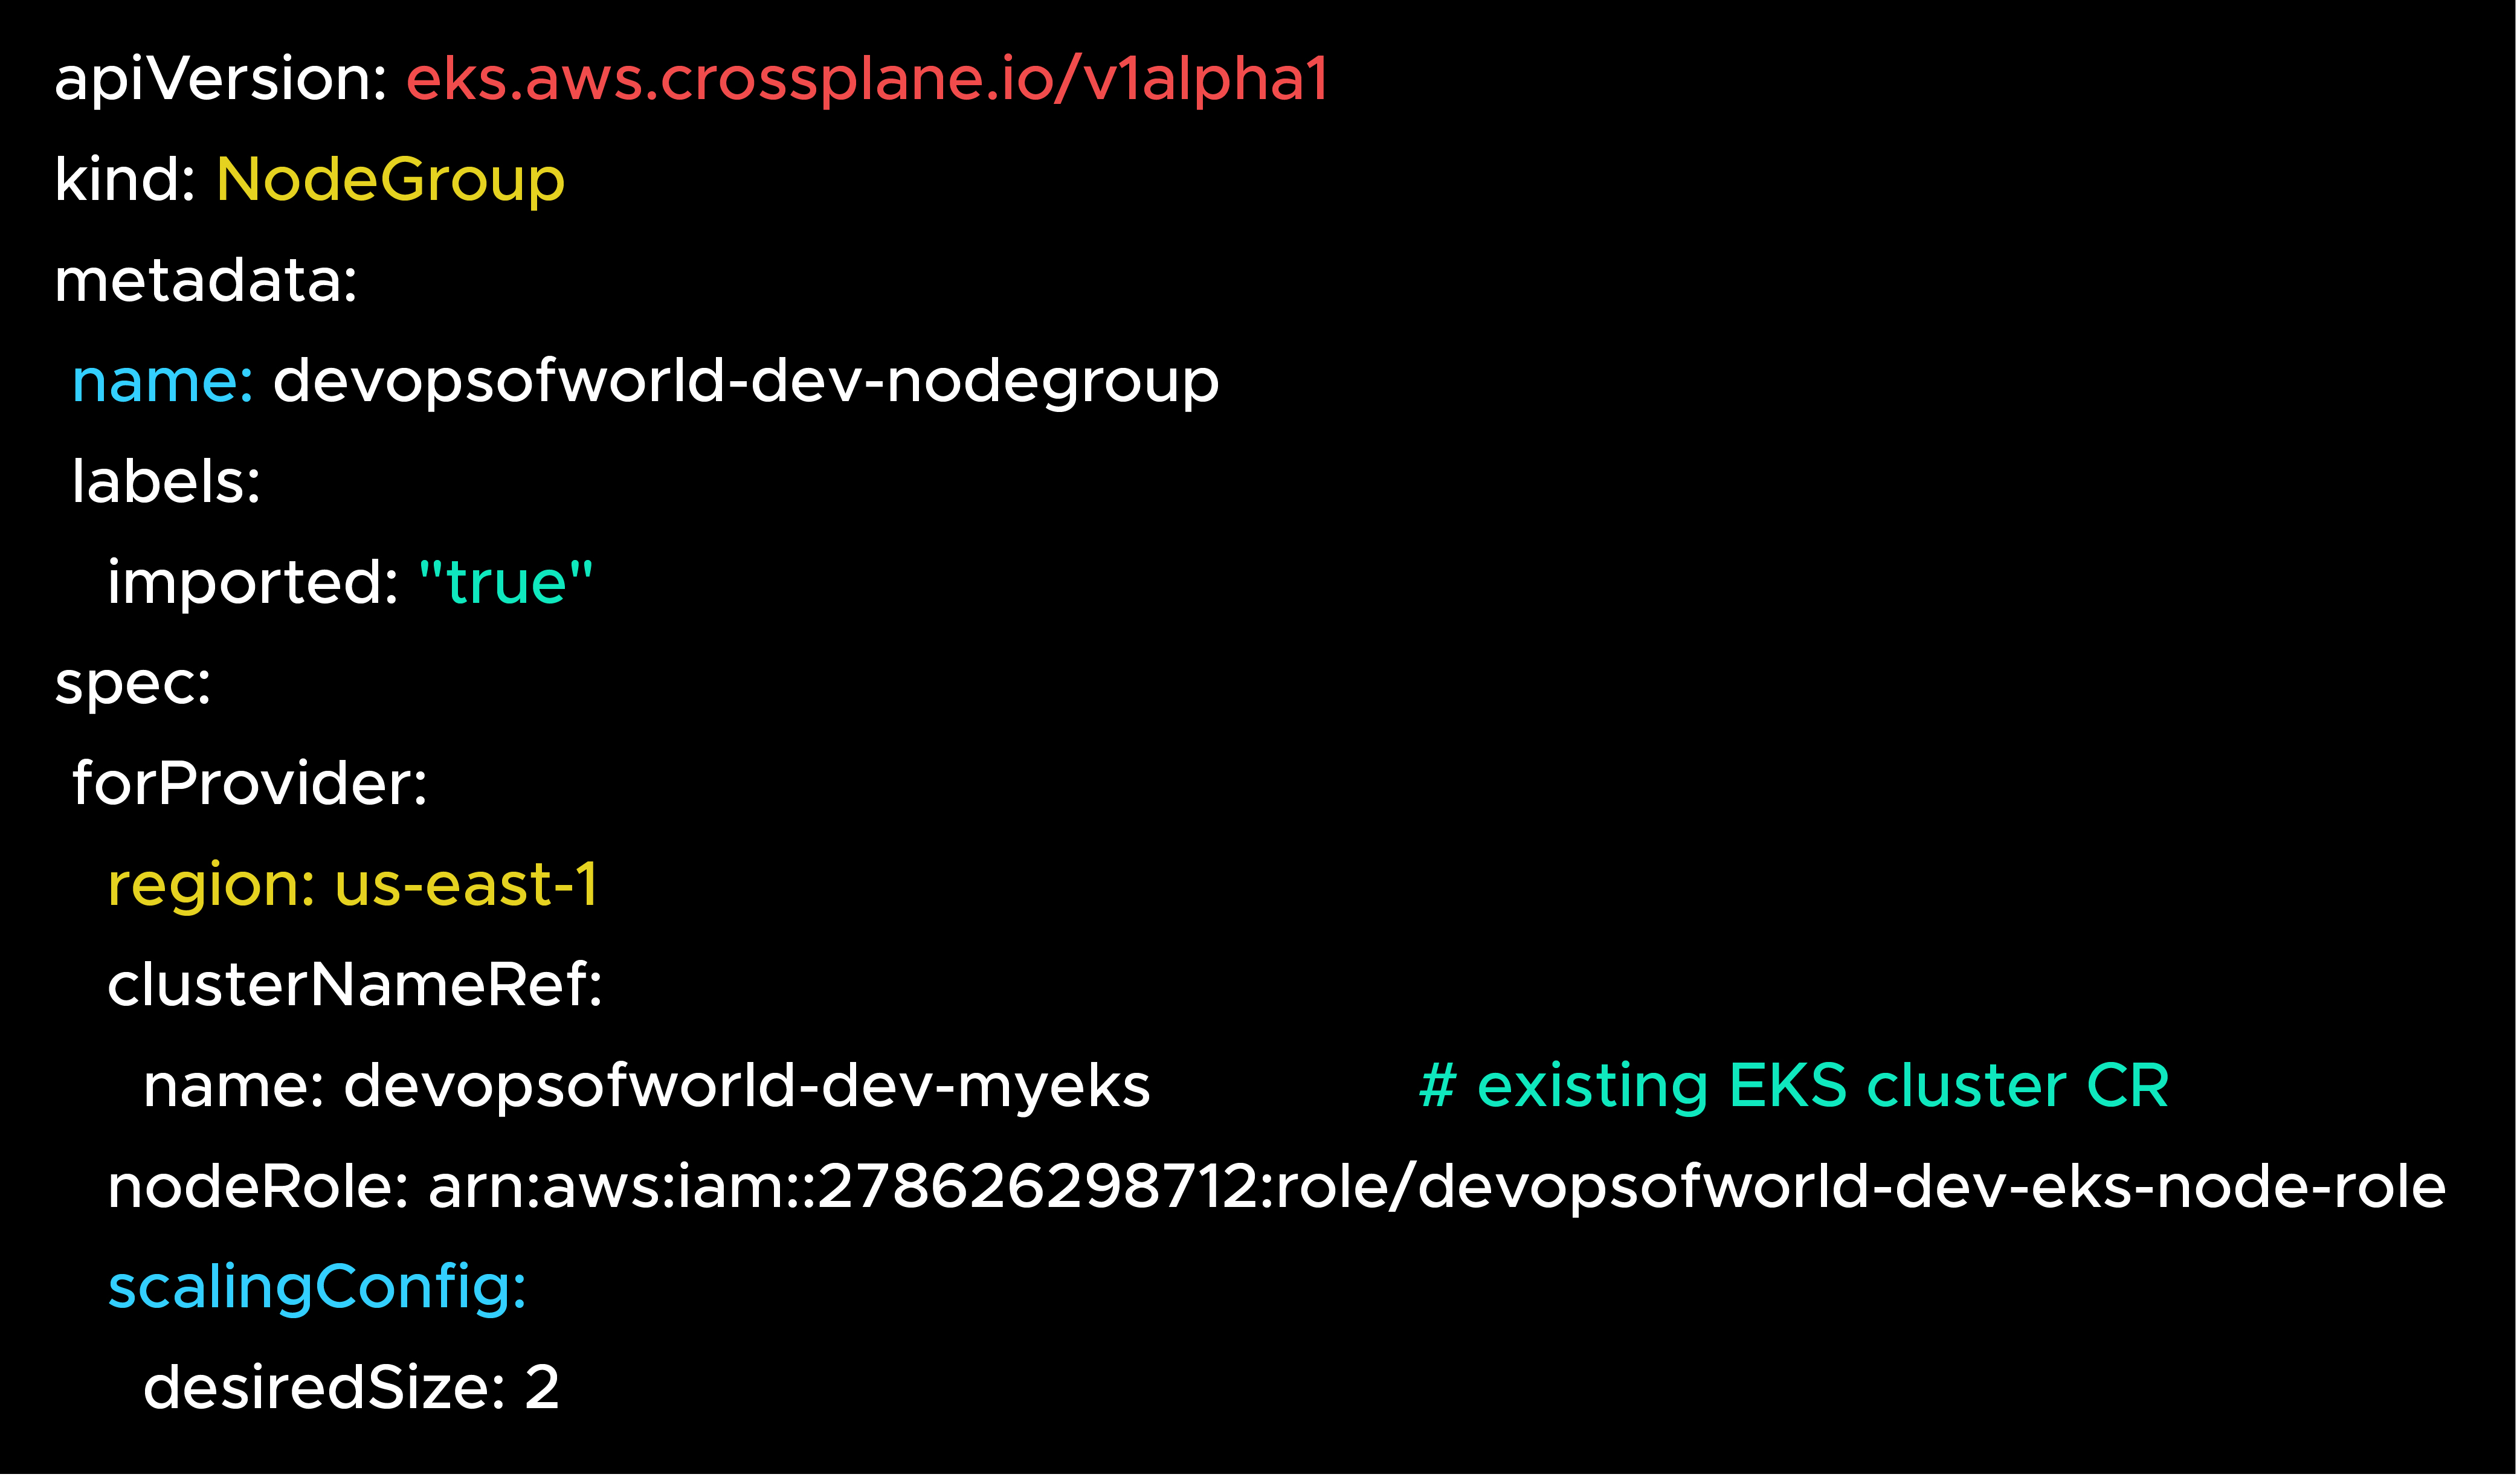
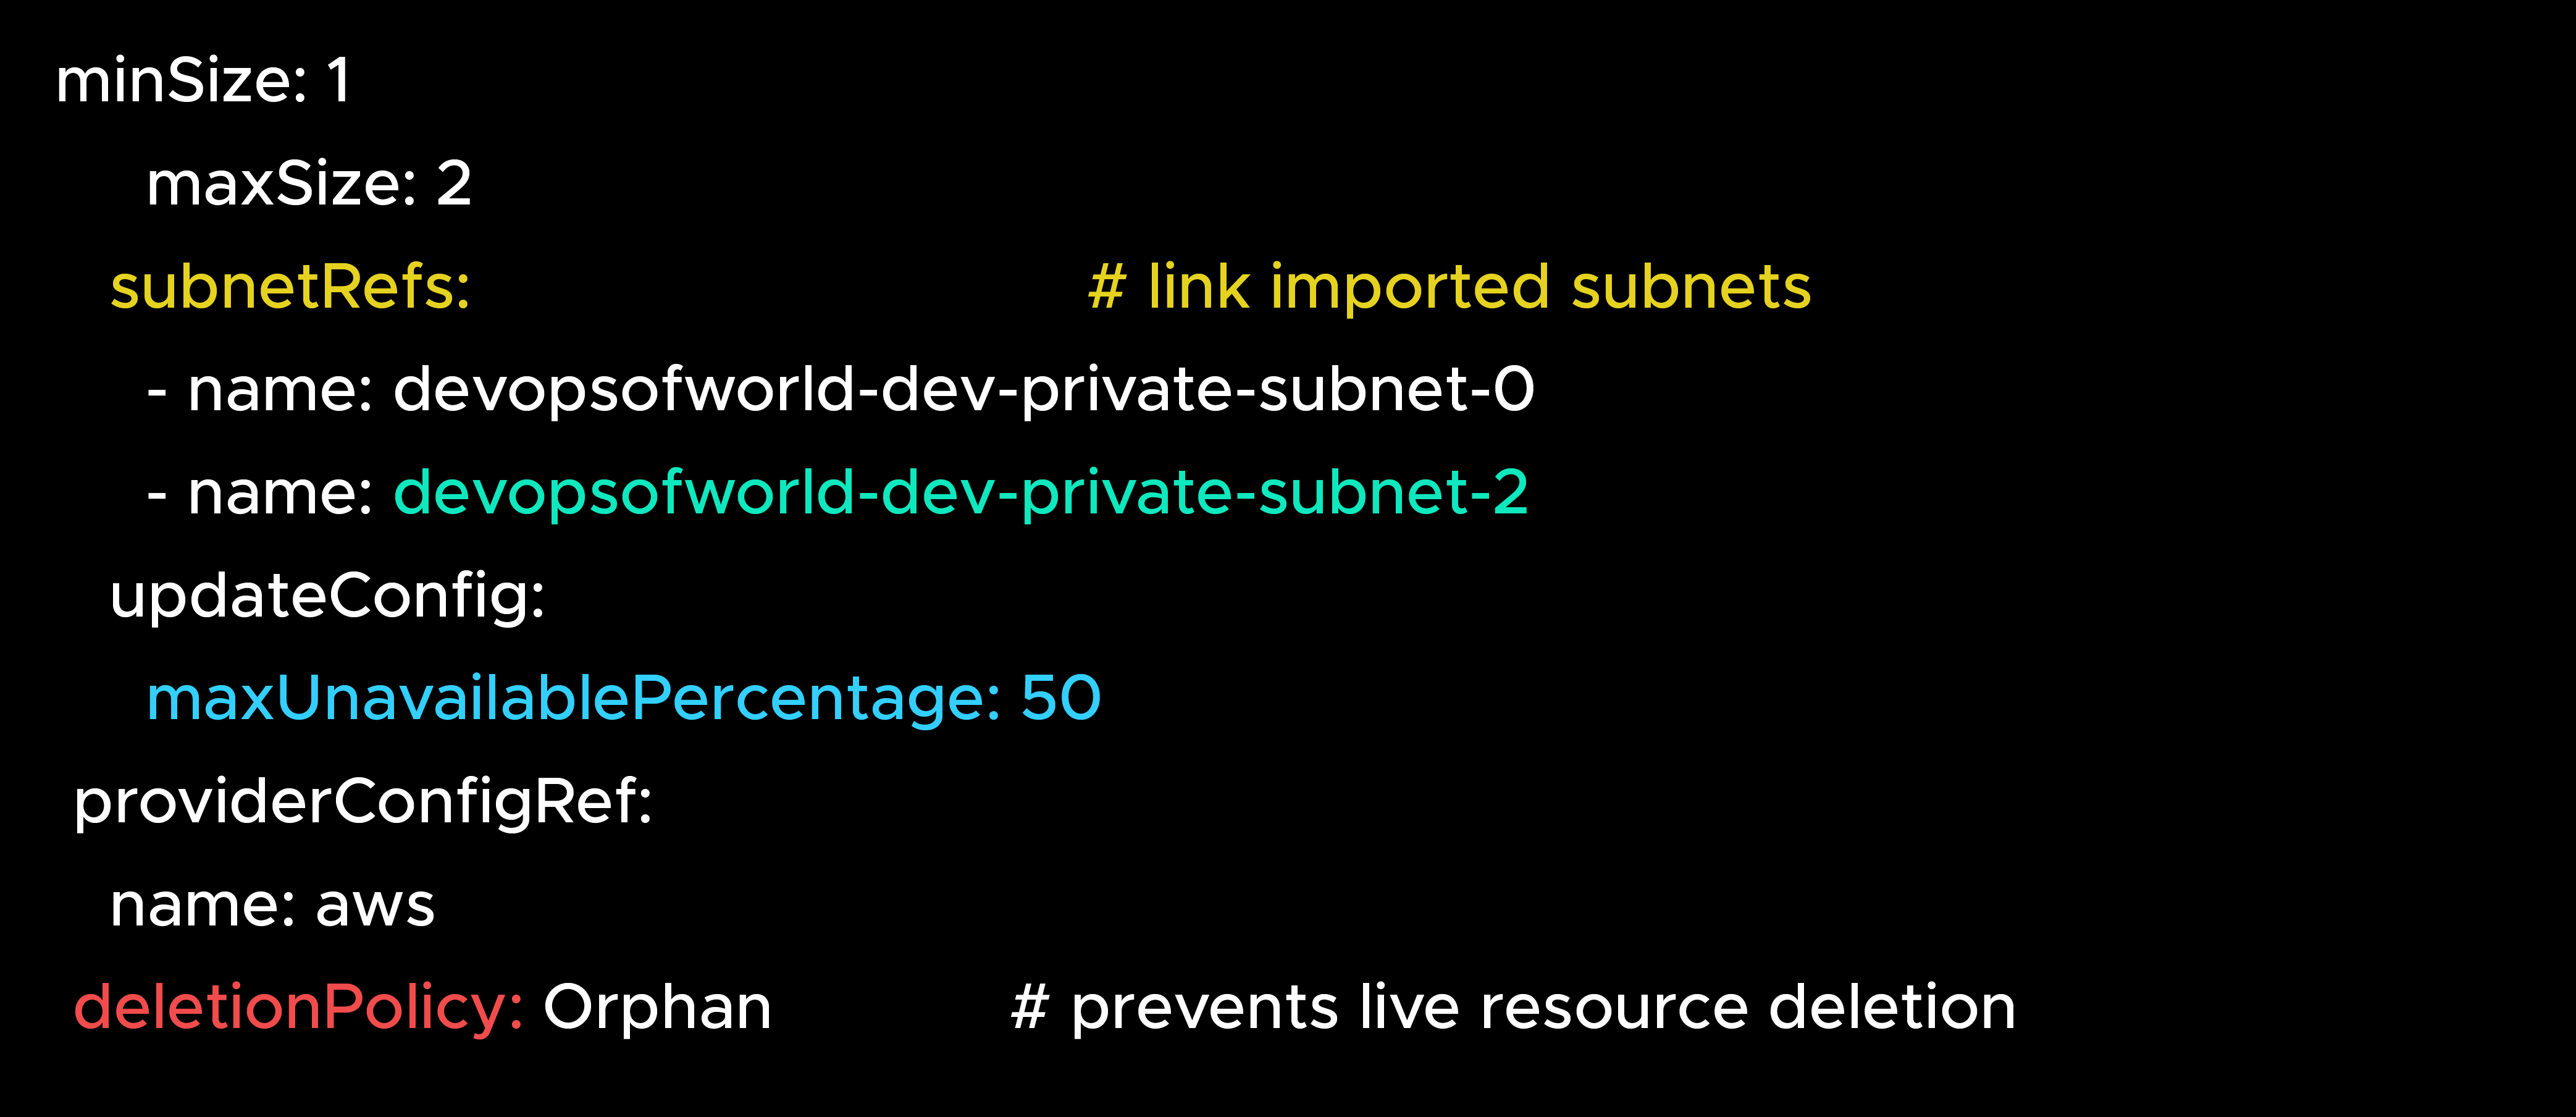
This example uses the community provider (crossplane-contrib/provider-aws) to demonstrate how to connect existing networking components to AWS EKS.
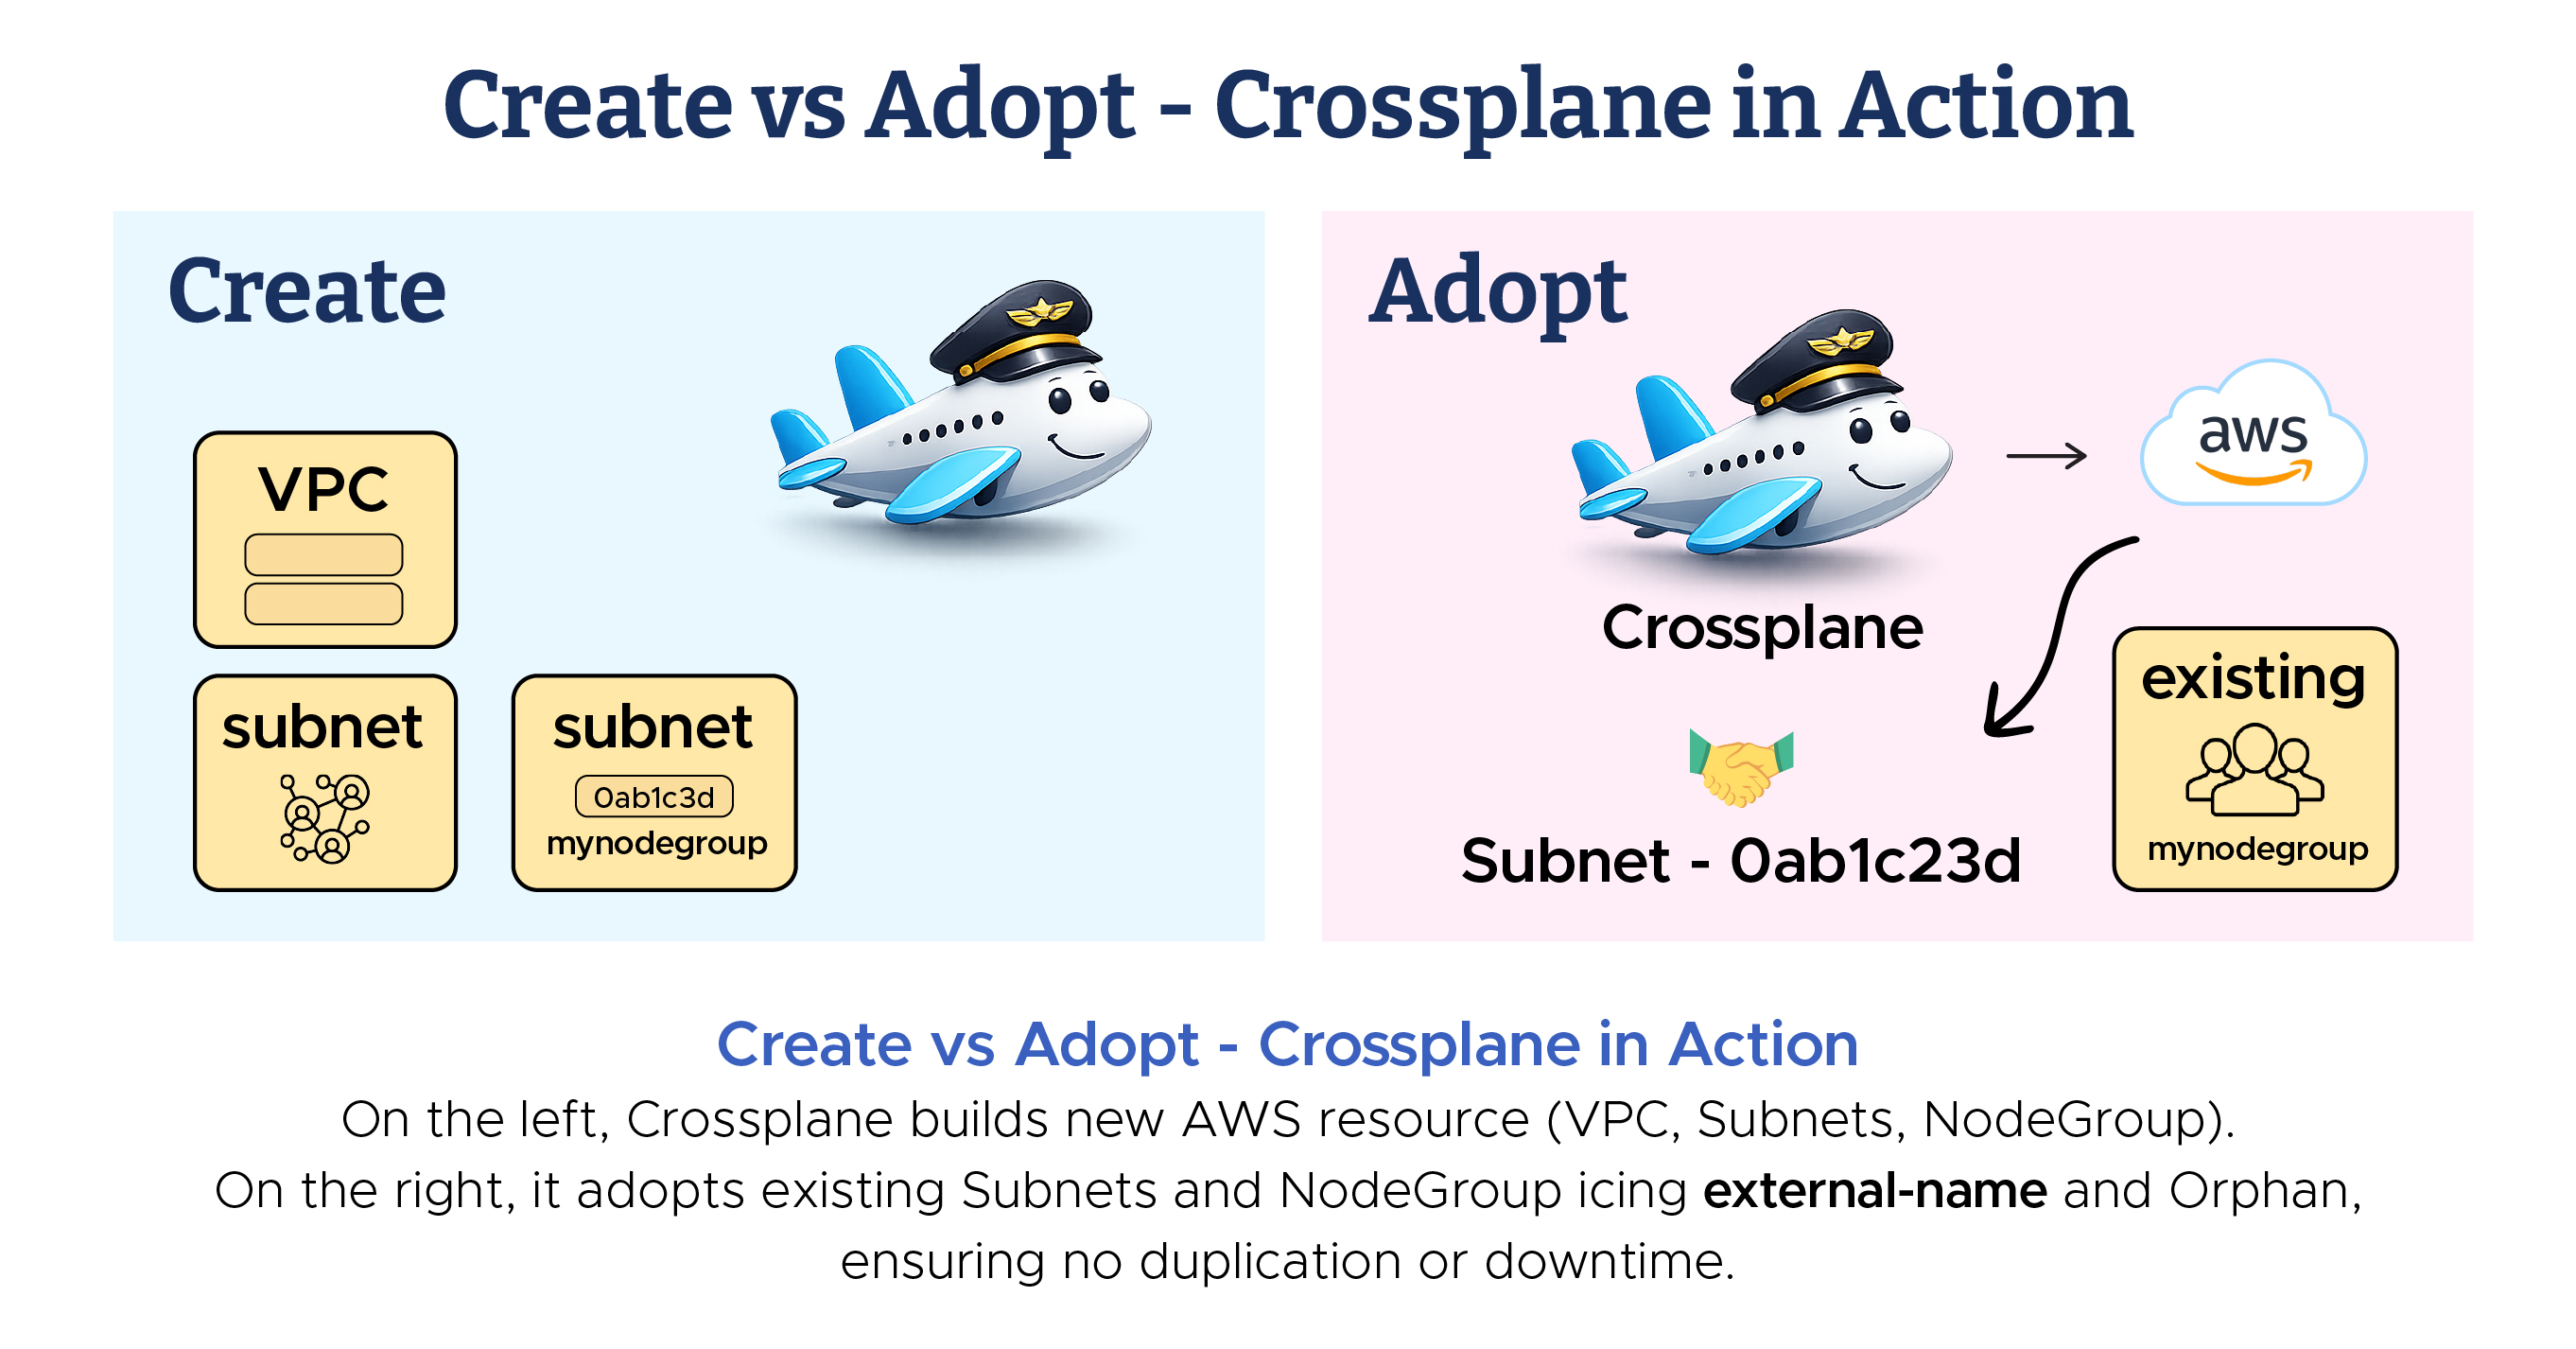
Each subnet is linked using its real AWS Subnet ID through the crossplane.io/external-name annotation.
This allows Crossplane to recognize and manage (but not recreate) the subnets.

This brings your AWS EKS NodeGroup under Crossplane management
while referencing the existing cluster and imported subnets.
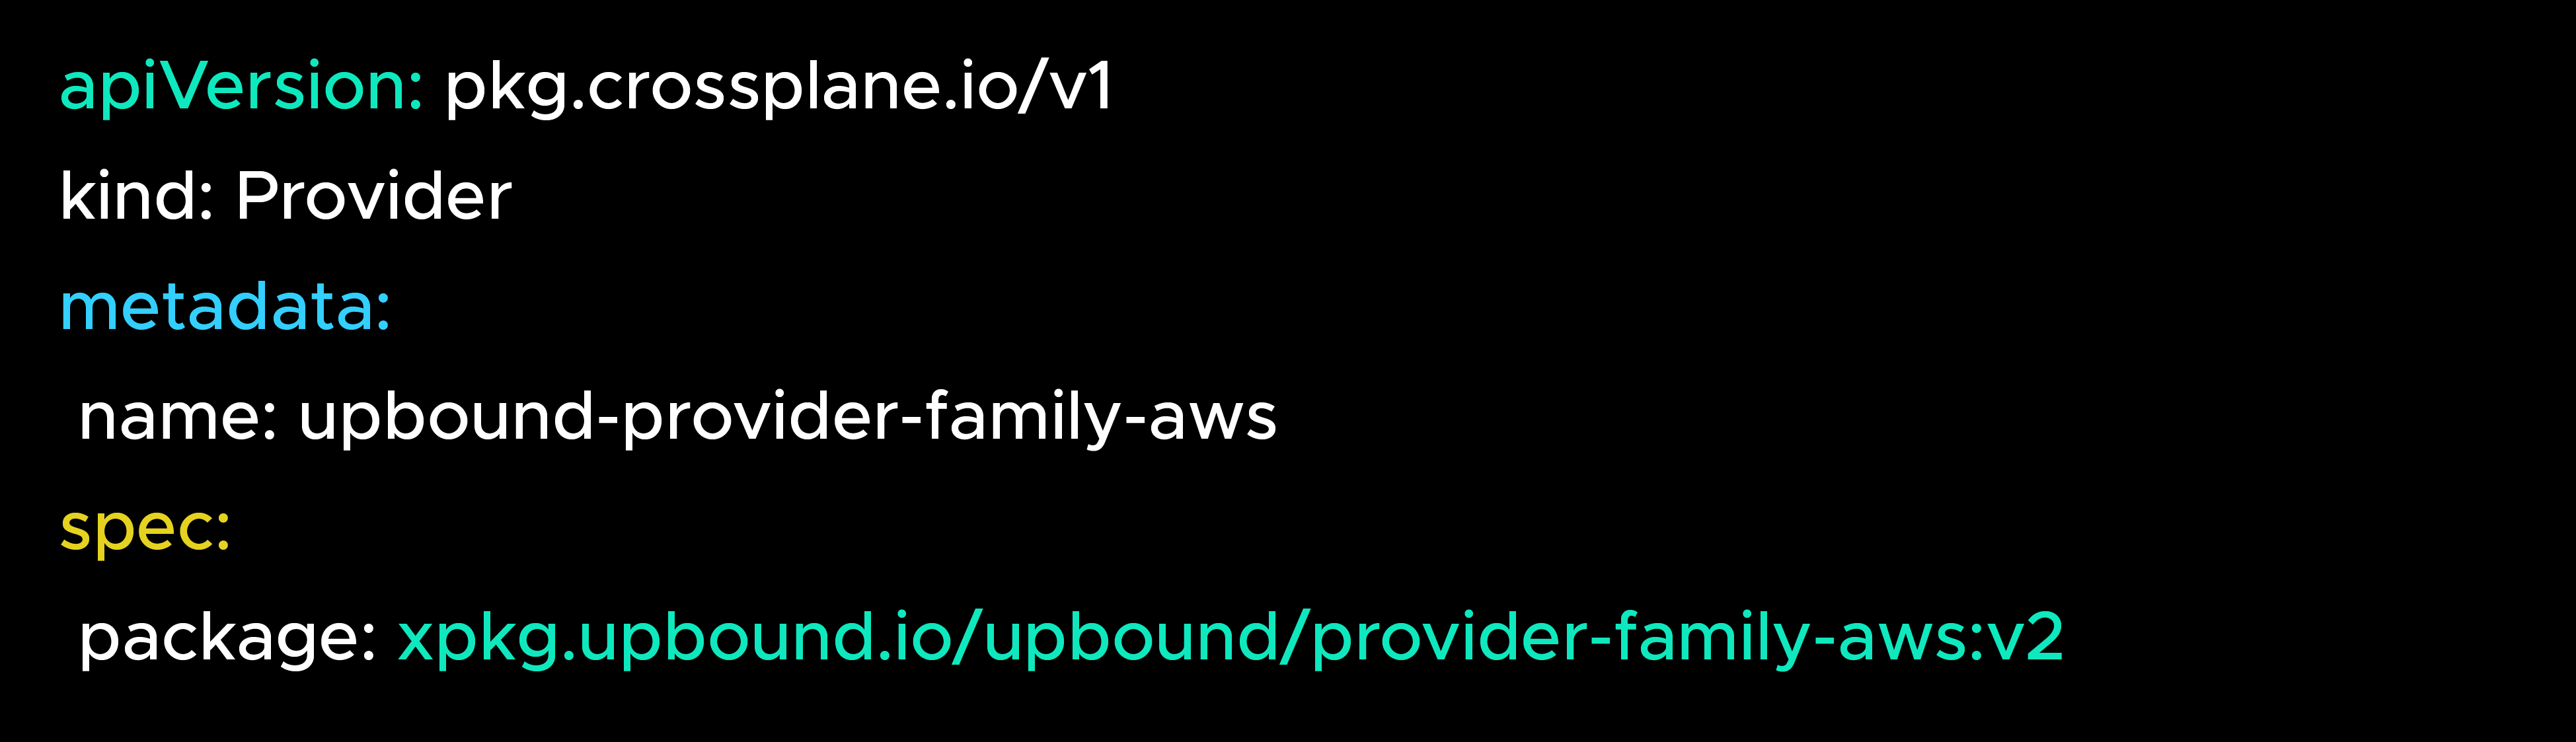
managementPolicy: ObserveOnly – Provides watch-only import mode, but is available only in the Upbound provider.This demo uses the Community Provider (crossplane-contrib/provider-aws),
which fully supports safe adoption through external-name and Orphan.
However, the managementPolicy: ObserveOnly feature—used for “read-only” imports—is available only in the Upbound Official Provider (provider-family-aws).
If you plan to adopt existing AWS RDS, AWS IAM, or AWS EKS resources in production with complete “observe-only” capability, consider switching to the Upbound provider for full support and long-term stability.
The first imports didn’t always work. Sometimes AWS creds were wrong, sometimes IAM permissions were missing.”
→ Suggest:
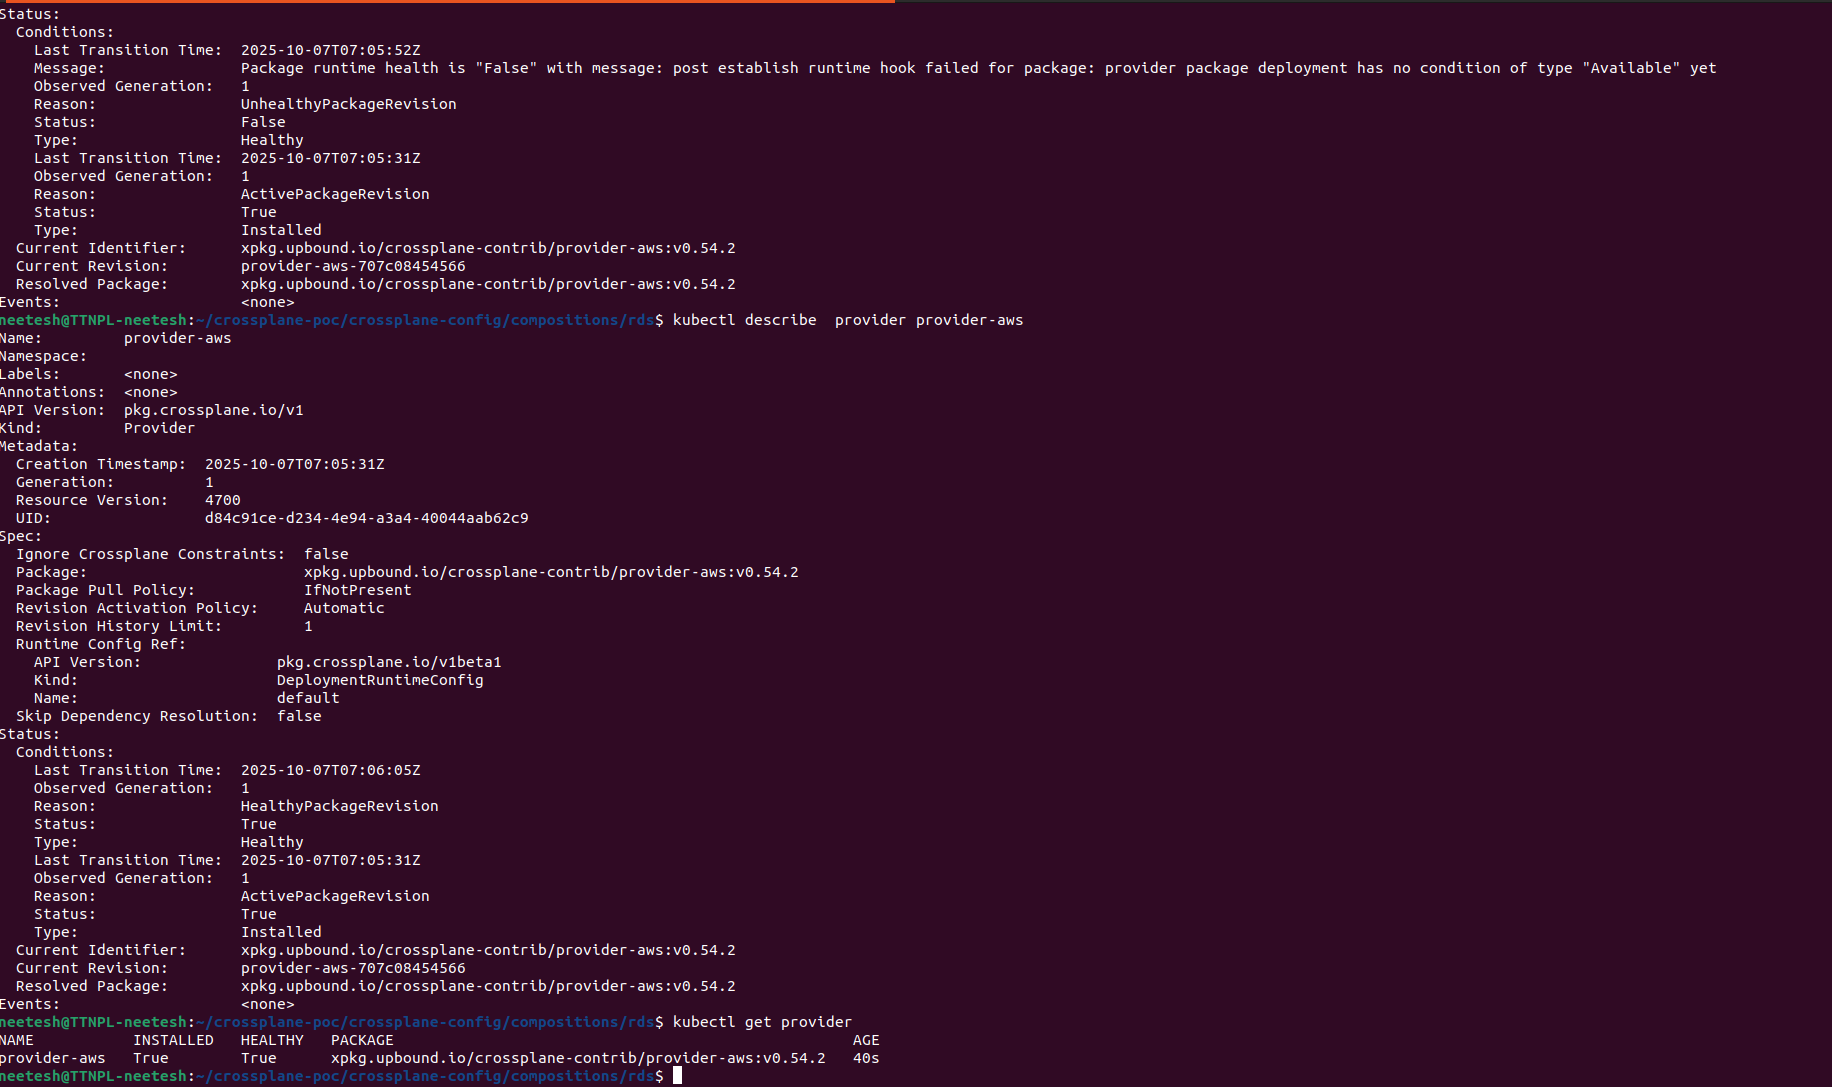
“The first imports didn’t always succeed — sometimes AWS creds were wrong, sometimes IAM permissions were missing. Instead of guessing, kubectl describe gave instant visibility into Crossplane’s view of the world.
“Importing is scarier than creating — but with the three shields and kubectl describe, you can adopt production infra without downtime.”
When we first tested importing a production AWS RDS, someone accidentally skipped ObserveOnly. Crossplane immediately tried to reconcile the settings — which
caused a brief scare — but thanks to Orphan, nothing was deleted.
From that day on, we enforced a strict rule:
“Always start with ObserveOnly when adopting existing infrastructure”.
By starting small, adopting carefully, and enforcing safety levers, we turned fear (‘don’t break prod’) into trust. With this foundation, the team felt confident expanding Crossplane to additional services such as S3, SQS, and IAM.
Next: Blog 4 – Governance, Security & Lifecycle Protection, where we show how guardrails like Kyverno, RBAC, and IRSA kept infra safe while scaling Crossplane across teams.
99% of companies saved up to 15% monthly with this plan & achieved peak performance.

Speak with our advisors to learn how you can take control of your Cloud Cost


